You will learn:
- To create an MSP plan that can be used by Epicflow
- Define tasks and relations in MSP
- Make a detailed plan with milestones, resources, work estimations, relations
To start, use the project plan template found by the next link MS Project Templates. It is not mandatory to use this template, but the settings are optimized for Epciflow usage. The screenshots in this wiki can differ depending on you MS-project version, but Epicflow supports all versions from version 2010 on.
We also recommend reading the wiki of Minimum planning prerequisites to prevent you to create too complicated and unmanageable project plans.
Gantt, Network and Resource view
A project plan can be represented in different ways. In the MS Project Templates, we created an optimized Gantt, Network and Resource view for Epicflow, but you can use any view you like. The advantage of using the Epicflow views is that the custom fields have the appropriate names. In the MS-project View menu, you can switch between any view you like. To plan a project we prefer to add tasks, resources and work in the Gantt view. To analyze relations between task we prefer the network view. To view the resources we prefer the resource sheet.
You can also use our demo files to play with. <add files>
Gantt Chart
Select View-> Gant chart -> Epicflow Gantt to view the Gantt chart. The main fields used by Epicflow are the Task Name, Resource Name, Predecessor, remaining work, actual work and the Deadline column. Start and end dates are not important for Epicflow since it is optimizing the load between the deadlines specified by the milestones. (Denoted by the green arrows at red marked tasks)
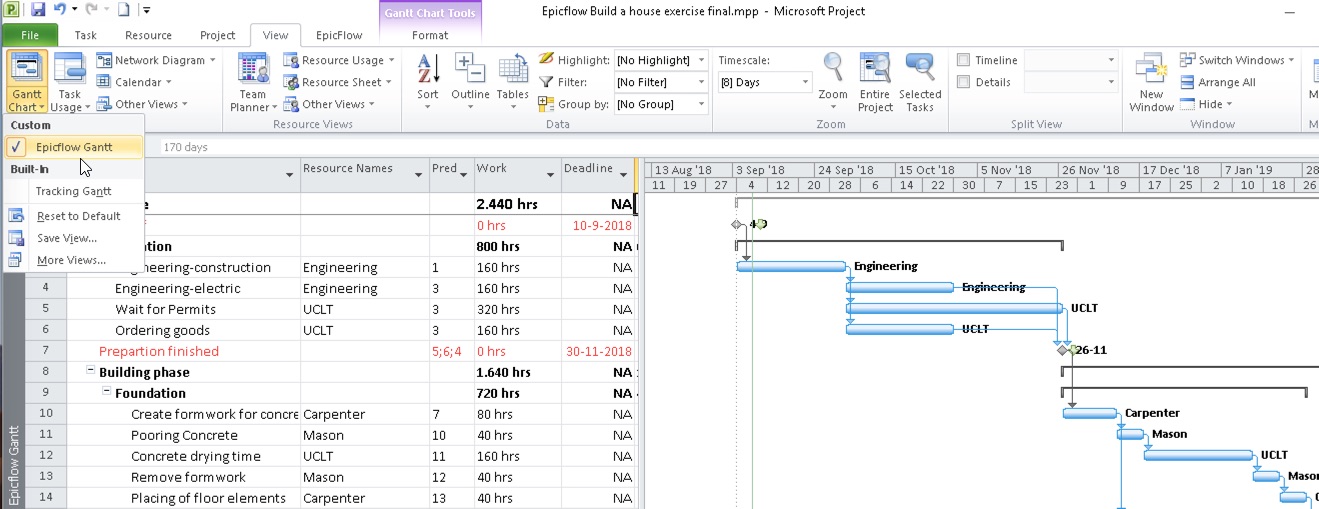
Screen #1 – MS Project “Epicflow Gantt” view
You can personalise the view by moving, insert or hiding columns. To insert/hide a column you have to right-click on the column name to select the option you want. To move you have to select the column by click-hold and move.
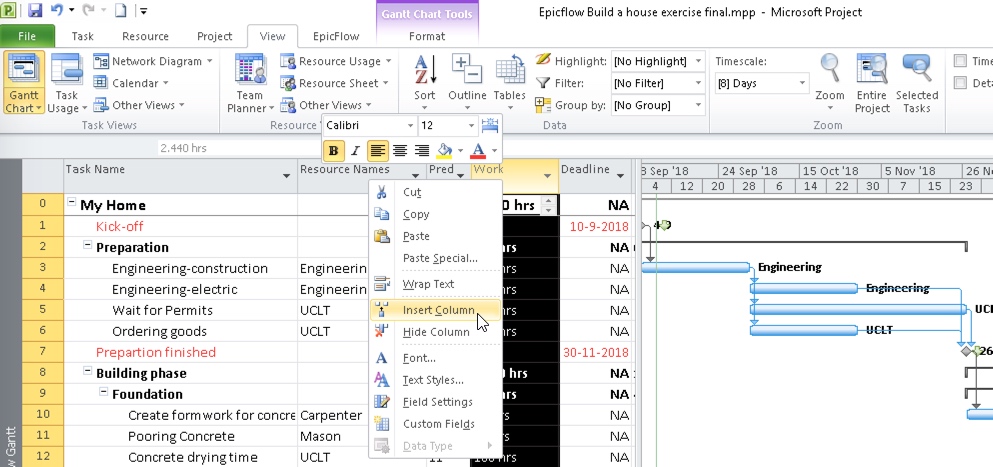
Screen #2 – Adding Columns
Epicflow custom fields are:
- Start milestone(flag 13); Denotes if the milestone has to be regarded by Epciflow as the start date of the project.
- Internal due date(flag 11); Denotes if the milestone has to be regarded by Epciflow as the end date of the project.
Make sure you have only one start and internal due date flag set.
Network Diagram
Select View-> Network Diagram -> Epicflow Network to view the Network Diagram. This diagram represents the same project as shown in the Gantt Chart above. However, the focus in the Network diagram is on the logical order of your tasks instead of the start and end times of the tasks. The network diagram is also called a Pert Chart.
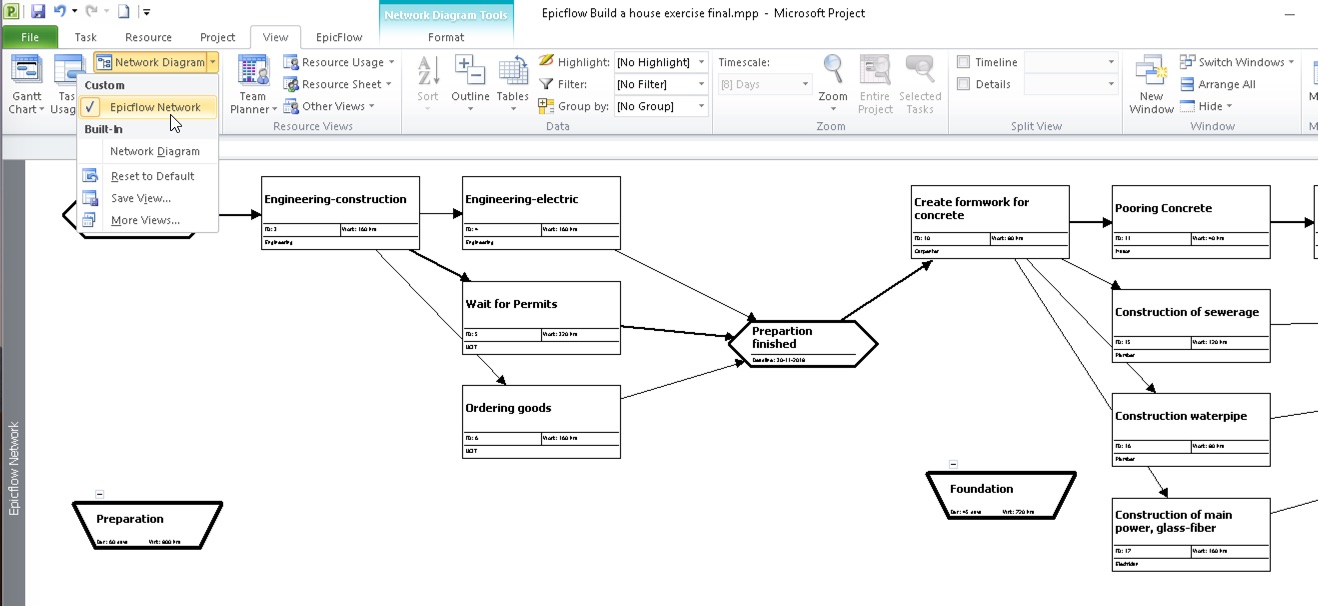
Screen #3 – Network Diagram
The first time you open the network view it can be a mess. You can organise this by right-clicking outside the blocks and select “Layout now”. Or selecting the blocks you want to organize and select Layout Selection/Related task now.
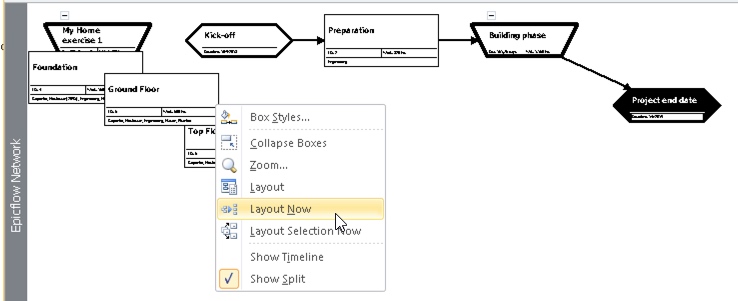
Screen #4 – Ordering Network View
Try yourselves:
- For the summary task (like building phase), try to expand and collapse them by clicking on the + and – sign to see what happens
- Click on a task and switch to Gantt view. Now the same task is selected in the Gantt view. Go back and forward to Network view and also check the effect of collapsing summary tasks in both views.
- What happens to the network if the duration changes in the Gantt?
- What happens to the network if the task is rescheduled?
- Try to draw a rectangle in the network view. Now a new task is created. Problem is that it is not always obvious to which summary task this task belongs. But you can jump back to the Gantt Chart to view this.
Resource sheet
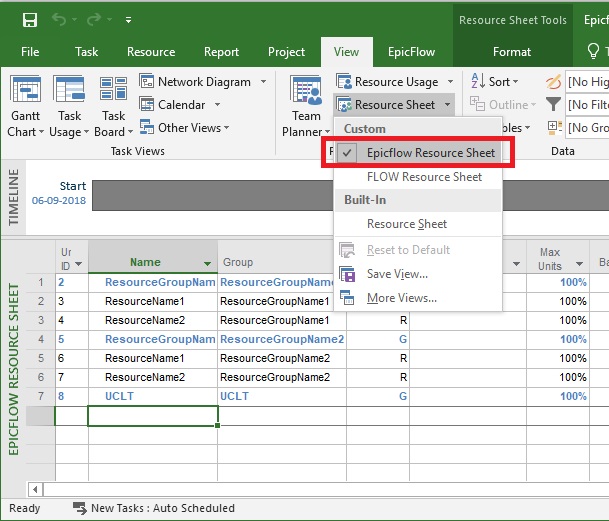
Select View-> Resource Sheet -> Epicflow Resource Sheet to view all the resources that can be used in your project. We will discuss you connect to a resource pool here. For now, we will explain the main set-up.
In Epicflow we can assign a task to a resource group or to a specific resource of a group. MSP does not support assignment to resource groups. That’s why we create a special resource for that and added a few extra columns to the resource sheet that we will explain now.
Screen #5 – Tasks Assignment
The resource sheet Columns:
- R &G; An Epicflow custom field (Text 23) to denote is an item is a Group or a Resource. R=Resource, G=Group. So “Carpenter” is a group and “Cap-res1” is a resource of this group.
- Group: An default MSP field. When making the “Resource Group” visible in the Gantt Chart it allows you to see to which group the resource belongs. This field is not used by Epicflow, it’s not mandatory to use it.
- Unique ID: MSP field that identifies the resource. Note that the ID changes when open or close a shared resource pool. Epicflow uses the resource name as an identifier.
- May Units; Defines resource’s capacity where 100% is equal to 1 FTE. Since the capacity is defined in Epciflow, changing this column has no effect for Epicflow.
There are many other settings for resources, although they can influence your schedule in the Gantt Chart, they all have no effect on Epicflow.
Defining Project Settings
Open Project
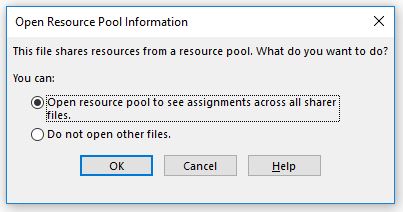
When open a specific Projects attached to the Resource Pool you are going to see next request:
Screen #6 – Open Resource Pool request on Project Opening
We would recommend to select “Do not open other files” when working with Project itself.
For the Projects not connected to the Resource Pool such popup doesn’t appear and you need to set such connection. More detailed description how to do it is presented bellow in Defining the Resource Pool -> Connect Project paragraph.
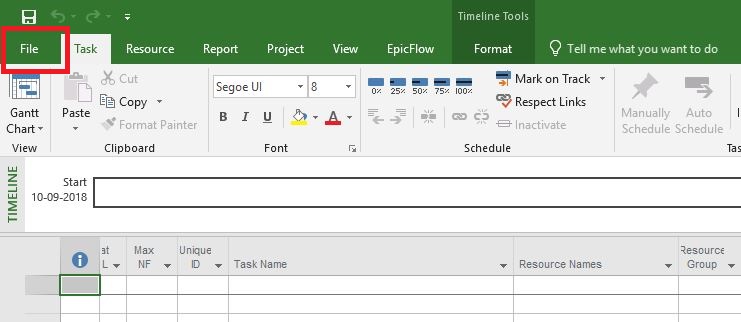
Project Manager
The project managers field in MSP is used by Epicflow to denote the project manager of the project.
- Click on the “File” tab in MS Project (left top corner of the MS Project menu )
Screen #7 – Adding PM
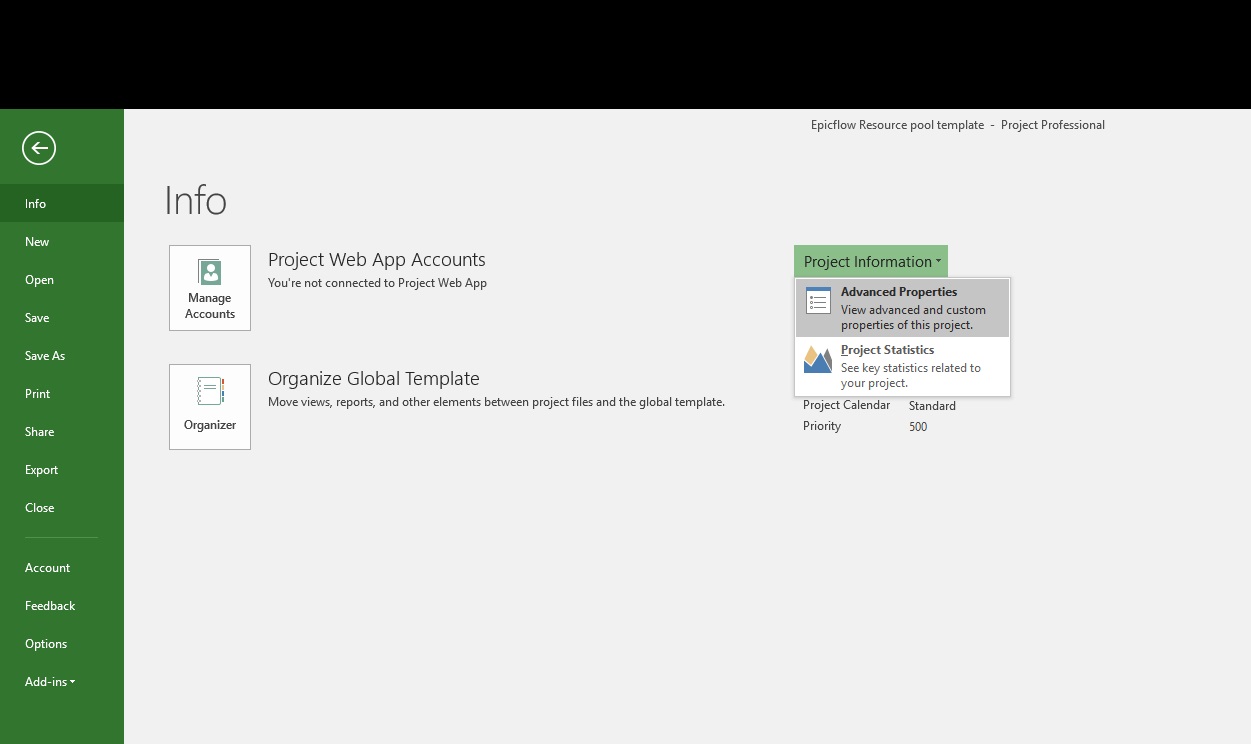
- Click on the “Project Information”-> “Info” and select “Advanced Properties” item from the appeared context menu
Screen #8 – Advanced Properties
- In newly appeared window select “Summary” tab and specify Project Manager’s name in “Manager” field

Screen #9 – Project Properties
Project Title
In the same menu as above, you can also specify the project name in the “Title” field. This title will become the project name used in Epciflow. This title corresponds with the project summary task name at line 0 of the Gantt Chart. If line 0 is not visible in the Gantt Chart you can configure this in the File->Options menu.
Epicflow Start & End Date
The start date of an Epicflow project is defined by the “Deadline” of the milestone marked as “Start Milestone”. The project end date or internal due date is defined by the milestone marked as “Int Due Date”. A task is regarded as a milestone by Epciflow when the duration is 0, no resource is attached and has a defined Deadline. (see picture below)
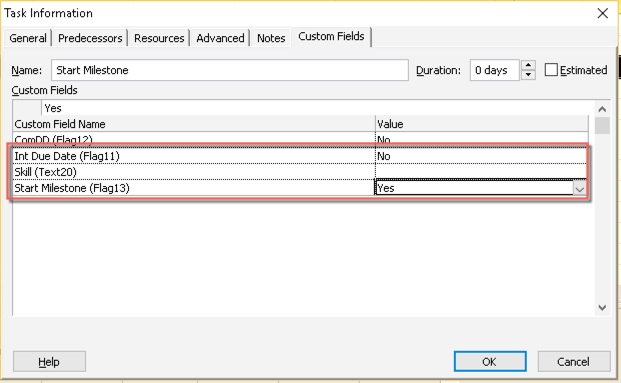
When using the MS Project Templates, then the start and end milestone are already defined and one only has to specify the “Deadline”. When not using the template, one has to set flags which are associated with the milestones. “Flag 13” as “Start Milestone”, “Flag 11” as “Int Due Date.” However, its strongly advised renaming these “Flag” columns to the names mentioned. (Right-Click on the column header and select “Custom Fields”-> Rename)
There are two ways to specify the Epicflow Start & End date. The recommended option is to add the Resource name, Deadline, Duration, Milestone, Start Milestone and Int Due Date to the Gantt chart and to set the values as specified in the picture below (See above at Gantt chart how to insert the required columns).
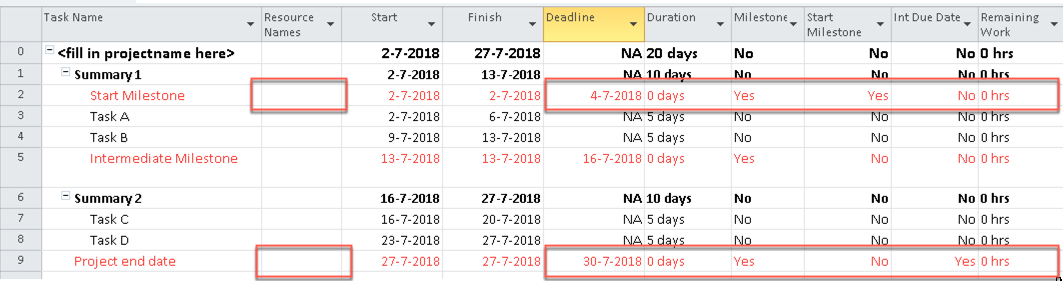
Screen #10 – Start End Date milestones
The second way is to double click on the task name. In the”advanced” tab of the pop-up window, set the ‘deadline’ to the appropriate date. In the “Custom Fields” tab set the “Int Due Date” or “Start Milestone” flag to the appropriate value.
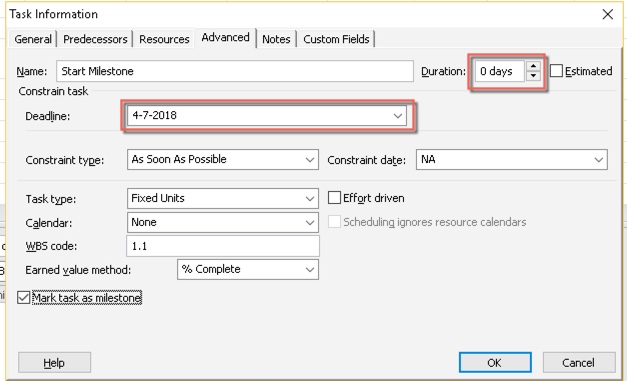
The “mark as milestone” checkbox is automatically set for a task with duration zero without resources. Setting the start date or the ‘Constraint date’ of the milestone is not mandatory, Epciflow will neglect this date. Epicflow only takes the Deadline into account of Milestones.
MSP Project Start date
When you create a new project it is not mandatory, but advised, to configure the project settings. First Select Project->Project information. By specifying the project start date in the project information menu you prevent that task without a predecessor are scheduled at an unexpected date. This field is not used by Epicflow as a start tase since Epicflow uses the deadline of the start milestone for that, but it makes life easier for you.

Screen #11 – Project Information
Project Status Date
The “Status date”, as displayed above, is used by MSP to wrap updated tasks around the status date. Since many of our users find this highly inconvenient we switched off all these advanced setting in our template. If you choose to use the status date, make sure its always set to the correct date before you update tasks and sync with Epicflow.
Defining Tasks
Creating a new task
When working with tasks, you first go to the “Task” tab to see the menu bar as displayed in the figure below. There are 3 ways to in
- To add a new task click on the line BELOW where the new task must be added.
- There are 3 ways to insert a new task:
- Press the “Insert” button
- Press the “Task” item in the menu bar as we have highlighted below.
- Right-click on the task below and select “Insert Task”
- You can now specify the task name
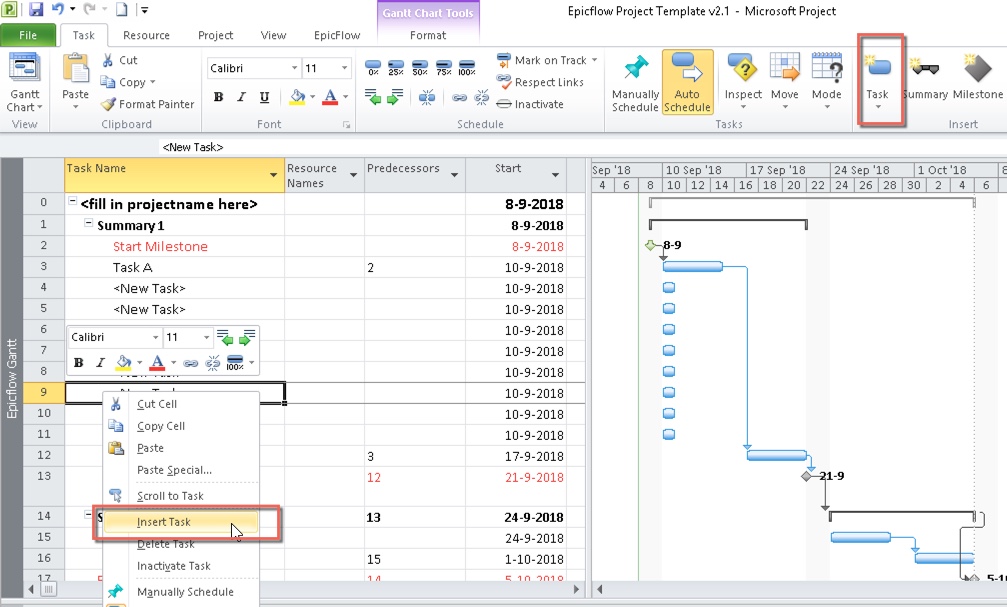
Screen #12 – Adding new task
Adding the Summary tasks
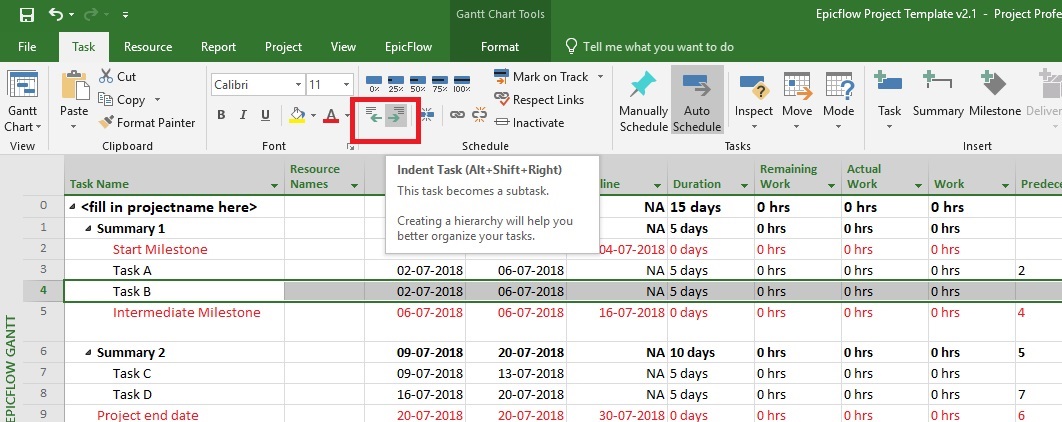
As soon as you have specified list of tasks and ordered those accordingly, you can perform grouping of such and create summary tasks of a different level with any hierarchy you would need to.
- To achieve it you would need to add a new task which will be converted into the summary task later. Note that its location should be right above the list of tasks which will be a part of it.
- Select task by left mouse button click which you would like to convert into sub-task and press on “Indent task” button at “Task” menu tab.
- To perform the action for multiple selection you would need to select all required tasks with pressed “shift” button. As soon as it done press on “Indent task” button at “Task” menu tab.
Screen #13 – Sub-task creation
Defining Task Relations
Creating a network of relations between tasks is essential to benefit from the power from the Epicflow algorithms to calculate priorities and the resource load. There are multiple ways to define relations between tasks:
- Predecessors: Specify in this column the preceding task(s). If no preceding task is defined, then the preceding task of the summary task is used. If none of the higher layer summary tasks has a defined predecessor than Epicflow uses the Start milestone as the starting date.
- Successors: Specify in this column the successor(s) of this task. A best practice is to first define the predecessors (and even hide this column) and finally check if there are tasks without successors. For tasks without a successor, the successor of the summary task will be used. If none of the higher layer summary tasks has a successor then Epicflow automatically uses the finish date of the highest layer summary task as a “virtual” milestone. In the Epicflow this automatically created milestone is denoted by an “a” next to the milestone sign in the pipeline page. Try to avoid having automatically created milestones by creating a clear network of relations.
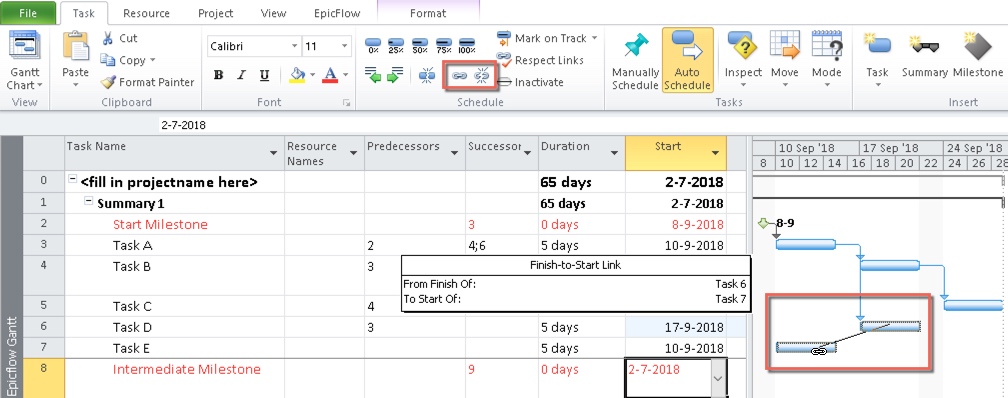
- By dragging: This is convenient when the tasks are displayed close to each other. See for example in the red rectangle below. Hover over a task and click-and-hold your mouse and drag now to the task you want to create a relation with. A link will be created when releasing the mouse if you see the link icon. You can delete a link by double-clicking on the link and selecting “Delete”.
- “link” option in Task menu: This is convenient when you have a sequence of multiple tasks. Select first all tasks that must be linked. Pressing the “link” button will create a chain of tasks for all selected tasks.
- Network Diagram: Convenient to check if you have a well-defined network and to modify relations. Select the network view (View -> Network diagram). Creating a relation works similar to the dragging option in the Gantt Chart by click-hold-drag from one task to the other. By double clicking on a relation, you get the option to delete a relation.
Screen #14 – Task relations
Assigning Resources
To allocate resource for the task you need to have created Resource Pool and connect the project to it. Additional information how to do it is granted in separate items here at the page. (“Upload the project” and “Creating Resource Pool, the basics“). In Epicflow only tasks with resources assigned to it will appear in the task list.
We describe 4 different ways to add resources to tasks.
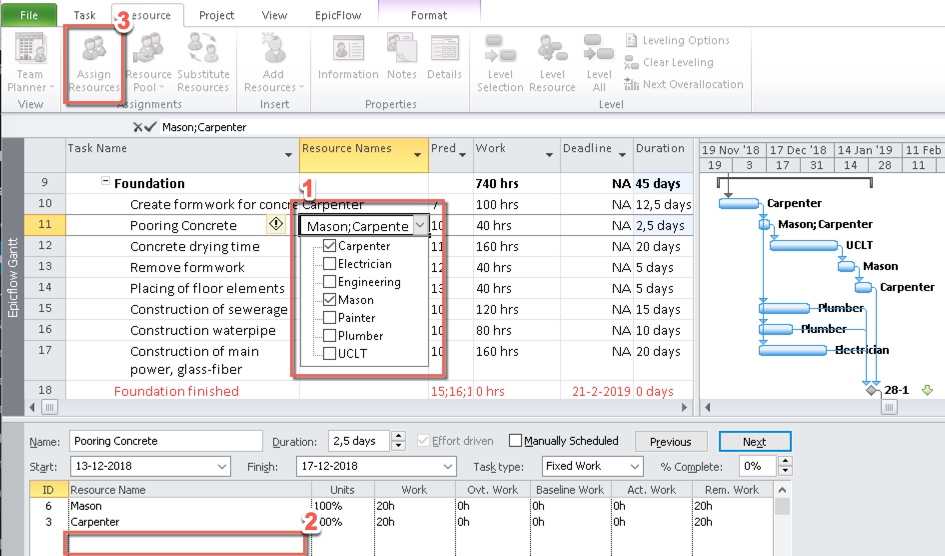
- Select cell “Resource Names” of the appropriate task and set checkbox for those resources which you would like to arrange for the task fulfilment.
- In case if you have multiple resources assigned for one task and would like to specify a different amount of work for each of such you:
- select “View” tab and press “Other View”->”Task form” element on it. Or check the “details” checkbox in the “View” tab.
- In the newly appeared window at the bottom of the MSP-window, perform editing and adding resources accordance to your requirements
- Press “OK” button to save the changes
- Use the Assing resources option from the resource tab. Works similar to option 1.
Screen #15 – Assigning resources
Defining work hours
After you have assigned resources to a task, you can specify the work related to the task. Epicflow works with next three fields in MSP:
- Remaining work; The work still to be done
- Actual Work; The spend or burned hour on the task
- Work = Remaining work + Actual Work
For newly created tasks one only specifies the “Work” related to a task; Actual work is zero and remaining work is equal to work. When a single resource is assigned to a task one can define the work in the task list.
- First add work to a task with a single resource, similar to line 14 and check the relation between Work and Duration. When adding 40 hrs of Work the duration will be default 5 days. Put 10 hrs in the “actual work” field and check the effect on the Remaining work(30) and Work(still 40).
When multiple resources are assigned to one task the “Task form” must be used. see the example on line 11.
- To view the “Task form”; Select the “View” tab and press “Other View”->”Task form” element on it. Or check the “details” checkbox in the “View” tab.
- Also here update the Work, the Actual work and remaining work field for every resource and check the relation.
- When clicking on “OK” ( the “Previous” button will turn into the “OK” button when an item is changed), then also the duration will be updated based on the resource assignment that requires the most time.

Screen #16 – Updating work hours
When using the Epicflow MS-Project template, the default task type used is “Fixed Work”. With such configuration if anybody change the duration of the task or the Units% of an assignment it will not ruin the task work estimation. Try the “Fixed units” and “Fixed Duration” setting yourselves and experience the difference. Again, Epicflow is not taking nor the Duration nor the units into account. The reason for this is that the Epicflow algorithms to calculate the priorities and resource load are based on the remaining work of a resource assignment.
Creating Milestones
- Make sure no resource is assigned to the task
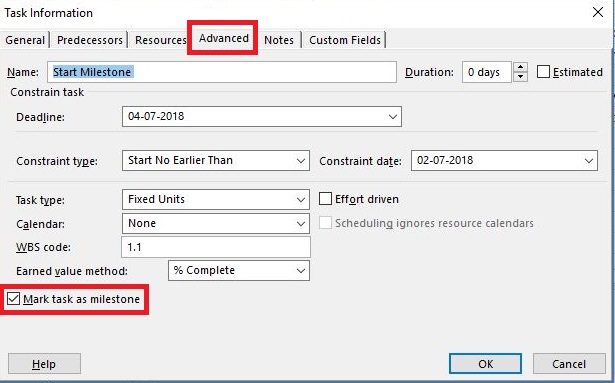
- Double click on the task line to show the task box and in newly appeared window select “Advanced” tab.
- Change “duration” to “zero”
- Specify Deadline date
- The checkbox “Mark task as a milestone” located in the bottom right side of the window is automatically set when you save changes in this window.
- Save applied changes by pressing “Ok” button
Screen #17 – Task To Milestone
Creating UCLT task
UCLT task is a task assigned on UCLT group (“Un-Compressible Lead Time”) which can be used as a resource in case of ordering time.
Information on UCLT group creation is granted further in this tutorial. In this chapter we are going to describe some specificity of UCLT tasks usage.
Keep in your mind that in case if UCLT task is not a first task in a chain of tasks it will be started by Epicflow next day the previous task is completed ignoring the day specified in milestone.
In result you could have a next situation.
Milestone is set on Friday (end of the week) but all tasks were completed on Monday (start of the week), so UCLT task will be started on Tuesday (start of the week) instead of Monday next week
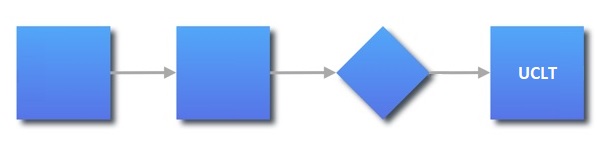
Screen #18 – Tasks chain with UCLT task
If you are willing to start UCLT task in a particular day you need to create a milestone with the specified date and link it to the UCLT task.
With such approach even if all Predecessors are completed UCLT task wont be started till the date specified in additional milestone.

Screen #19 – Tasks chain with UCLT task and additional milestone
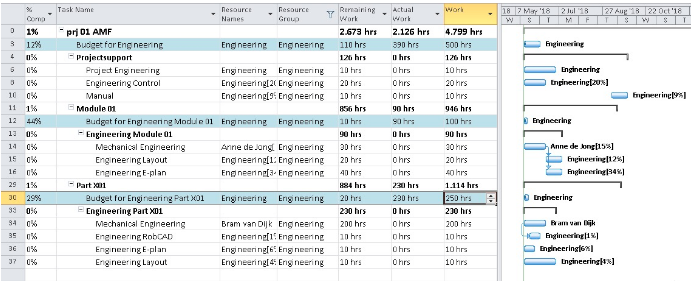
Budget Tasks in MSP
1.1. To use budgets in your project you must “enable budget processing”->
Open in the pipeline the project info card (see the previous point) and turn on “Enable budget processing” in Advance settings mode.
The default settings to search for budget tasks in the MS-Project file are the “name” column where Epicflow looks for task containing the phrase “budget” (not case sensitive) in its task name. All other text is not mandatory.
1.2. In the example below, we created budget tasks for the resource group Engineering. The first “Budget for Engineering” of 500 work hours is defined at the top level of the project, meaning that any task or sub-budget assigned to the resource group Engineering or one of its resources is using this buffer. “Budget for Engineering Module 01” is an example of a sub-budget since it is part of a summary task of this project. Any task in this summary task that is related to the resource group Engineering eats out of this buffer of 100 work hours. In this example, you can see that one task of 30 hours is assigned to the resource Anne de Jong of the resource group engineering, and the other two task of 20 and 40 work hours are assigned to the Engineering group itself. In total 90 work hours.
1.3 The Remaining and actual work values of a budget task in MS-Project are calculated by Epicflow and updates when syncing the project.
For a buffer task in MS-project:
– The “Remaining work” denote the remaining buffer left. (10 mh in our example)
– The “Actual Work” is used to denote how much of the work hours is used from this buffer. (90 mh in our example)
Manual adjustment of the remaining or actual work is overwritten by Epicflow for budget tasks. Only changes in the Work column are taken into account for budget tasks by Epicflow.
Screen #20– Budget (MSP)
Define Budget for a Multigroup
In our example, we defined a multigroup “Production” consisting of “Electric” and “Assembly”
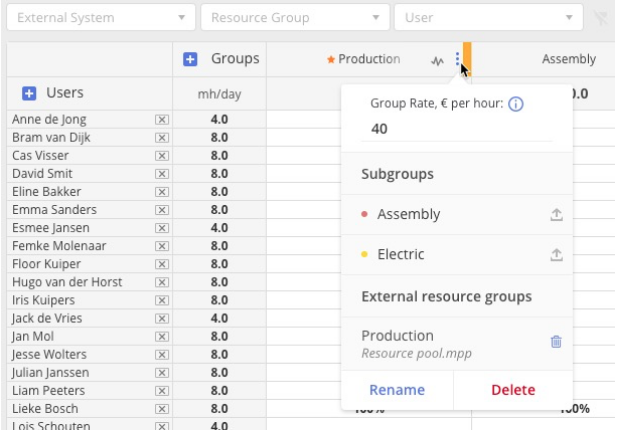
Screen #13– Multigroup (Resource Management)
The idea of a budget for a multi-group is that maybe at the start of the project you reserve a total budget for “Production” and in a later stage you will specify who will use which part of the budget.
In our MS-project example this looks like this:

Screen #14– Multigroup Budget (MSP)
At the top level, we have besides our “Engineering” budget a budget for “Production”. All task assigned to Assembly or electric or at one of its resource “eat” from this buffer.
Defining the Resource pool
Epicflow uses the shared resource pool as the source of the MS-project resources. In this paragraph, we will learn you how to create a resourcepool and how to connect your project to it.
To start, use the Resource Pool template found by next link MS Project Templates. Save the file in the Epicflow file folder, according to the project naming convention. i.e. “Resource Pool.mpp”. See the explanation of the Resource Sheet and the related fields in this at the top of this article to see how the resourcepool is organized.
For the purpose of Epicflow, the Resource Pool requires:
- adding the Group names to the Resource Pool;
- adding the Resource names to the Resource Pool and specify belonging of the particular Resource to a specific Group;
- Set a special key for identification difference between Resource and Group for the Epicflow; The R of G column.
- Optionally: Define resource availability
Add Resource
Some blank resources records have been added into the template, so you will not need to insert a new one.
- To add a new resource click on “Resource” tab and click on the line BELOW where new resource must be added.
- In selected “Resource” tab select item “Add Resources” and select “Work Resource” item from the appeared menu. Epicflow does not support the other resource types.
- You can also add a resource by clicking insert, or by right-clicking on the resource below and then select “insert resource”
- Fill in next fields:
- “Name” – specify name of Resource or Resource Group
- “Group” – should contain name of the Resource Group to which Resource is assigned to. For Resource Group it should be equal to “Name” field.
- “R or G”- special keys column. For each Resource should contain “R” key and for the Resource Group it should be “G”.
- (Optional) “Max units”- by default 100% which is equal to one FTE.
- (Optional) “Email Address” – required for further invite procedure of the users into the system.
- (Optional) “Staff Number OR Facility Reference” – Used for mapping a user to an external system. In the resource card, this value is displayed as the Internal ID. (It is only visible in the UI after the user is mapped).
We strongly recommend to specify Email Address on resource creation, even if it’s not obligatory. Reason that if later you change name of the Resource, system will be able to link it with the user in Epicflow by Email Address and use such as identifier for the resoruce.
- Repeat all steps to add all required resources
- Save Resource Pool
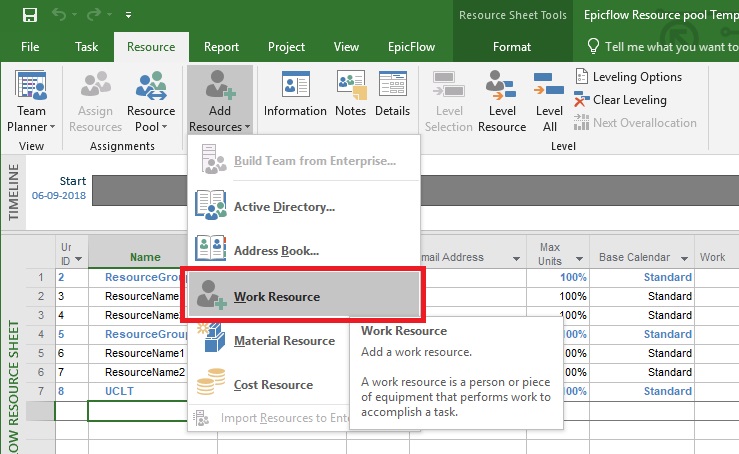
Screen #21 – Adding Resource
Add New Group
Similar to adding a new resource. The differences are:
- The “G” in the R or G column
- Optionally: you can put as the max Units the sum of the units of the resource of the group. This is not required since this is also internally defined in Epciflow.
Add special UCLT Group
You can specify a special group called “UCLT” (“Un-Compressible Lead Time”) which can be used as a resource in case of ordering time.
If task is assigned on UCLT group, on daily basis, Epicflow automatically subtracts Capacity of the group from the tasks’ Remaining Work.
To add UCLT group you need to add a group with the name “UCLT” as it described in previous chapter.
Be aware that UCLT group shouldn’t contain any resource assigned to it and it doesn’t work with the task’s duration. That’s why you need always specify Remaining Work equal to required duration.
For additional information regard UCLT tasks please refer to a separate chapter “UCLT tasks creation”
Add resource to Multiple Groups
MS Project doesn’t allow to have one resource in two groups simultaneously and if you would like to have, for example, resource “Res1” to be assigned to group “Gr1” and “Gr2” you need to perform next actions:
- Specify in MS Resource Pool resource “Res1” within group “Gr1”
- Specify in MS Resource Pool resource “Res1<something>” within group “Gr2”
- Set the same email address for both resources.
- Upload MS Resource Pool into epicflow system
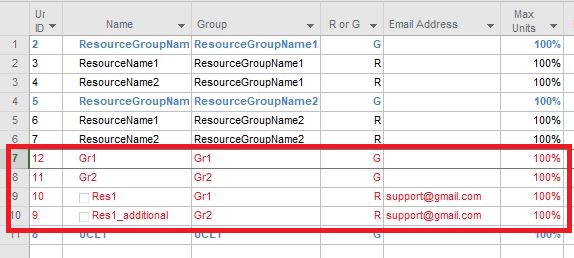
Screen #22 – Add resource to a multiple Group
In result Epicflow system will accept such identification as one resource with the shortest name “Res1” which do belong to “Gr1” and “Gr2”.
Connect Project
Open your project file and open the resource pool. If it is not the first project connected to the resource pool you will get the following message:
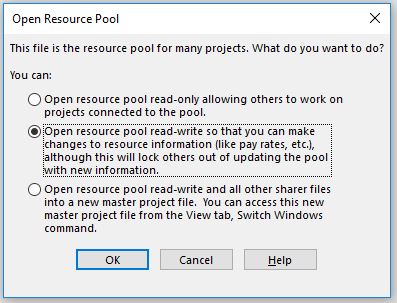
Screen #23 – Open Resource Pool
- Open the Resource pool in read-write mode.
- Open MS project file.
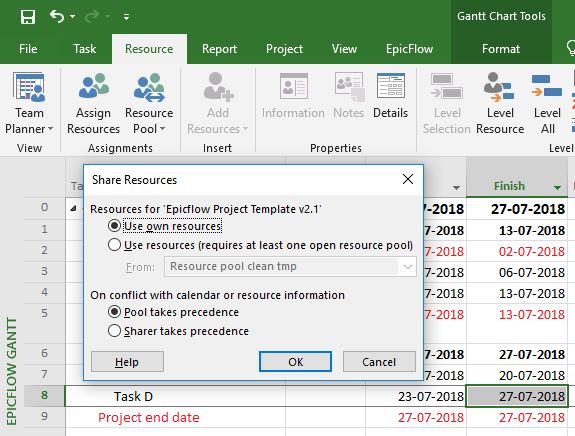
- Select in MS Project menu tab “Resource”-> “Resource pool” -> “Share resources” -> and from the appeared drop-down list choose appropriate Resource Pool.mpp file.
Screen #24 – Linking Resource Pool to the Project
As soon as you press “Ok” button and save Project and Resource Pool files they are defined as connected.
Be aware that projects which are not linked to the Resource Pool wont be uploaded.
Unlink Project
In case is project is over and you would like to exclude it from the system and storage itself, for example in case of backup archive preparation of the old not required files, you would need to remove a connection of the project on Resource Pool.
For that you need to
- Open the Resource pool in read-write mode.
Screen #25 – Open Resource Pool
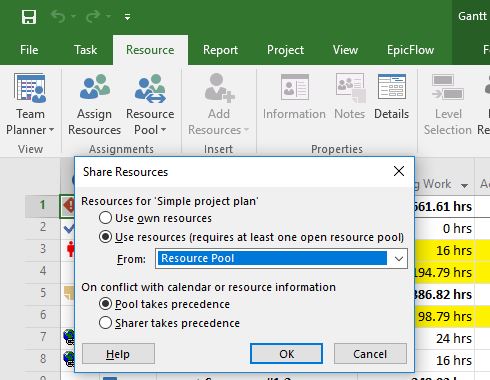
- Open MS project file.
- Select in MS Project menu tab “Resource”-> “Resource pool” -> “Share resources” -> and select option “Use own resources”.
Screen #26 – Unlink Resource Pool
As soon as you press “Ok” button and save Project and Resource Pool files they are defined as unlinked.
Delete Resource
To delete Resource from the Pool you would need to:
- Open the Resource pool in read-write mode.
Screen #27 – Open Resource Pool
- Select in MS Project menu tab “View”-> “Resource Sheet”
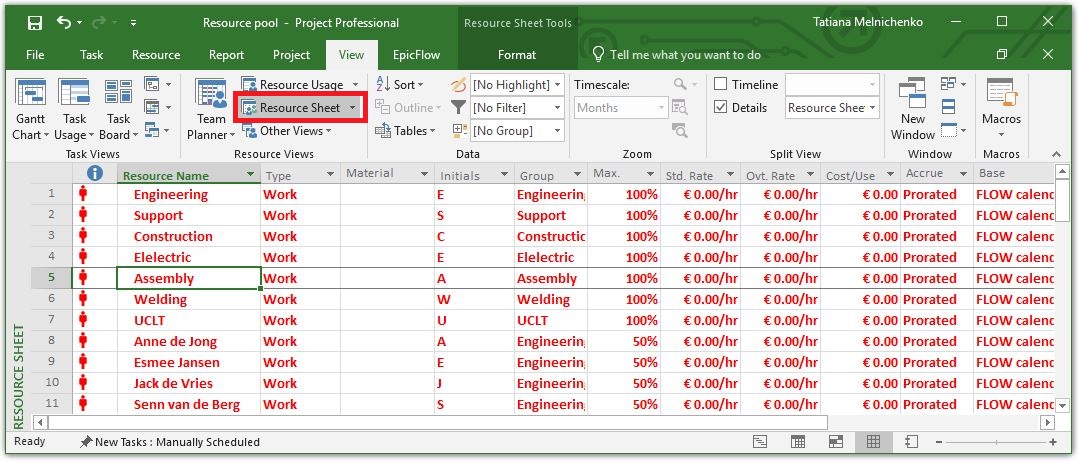
Screen #28 – Resource Sheet
- Allocate the needed resource in your Resource Pool and select it by left mouse click
- Select in MS Project menu tab “Resources”->”Details”
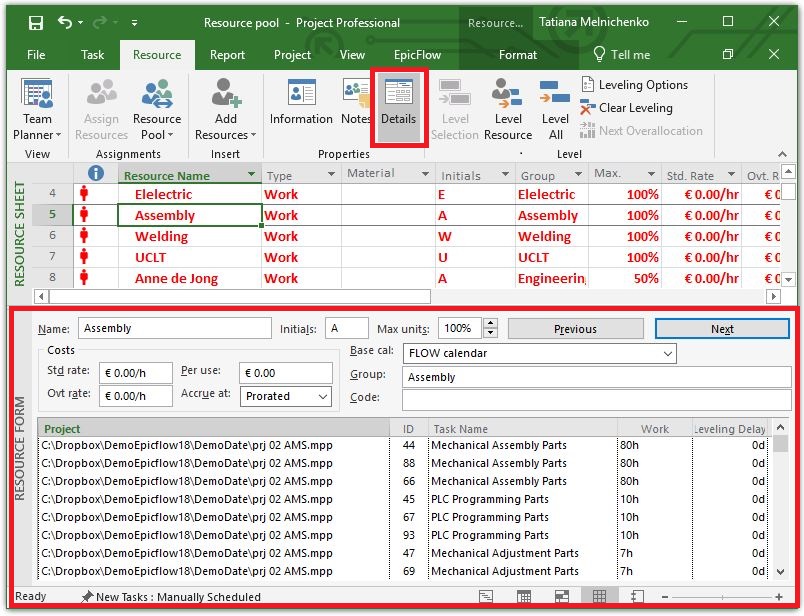
Screen #29 – Resource Details
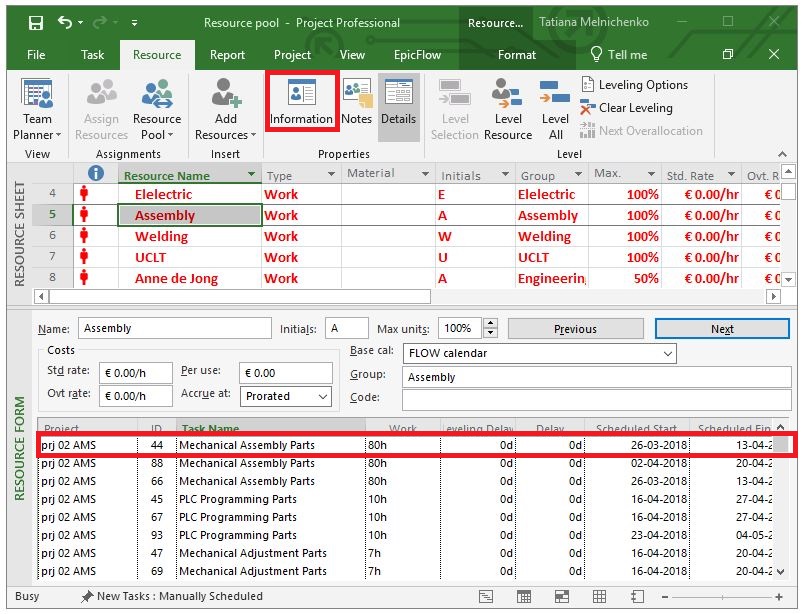
In result, at the bottom of your screen, you’ll have a list of all task on which resource is assigned with the Project Name in which task is defined. Before Resource deletion itself you need to reassign all tasks from the particular resource to omit deletion of Actual, Remaining and Total work.
To proceed with it at first you need to
- open all Projects from the “Project” column displayed in “Resource Form” as we have on Screen above
- Go back to Resource Pool and select required task in the appeared frame by left-click.Press “Information” button from the “Resource” menu tab
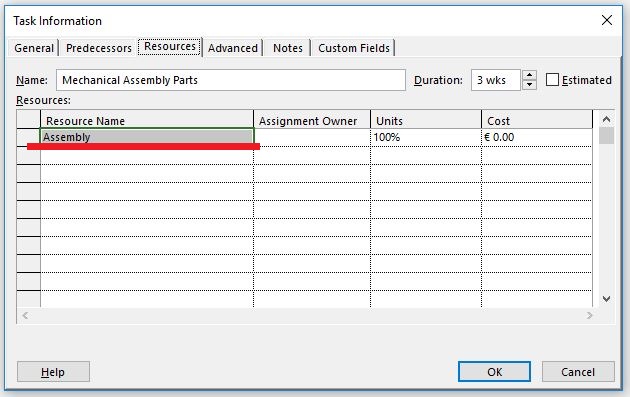
Screen #30 – Task Information
- In appeared window “Task Information” navigate to the “Resoruces” tab and perform selection of another resource for the particular task to reassign it.
Screen #31 – Resource Reassignment
- Proceed as described in a previous two steps for all tasks on which resource is assigned
- Only when resource has no assignment you can deleted it by right mouse button click and selection of “Delete Resource” item
- Save and Close all files
Delete Group
To delete group from the resource pool
- Delete all Resources of the Group, as it described in “Delete Resource” chapter.
- As next step you would need to reassign all assigned task from the current Group itself. To proceed with it follow all steps covered in “Delete Resource” chapter with only difference that instead Resource all actions must be performed on the Group.
- Only when Group has no assignment and resources in it, you can perform deletion of such by right mouse button click and selection of “Delete Resource” item
- Save and Close all files
Troubleshooting
Can’t open resource pool in read-write mode
Since this resource pool is shared among all projects it can be that this is not allowed to open the pool in read-write mode.
When editing a project:
No problem, read-only will do and is even preferred in order not to block the resource pool from editing.
When connecting project to resource pool:
Read-write is preferred, but read-only will also do. You will still be able to create a relation from your project file to the resource pool, only this link is not stored in the resource pool itself. This will be corrected automatically the next time you have a chance to open your project and the resource pool in read-write mode.
Unintentionally added resources to pool
This happens when you type a name in the resource name field in your project file which is not part of the shared resource pool. If you did this only in your local project file you can just delete them. If those resources are saved in the shared resource pool you have to remove them also from the shared resource pool.
You can recognize unintended added resource in the shared resource pool since the “group” filed and custom fields “R of G” are not filled in.
Can’t delete a resource from pool
This happens when there is work related to a resource. Now you have to open the resource pool and the project(s) where the work is allocated simultaneously in read-write mode.
You can do this:
- By opening the resource pool, and selecting the 3rd option. “read-write mode and all other shared files” This will create a master project file that includes all related projects. In the Gantt Chart, you can now filter on the resource you want to delete and remove the assignments. After that, you can delete the resource.
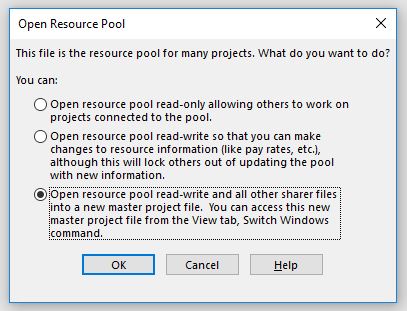
Screen #32 – Open Resource Pool and All Projects
Projects not found when opening master file
This happens when file was moved, deleted or renamed.
In this case you wont be able to break the link in Resoruce Pool on obsolete file.
Workaround is to
- create a project file with exact same name
- place it in the same location
- link it to the Resource Pool
- save all files
- unlink specially created project
- save all files and delete project created at first step
Project Synchronization issue
Usually, for previously uploaded project, it happens either when
- specified more than one Start milestone or External\Internal Due Date Milestones
- “Deadline” cell’s value for the Start milestone or External\Internal Due Date Milestones was removed
- task is assigned on new resource which wasn’t uploaded into Epicflow yet
To work out such cases
- verify structure of the Project and Resource Pool files in accordance to template
- before Project synchronization open Resoruce Pool file in Read-Write mode and synchronize it first. On successful Resource Pool synchronization go back to the Project itself and sync it as well.