Introduction
Defining budgets in the system involves setting financial parameters for projects, allowing users to allocate resources effectively and monitor expenditures. This process enables accurate tracking of approved spending and ensures that project costs remain within defined limits.
Define Budget for the projects
You can define Project Budget in work hours in the Project card.
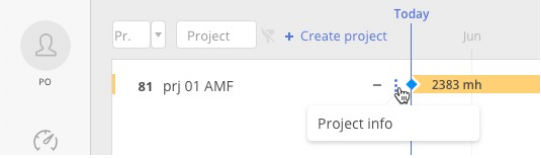
Screen #1– “Project info”
Go to Pipeline and navigate into project info, and define an Approved budget, all the rest (Burned, Remaining work, Total expected work, Remaining budget) will be calculated automatically according to the uploaded data from the external system.
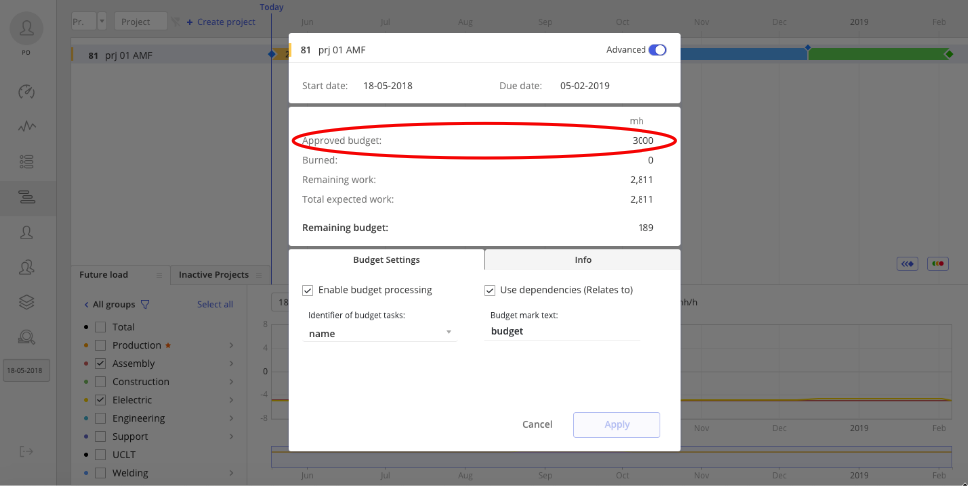
Screen #2– Project card (budget)
Activate Budget for Tasks
To work with budget tasks in Epicflow, you must first activate budget tasks within the project settings. This step is crucial for enabling the creation of budget tasks.
1.1 Activate Budget Tasks in the Project:
1. Open the project card by clicking on the project name in the Pipeline.
2. Select Advanced to view the Budget Settings tab.
3. Check the box to Enable Budget Processing.
4. Click to add an Identifier in the Identifier of budget tasks field and select Tag.
5. Define the name in Budget Mark Text. It is recommended to use the word “Budget”.
6. Click the Save button to apply and save the changes.
With these settings, any task in the project tagged with Budget will be treated as a Budget Task. To create a Budget Task, simply add the Budget tag to a regular task.
Screen #3– Activate Budget Tasks
Working with Budget Tasks
1.1 Create Budget Tasks:
1. Navigate to the Pipeline page.
2. Click the three dots next to the project name or summary name.
3. Select the Create Task option.
4. Fill in all the necessary information.
5. Add the “Budget” tag. This is essential for creating a budget task or converting a non-budget task into a budget task.
6. Click the Create button.
You can also review how to create tasks in Quick Edit Mode, and remember to include the budget tag when applicable.
Screen #4– Create Budget Task
If you remove the ‘Budget’ tag, the budget task will be converted into a regular task.
1.2 Assign Resources
For budget tasks, you can only assign groups or teams, not specific users. The exception to this is generic resources. The reason for this is that a generic resource is not yet defined as a user, group, or team. When you assign a generic resource to a budget task, the budget will be related only with a group. Read more about related budgets in this article.
However you can distribute the budget among resources. Please refer to this article to learn more.
Budgets In the Task List
1.1 In the task list of Epicflow you can filter on the budgets and its related task in the “budget” column. The budget column describes from which budget the task consumes its budget.
When filtering on a specific budget, then all tasks that are directly related to this budget are showed plus the budget task itself. The budget tasks are marked by an orange dot before their task name.
1.2 Example:
We now filter on the “Budget of Engineering module 01” budget, resulting in our three tasks with 90 mh of work in total and the budget task itself.

Screen #5– Budget (Tasklist)
Note that for the buffer task (the task with orange dot):
- The 10 mh in the remaining column denoted the buffer left.
- The 90 mh in the spend column denotes how much of the work hours are used from this buffer.
- Spend and remaining are calculated automatically, you are only allowed to change the Total mh.
- These values are synchronized with the MS-project file. You see the same values in our MS-project file example.
1.3 Hierarchy of buffer tasks. The related buffer of the buffer task itself is “Budget for Engineering”. When filtering in the “Budget” column for all task related to engineering, you can see the hierarchy. If a buffer task is is at the top of the hierarchy (so it can’t consume from any other buffer) then you see [Budget] in the buffer column. See the example below.

Screen #6– Hierarchy of buffer tasks (Budget)
Define Budget for a Multigroup
In our example, we defined a multigroup “Production” consisting of “Electric” and “Assembly”
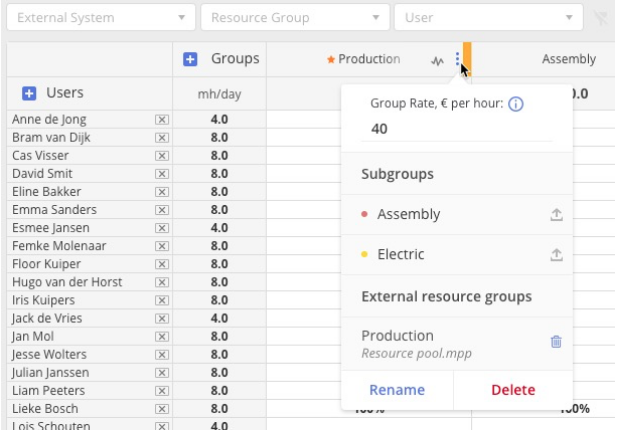
Screen #7– Multigroup (Resource Management)
The idea of a budget for a multi-group is that maybe at the start of the project you reserve a total budget for “Production” and in a later stage you will specify who will use which part of the budget.
Permissions
To grant users the ability to perform any actions related to budgets or budget tasks, they must have the specified permission. Below is a list of all permissions related to budgets. You can read more about permissions in this article.
List of Permissions Related to Budget
- Project Permission: Approved Budget – This permission controls user access to the Approved Budget and Remaining Budget mh.
- Project financial info – This permission controls user access to the Project Financial Info. Depending on the permission, users can have no access, view Project Financial Info, or manage Project Financial Info in € in the project card.
- Project Permission: Project Card: Budget Settings Tab – This permission controls user access to the Budget Settings Tab in the Project Card. In this tab, you can enable or disable Budget Tasks. By default, Budget Tasks are enabled, but this permission is required to disable or re-enable them.
- Project Permission – Project – Card – Info Tab – This permission controls user access to the Info Tab in the Project Card. In this tab, users can access information about remaining work, scheduled hours, hours already budgeted, and the Project Buffer.
- Task, Summaries, and Milestone – Manage group assignments: Budgeted Group – Possible to reassign tasks which assigned to Budget to another Budgeted group;
- Task, Summaries and Milestone – Manage user assignment – Budgeted User – Possible to distribute budget among specific users.
- Task, Summaries, and Milestone – Task Card – Tags – This permission controls user access to create Budget Tasks. Since a Budget Task is defined by the tag “Budget,” users must have the ability to manage tags in the task card to create these tasks.
- Group Permission – Group Card Fields – Group Rate: This permission controls user access to the Group Rate, which specifies the budget for the group.
To grant the necessary permissions, please follow these steps
- Navigate to the Settings page.
- Select the Roles tab.
- Click on the name of the role you want to edit.
- On the right side of the screen, select the scope of the permissions to edit it.
- Click the Save button to save your changes.