Budget distribution is the Epicflow feature that helps a project manager with allocation of the budget tasks among the Project team members. The purpose of it is to enhance Planning Quality and improve Projects’ flow control
You can use the Budget Distribution feature to determine how much work will be performed by each of the assigned resources.
Overview
General
In the system, we distinguish the following parameters as an indication of a budget task:
- Total – total hours specified for a budget task itself;
- Spent – a sum of hours spent on all linked tasks;
- Planned – a sum of total hours for all linked tasks (not shown at the budget card);
- Rem. planned = Planned – Spent;
- Unplanned = Total – Planned.
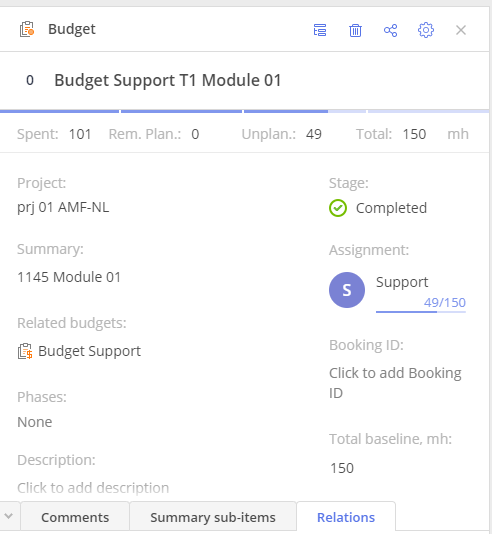
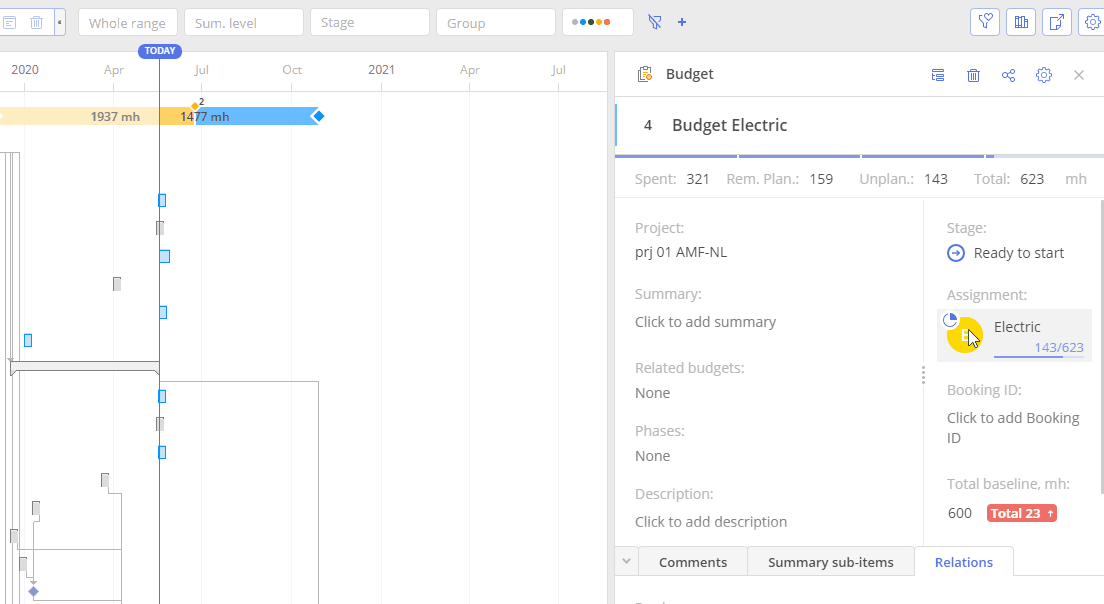
Screen #1 – Budget Task Card
At the header of a budget task card, you can see Spent, Remaining, Planned, Unplanned and Total fields (upon the condition there’s a budget task assigned to group1 at a project level, and there are tasks assigned to it).
If you hover over an hour slider in a budget task card, you’ll see a tooltip showing the percentage of budget expended.
On the Task Lst, Pipeline or Quick Edit Mode you can recognize a budget task by the icon placed next to it.
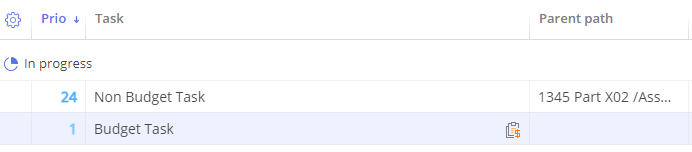
Screen #2 – Distinguish Budget Task from Non-Budget Task
How to Budget a Specific Resource
If you want to assign part of a budget to a specific team member, you can do it directly via Budget Distribution.
Step-by-step
- Open the Task Card.
- Assign the task to the relevant Group (if not already assigned).
- Add or confirm the Budget task (budget must exist at the project level).
- Click on the Group Assignment.
- In the Budget Distribution section, click Edit.
- Click Not Assigned and select the user from the group.
- Click Reassign User.
- Adjust the percentage or hours if needed.
- Click Apply, then Save.
The selected user will now receive their portion of the budget.
Key Idea
Instead of thinking in terms of “assigning tasks,” think of splitting the budget:
- The budget is created for a group
- Then you distribute portions of that budget to specific users
- Each user gets a share of the total
Assignment Units
When the team or group is assigned to the budget, you can notice letter ‘A,’ which stands for ‘Auto,’ indicating that the whole capacity of the group or team is utilized at the time the budget task takes place. We use this mechanism because the team or resource group can change over time
Screen #3-Assignment Units in Budget Card
Additional information on Defining the Budget is available in the corresponding Wiki Article.
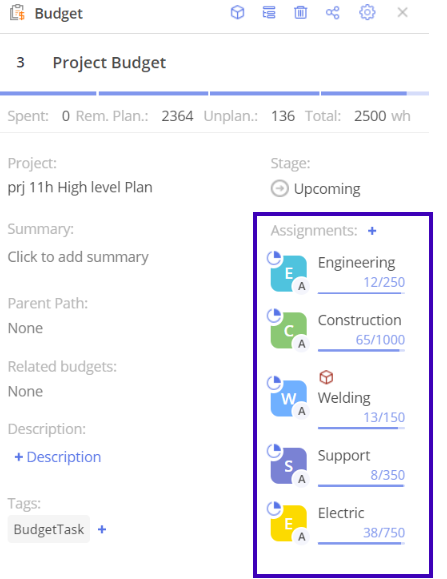
Groups and Multigroup
When you enter a budget task card and hover over the assignment icon, you’ll see an assignment pop-up with the following information:
- Spent, Rem.Plan., Unplanned, and Total;
- “Budget assigned to” with group icon and name;
- “Budget distribution” section with a percentage bar;
- Edit button in the Budget distribution section.
If a budget task is assigned to a multigroup, you’ll also see the explanation that a budget can be allocated to it.
![]()
Screen #3 -assignment icon in a budget task card
Quick Edit Mode
If there’s a budget task with 40 hours in total assigned to a group on a project level, and there’s a task linked to the budget with 10h spent and 20h total, you’ll see Spent 10h, Unplanned 20h and Total 40h in a budget card, and Rem 20h, Spent 20h, Total 40h in the corresponding columns for the budget task.
Additional information on Working with the budgets is available in the corresponding Wiki Article
Distribution Menu
Open a budget task card and an assignment pop-up. Click the Edit button in the Budget Distribution section and you’ll see the budget distribution menu. There, you can see:
- Distributing () mh’ header
- Cross button at the header
- Number of parts section
- Percentage bar with explanation ‘Allocated for user1’
- Reset unlocked button
- 1 part of budget
- More Parts button
- Cancel and Apply buttons
Budget Part
To check the budget part, go to the budget distribution menu. There you’ll see
- user icon,
- user name,
- group name,
- number of mh and percentage,
- lock button,
- trash button.
You can check the maximum number of budget parts by clicking the “more parts” button. Keep in mind that you can create not more than 5 parts.
If the budget parts are locked, you can’t change the percentage for them. But you can change the maximum number of locked budget parts if the number of the unlocked parts is more than 2.
If you change the percentage of one of the unlocked budget parts manually, the percentage of the other parts is recalculated accordingly and the percentage bar at the top is adjusted correspondingly.
To create a budget part, make sure there’s a budget task assigned to a group at the project level. Open the budget distribution menu and click on the More parts button. Specify a user for a budget part.
NB:
- You can’t create duplicated budget parts for a group.
- If there are duplicated budget parts for a group, you can unite them by clicking on the Combine button.
- Besides, it’s impossible to create duplicated budget parts for a user.
- You can’t create several identical assignments.
 Screen #5 – budget part
Reset Unlocked Budget
To reset an unlocked budget part, make sure there’s a budget task assigned to a group on a project level.
- Open the budget distribution menu and find 2 unlocked parts and 1 locked budget part.
- Set the percentage for one unlocked budget part manually.
- Click on the Reset unlocked button.
The percentage for unlocked budget parts will be recalculated accordingly and the percentage for locked budget parts won’t be changed.
Budgeted User in the Reassign Pop-Up
A user is Budgeted in the reassign pop-up when the assignment matches the budget part / the budget assignment. If there’s a budget task assigned to a group in a summary, and there’s a task assigned to a user in this group, and if you open the Budget distribution menu with a budget part for this user, you’ll see this user in the Budgeted section of the reassign pop-up.
And a user won’t be budgeted if the assignment doesn’t match the budget or if the assignment matches the budget but the task belongs to another summary.
To distribute budget among resources please follow these steps:
1. Access the Task Card.
2. Click on Group Assignment.
3. Next to the field labeled Budget Distribution, click the Edit button.
4. Click on the Not Assigned button located just above Group Assignment.
5. In the newly opened pop-up, select the user.
6. Click the Reassign User button.
7. Click the Apply button.
8. Click the Save button.
You can now see the budget distributed for resources in the Budget Resource column.
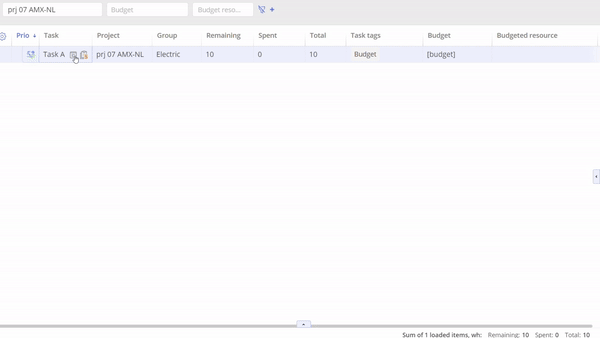
Screen #6– Distributing the Budget among Resources

Screen #7 Budget Resource Column in the Group Task List
Budgeted User in the Personal Task List
When a budget-related task is assigned solely to a group and a specific user is included in the budget distribution, this will be reflected in the personal task list. By hovering over the budget icon, you can view how the budget is distributed among the resources.
To view how the budget is distributed among resources, follow these steps:
1. Access the Personal Task List.
2. Apply the User filter.
3. Enable the Include Group Tasks options.
4. If you see the Budget icon, hover over it to see the distribution of the budget among the resources.
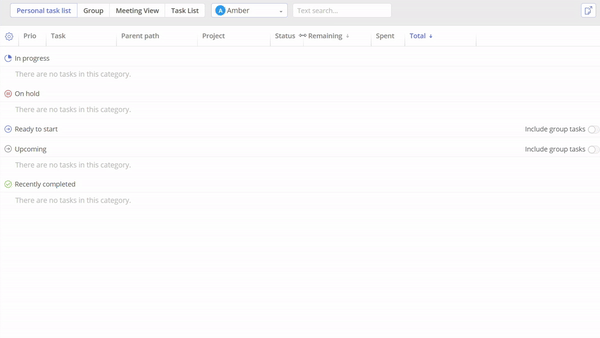
Screen #8 Budgeted Resource in the Personal Task List
Hours explanation examples
Case 1
If there’s a task with 40 hours total assigned to a group on the project level and there are no tasks linked to the budget, you can see 40 hours in the upland and total fields in the budget task card header. In this case, other fields will be empty.
Case 2
If there’s a task linked to the budget with spent 0h, total 20h upon the same conditions as described above, you’ll see Spent 0h, Rem.Plan. 20h, Unplanned 20h, and Total 40h in the budget task card header.
Case 3
If there’s a budget task with 40 hours total assigned to a group on a project level, and there’s a task linked to the budget with spent 0h and total 60h, and more budget is required for the task, you’ll see Spent 0h, Rem.Plan. 60h, Unplanned 20h, and Total 40h in the header.
Case 4
If there’s a budget task with 40 hours total assigned to a group on a project level, and there’s a task linked to the budget with spent 0h and total 40h, so the budget is equal to the total for a task, you’ll see Spent 0h, Rem.Plan. 40h, Unplanned 0h, and Total 40h in the header.
Case 5
If there’s a budget task with 40 hours total assigned to a group on a project level, and there’s a task linked to the budget with spent 10h and total 20h, you’ll see Spent 10h, Rem.Plan. 10h, Unplanned 20h and Total 40h in the header.
Case 6
If there’s a budget task with 40 hours total assigned to a group on a project level, and there’s a task linked to the budget with spent 0h and total 40h, so the budget is equal to the total for a task, you’ll see Spent 0h, Rem.Plan. 40h, Unplanned 0h, and Total 40h in the header.