Overall Overview
- Having corresponding permissions, you’ll be able to navigate to the Timesheet page by selecting an appropriate item of the system menu located leftward.
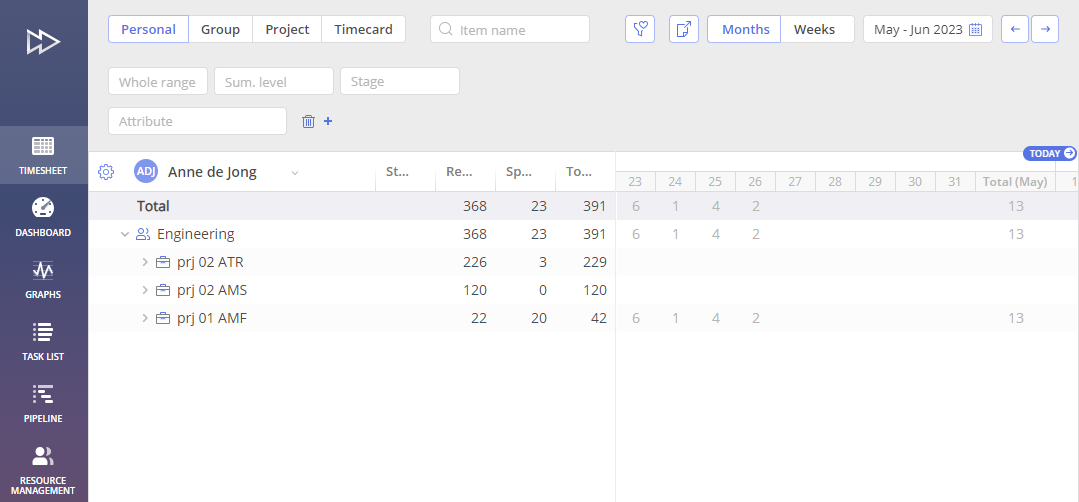
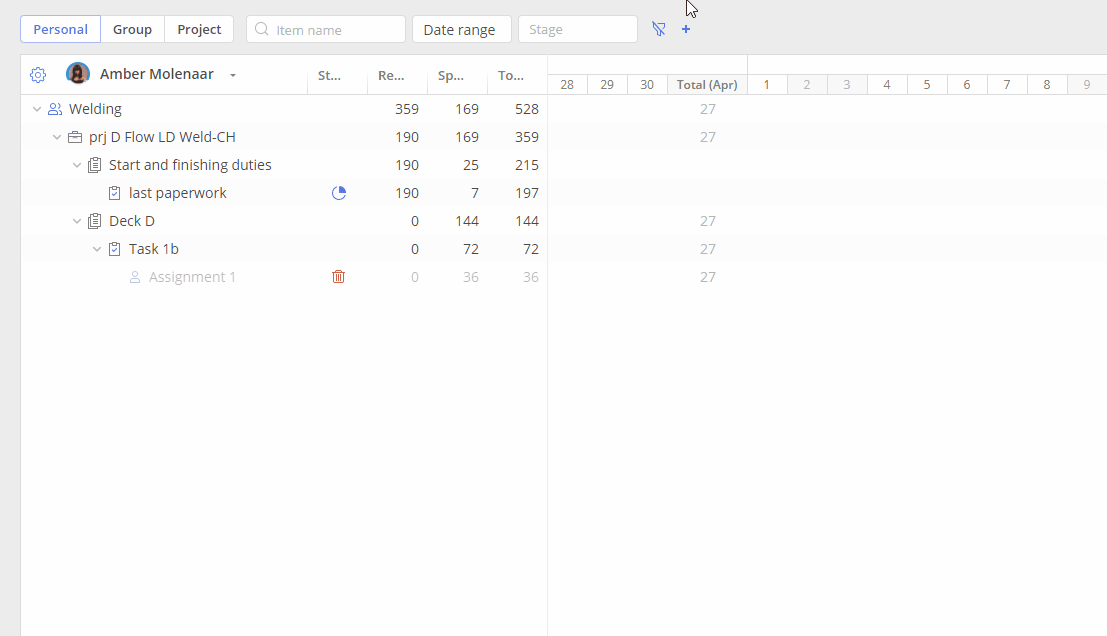
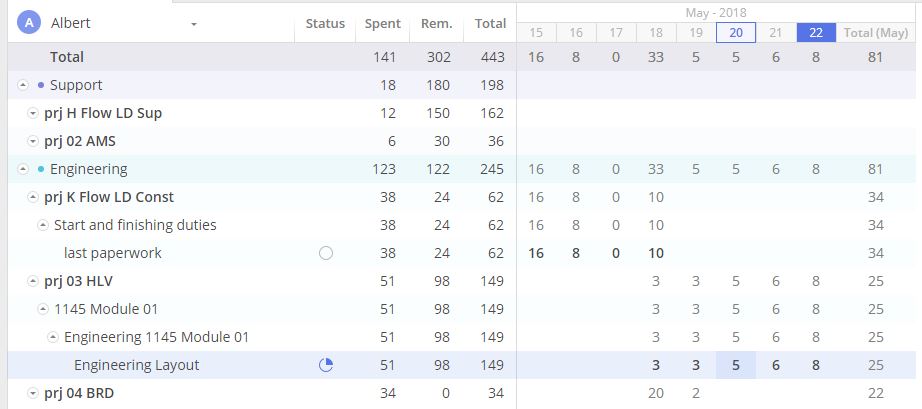
Screen #1 – Timesheet – General view
Timesheet page has four tabs: Personal, Group, Project and Timecard.
Here is description of their purpose
The Personal, Group, and Project tabs are intended to list time: remaining, spent, and total for various tasks. All these tabs present the same information from different perspectives. Each tab consists of two parts.
- leftward, you can see the description of all assigned tasks to a particular user, group or project ranged by User Groups and Summary items
- rightward, you can see the produced output according to the particular task at the timeline.
Timecard will display the general time spent by an employee on various projects. It also consists of two parts.
- leftward, you can see the name of the project
- rightward, you can see the produced output according to the particular project at the timeline.
Timesheet Filtering
This functionality allows adding and hiding filters to make the Timesheet page as convenient for navigation and work as possible. With the filtering feature, you can focus exactly on the data you need at the moment.
Let us remind you that Timesheet has four different tabs: Personal, Group, Project and Timecard. Filtering is available for first three of these tabs: Personal, Group and Project. Here are the applicable rules and principles of working with filtering in tabs:
- You can filter by different inputs for the same filter in both Personal, Group, and Project tabs.
- The system will display valid data even after the Timesheet refresh.
- You can also apply a filter in one of the tabs only, and the system will show valid data in each tab even after refresh.
To work with filters on the Timesheet page, open a filter configuration menu by clicking on the “Add filter” button.
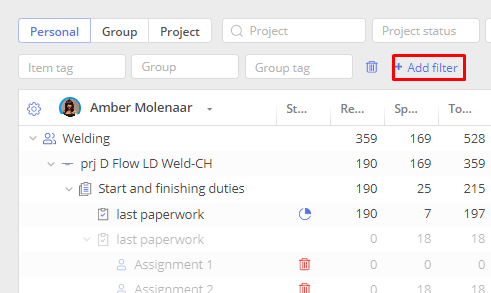
Screen #2 – Timesheet – Checking Filters
You can apply Timesheet filters based on the following three sections with corresponding subsections:
- Item filter:
- Name,
- Date range,
- Summary level,
- Task stage,
- Tag, and
- Skills
- Project filter:
- Name,
- Manager,
- Status, and
- Tag
- Resource filter:
- Group,
- Group tag,
- User, and
- User tag.
Basic actions
If all filters are hidden,
- Click on the ‘Add filter’ button,
- Then click on ‘filter’ in the filter menu.
It’ll be removed from the menu and added to the Timesheet page.
To hide a filter on the Timesheet page, click a ‘trash’ icon in the ‘filter’ field.
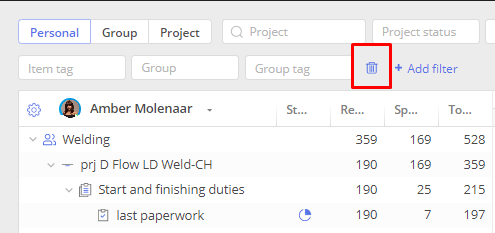
Screen #3 – Timesheet – Hiding Filters
You can clear all filters by clicking the “clear all filters” button. After this action, the ‘clear all filters’ button is replaced with the “remove all filters” one.
Then, if you’d like to remove all filters on the Timesheet page, click on the “remove filters” button.
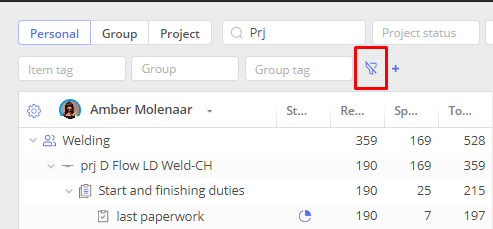
Screen #4 – Timesheet – Hiding Filters
Filtering by Project/Project Manager’s/Task Names
You can filter items by project, project manager’s, and task names. Here are some rules and principles of working with this type of filter.
- If you’d like to find a certain project by its name/by a PM’s name/by a task name, apply a Timesheet filter on the project/PM’s name/task name. Just type it in the name filter and check it out as the system will filter it out among the other project/PM’s names/Task names.
- If there are several projects with compound names (Project1 and Project2), where one of the words is the same, the system will show you all coincidences based on the project name you applied to the filtering functionality. The same will happen if you filter on a project manager’s name and there are several identical names but different surnames.
- You can filter only one project at a time by the project/PM/task name on the Timesheet page. It means that if you enter several project/project managers’/task names with a space between them, the system won’t apply the filter and you won’t see any filtered projects.
Working with Project Status Filter
You can filter projects by their statuses and choose one of the following variants:
- Show all,
- Active,
- Inactive
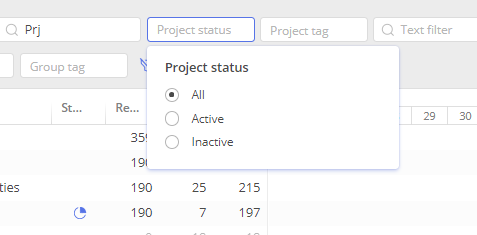
Screen #5 – Timesheet – Project Status Filter
Project Tag
You can filter projects by project tags. Just enter a unique tag and the system will show you the corresponding project.
- If there are several projects with compound tags (the ones that consist of two words or contain numerals, e.g. Flow1), where one of the words is the same, the system will show you all coincidences based on the project name you entered. For example, it will show two projects – Flow1 and Flow2 if you’ve entered “Flow” in the filtering field.
- You can filter Timesheet data on several project tags by using “and”/“or” principles.
- If you filter on several tags with the “or” option, the system will show you all projects with the configured tags.
- If you filter on several tags with the “and” option, the system will show you the project containing all the configured tags.
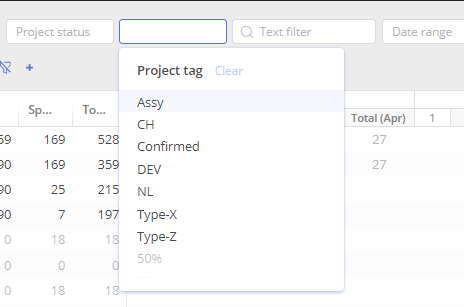
Screen #6 – Timesheet – Project Tag Filtering
Summary Name
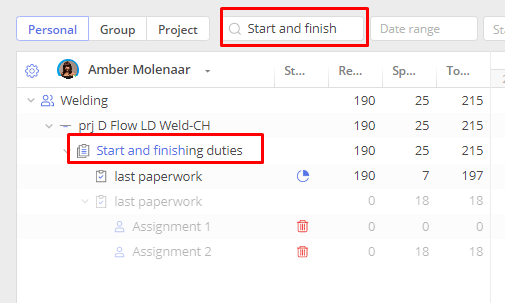
Screen #7 – Timesheet – Filtering by Summary Name
When working with the summary name filtering, keep in mind the following principles of work:
- A summary contains sub-tasks, sub-summaries, and milestones.
- If you specify ‘summary’ in the text filter, you’ll see it filtered. But if it’s collapsed, the text filter remains active.
- If you expand the summary, you’ll see all sub-tasks, sub-summaries, and milestones. And the text filter changes its colour into pale grey and becomes inactive.
- If you collapse the summary then, the text filter becomes active again.
- And if you click on an inactive text filter when the summary is expanded, the filter will become active, and the summary will collapse.
- If a summary has several levels of sub-summaries, any of it will be expanded upon filtration together with the upper level summaries.
- If a summary has several levels of sub-summaries, and the summary on each level is expanded and the user selects any summary level filter, then the summary of the selected level will be collapsed together with the upper-level summary.
- If a summary has several sub-summaries and they’re collapsed, the summaries of all levels will be expanded upon the click on the ‘expand all’ button. On the contrary, if they’re expanded, you can click on “level1” in the summary level filter to have all levels collapsed.
Date Range
In the date range filtering menu, you can choose either ‘show all’ option or select a period.
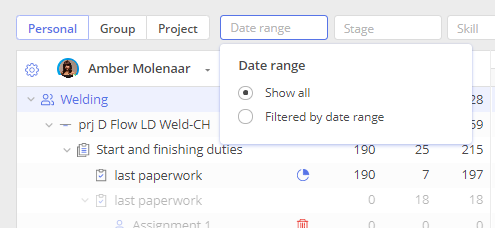
Screen #8 – Timesheet – Filtering by Date Range
- If you select a date range, for example, one month, you’ll see all tasks the work on which was logged during this period.
- If you select the ‘show all’ option, you’ll see all tasks regardless of dates.
- If you open a Task Card when the tasks are filtered by a date range in Timesheet, you’ll see the same filtered tasks.
Task Stage
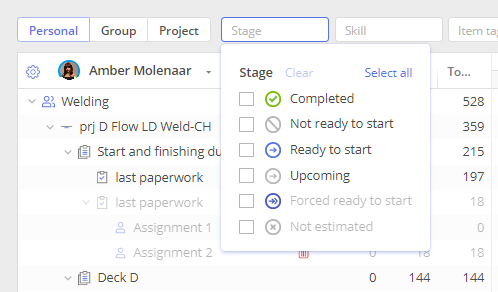
Screen #9 – Timesheet – Filtering by Task Stage
You can apply filtering by the task stage. Just choose one of the available task stages in the filter window:
- Not ready to start
- Upcoming
- Not estimated
- Ready to start
- Forced ready to start
You can also select all stages, and the system will display all tasks that are at any stage of their execution. Just click on the Stage filter field and click on the ‘select all’ button.
In a similar way, you can clear all filters or deselect all stages by clicking on the ‘deselect all’ or ‘clear’ button.
Skills
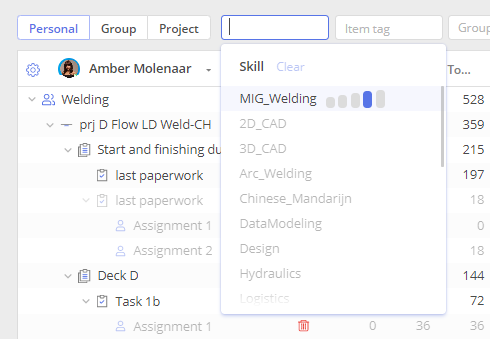
Screen #10 – Timesheet – Filtering by Skills
- To filter tasks by the skills that are required for their completion, click on the skill filter field and choose the necessary skill in the drop-down with a list of all available skills.
- You can also select skill levels. Just click on the necessary level to select it or choose several skill levels by the click-n-drag function.
- If a summary has inherited skills, it will be displayed together with the corresponding project and task if you apply a filter by the inherited skills in Timesheet.
- If a project has several summaries that contain tasks with the required skills, they both will be displayed.
- You can also filter items by several skill filters with ‘and’ and ‘or’ options.
Filtering by Tags
Task Tag
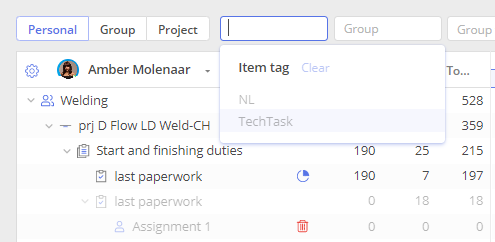
Screen #11 – Timesheet – Filtering by Tags
You can filter project tasks by tags.
- If there are several items with the same tag, they all will be displayed in the Timesheet when you apply the filter.
- You can also filter items by several tags using ‘and’ and ‘or’ options. Let’s consider some examples. If there are two items with two different tags and an item that has these both tags and you apply the ‘or’ option, you’ll see all these three items. And if you apply the ‘and’ option, only the item that has both tags will be displayed.
- If you enter two tags one of which doesn’t exist, and apply one of these options, the system will show you the items with the existing tag.
Summary Tag
Screen #12 – Timesheet – Summary Tag
You can filter items by summary tags.
- When you apply a summary tag filter, the system displays a necessary summary in a collapsed view.
- To check items inside the summary, just expand it. After that, the filter field becomes inactive (changes its colour into pale grey). The system will display all sub-tasks, sub-summaries, and milestones inside this summary.
- You can collapse the expanded summary with items, and the item tag filter becomes active again.
- To activate the item tag filter, just click on it. This action will collapse the expanded summary and activate the tag filter.
User Assignments
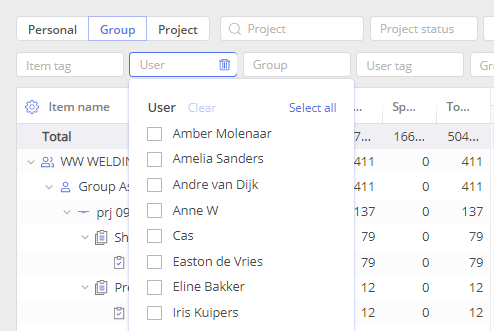
Screen #13 – Timesheet – Filtering by User Assignments
You can filter items by user assignments.
- Just select a necessary user in the filter drop-down and the system will show you their tasks and corresponding projects.
- If you select the user who has no assignments, no projects will be displayed.
- You can also select all users and the system will display all existing projects. The users in the list are ordered alphabetically.
- You can deselect all users by clicking a ‘clear’ or ‘deselect all’ button. All projects will be hidden.
User Tags
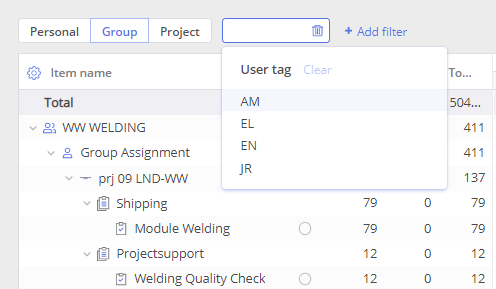
Screen #14 – Timesheet – Filtering by User Tags
There are some rules and principles of working with user tag filtering:
- You can filter items by one or several user tags by applying ‘and’ and ‘or’ options. Let’s consider some examples. If there are two items with two different user tags and an item that has these both tags and you apply the ‘or’ option, you’ll see all these three items. And if you apply the ‘and’ option, only the item that has both tags will be displayed.
- If you enter two tags one of which doesn’t exist, and apply one of these options, the system will show you the items with the existing tag.
Group Assignments
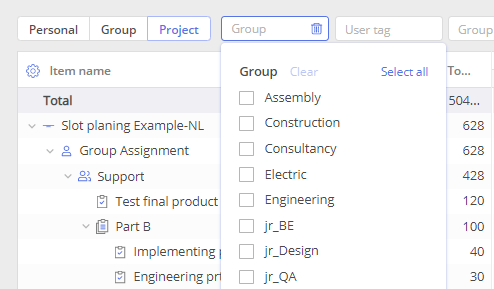
Screen #15 – Timesheet – Filtering by Group Assigmnets
You can filter items by group assignments.
- Just select a necessary group in the filter drop-down and the system will show you the tasks assigned to it and corresponding projects.
- If you select the group with no assignments, no projects will be displayed.
- If you filter items by two groups but one of them has no assignments, the system will show you only the project that has the corresponding group assignments.
- You can also select all groups and the system will display all existing projects.
- The groups in the list are ordered alphabetically.
- You can deselect all groups by clicking a ‘clear’ or ‘deselect all’ button. All projects will be hidden.
Group Tags
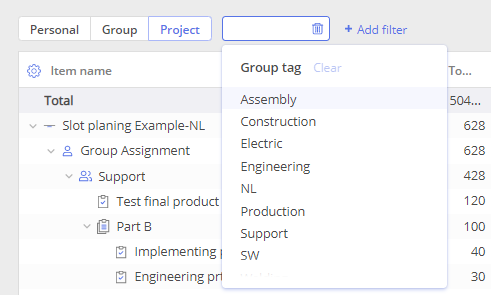
Screen #16 – Timesheet – Filtering by Group Tag
You can filter items by one or several group tags.
- If this group tag exists in several projects, the system will display all projects that have this group tag.
- If no tasks are assigned to a group and you filter items by this group’s tag, then no projects will be shown.
- If you filter items by several group tags, and one of the groups has no assignments, the system will show you only the project with the groups that have assignments.
- You can clear all group tags by clicking a ‘clear’ button. All projects with all tasks will be displayed.
- You can also filter items by group tags by applying ‘and’ and ‘or’ options.
- If there are two items with two different group tags and an item that has these both tags and you apply the ‘or’ option, you’ll see all these three items.
- And if you apply the ‘and’ option, only the item that has both tags will be displayed.
- If you enter two tags one of which doesn’t exist, and apply one of these options, the system will show you the items with the existing tag.
Task Completion
To work with the ‘task completion’ functionality in Timesheet from any tab (Personal, Group, or Project), make sure there’s at least one task assigned to the user (you) and the task has some remaining hours.
- Go to the Timesheet page and click on the ‘complete task’ icon to the right of the task. Then you’ll see an assignment completion pop-up.
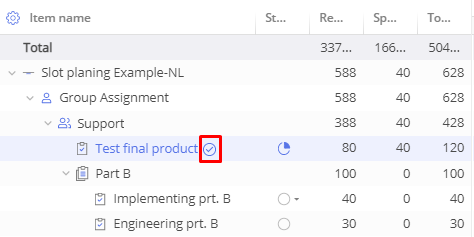
Screen #17 – Timesheet – Completing Task Button
You’ll see the user’s name in the header and the following data:
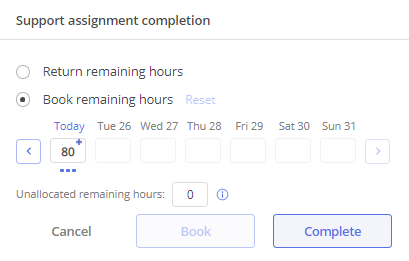
Screen #18 – Timesheet – Complete Task Menu
- ‘Return remaining hours’ option
- ‘Book remaining hours’ option
- ‘Reset’ button
- A calendar
- ‘Today’ with the remaining hours and three dots above it.
- An ‘info’ button next to the unallocated remaining hours with a tooltip “These hours will be returned if you choose ‘complete’ or remain if you select ‘book’”
- A ‘cancel’ button
- ‘Book’ button which is disabled
- ‘Complete’ button.
Returning Remaining Hours
If you’ve spent all the hours that had been allocated for a task execution and would like to complete the task, just go to the Timesheet page (any tab) and click a “complete task” button right next to the task.
Screen #19 – Timesheet – Complete Task and Return Hours
- Then you’ll see an assignment completion pop-up.
- Click on the radio button next to the ‘return remaining hours’ button.
- Then click on the ‘complete’ button.
- The task will be closed and you’ll see corresponding data about the task completion.
Returning Remaining Hours when not All Hours Are Spent
If you’ve spent not all the time allocated for the task completion, you can return it. For this end,
- click on the ‘complete task’ button to the right of the task in Timesheet.
- You’ll see an assignment completion pop-up.
- Then click on the radio button next to ‘Return remaining hours’ and click on the ‘complete’ button.
- The pop-up and the task will be closed and you’ll see an icon of a completed task with the corresponding data.
Completing a Task with Logged Time for Today
To complete the task and log the time spent on it for today, do the following actions:
- Click on the complete task icon to the right of the task in Timesheet. You’ll see an assignment completion pop-up.
- Click on the ‘book remaining hours’ radio button.
- Check a calendar slider that shows the current week. You’ll see your hours in Today input with no unallocated hours.
- Then click the ‘complete’ button.
You’ll see your tasks completed and all spent hours appeared on one of the Timesheet tabs for today.
Booking Remaining Hours
Screen #20 – Timesheet – Complete Task and Book Hours
To book the remaining hours, do the following actions:
- Click on the complete task icon to the right of the task in Timesheet. You’ll see an assignment completion pop-up.
- Click on the ‘book remaining hours’ radio button.
- Check a calendar slider that shows the current week. You’ll see your hours in Today input.
- Take some of these hours and enter them in the ‘today’ input.
- The unallocated hours go to the ‘unallocated remaining hours’ input.
- Then click the ‘book’ button.
The pop-up will be closed and you’ll see the new data on your task, where spent, remaining, and total hours will be set up there.
Booking Remaining Hours and Completing the Task
To complete the task and log the time spent on it for today, do the following actions:
- Click on the complete task icon to the right of the task in Timesheet. You’ll see an assignment completion pop-up.
- Click on the ‘book remaining hours’ radio button.
- Check a calendar slider that shows the current week. You’ll see your hours in Today input.
- Take some of these hours and enter them in the ‘today’ input.
- Then go to the ‘unallocated remaining hours’ input.
- Click the ‘complete the task’ button.
The pop-up will be closed and you’ll see the corresponding number of hours in the ‘spent’ section and in the corresponding tab of the Timesheet for today.
Distributing Hours Spent on a Task
To distribute the hours spent on the task, do the following actions:
- Click on the ‘complete task’ icon to the right of the task in Timesheet. You’ll see an assignment completion pop-up.
- Click on the ‘book remaining hours’ radio button.
- Check a calendar slider that shows the current week. You’ll see your hours in Today input.
- Click on three dots to see the pop-up with ‘till today’ and ‘start from a date’.
The hours will be distributed automatically according to the set up parameters based on the user’s availability data as well as the information about other tasks. And this task will be marked as completed.
Let’s consider some examples when a user selects ‘start from a date’. If a user has 18 hours and chooses ‘yesterday’ as a starting point, 8 hours will be logged out for yesterday, and the rest 10 hours will be logged today. And if a user selects ‘last Friday’, the calendar slider will go to the previous week automatically and start distributing the hours starting from this day.
NB: If some time has been booked for this date, you’ll see a blue ‘+’ sign.
- If a user specifies ‘start from a date’ and some time has been already spent on another task during one of the days, the system will automatically subtract these hours from the user’s standard availability.
- If all user’s available hours have been spent, the system will automatically ignore this day and distribute the hours correspondingly taking these data into account.
Output Adjustment
You can correct the previously reported output if you have corresponding permissions. For that end, navigate to the particular date either by:
- using a date picker
or
- by scrolling the top dates line or simple drugging it
As soon as the correct task is located by selecting the appropriate cell with the value you will be able to adjust it.
Every 15 seconds of a timeout after the latest activity, the system automatically refreshes the page to display relevant information.
Please note that editing can be performed only per task and is forbidden for summary items
Screen #21 – Timesheet – Editing
Please note that when you report output for the task with multiple assignments and remove the assignee’s record, you won’t be able to edit it. It’ll be discoloured.
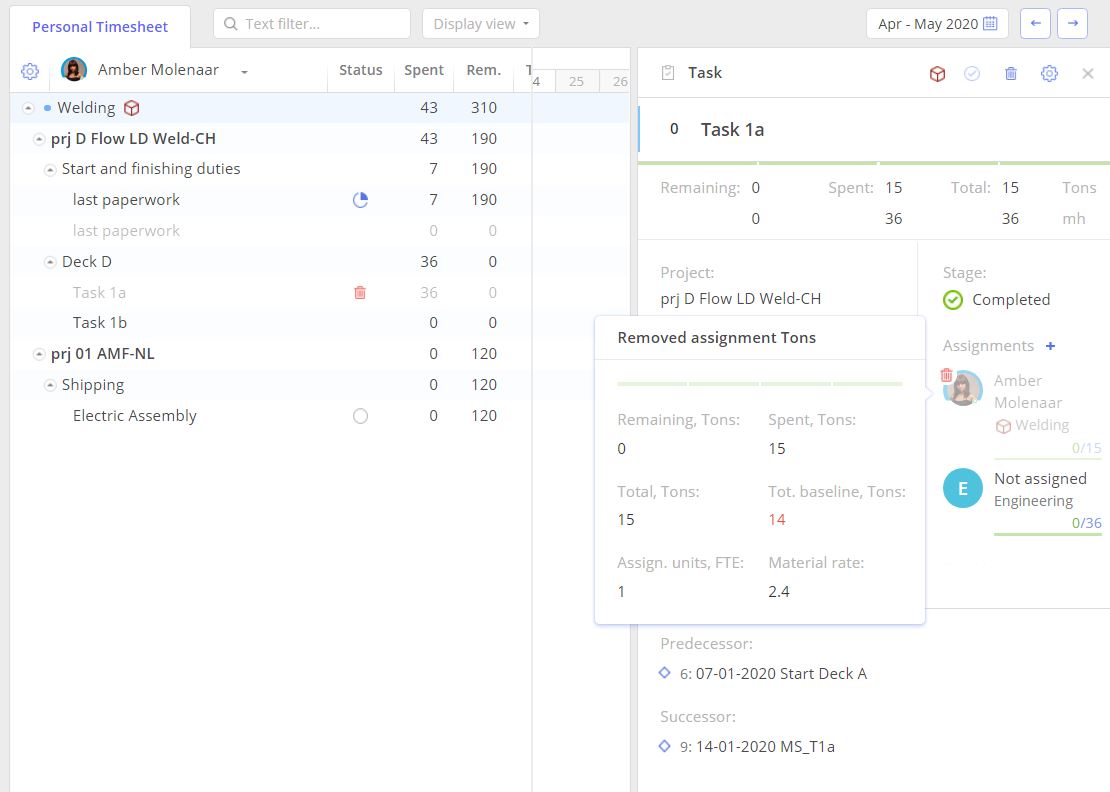
Screen #22 – Timesheet – Removed assignee
View Configuration
Columns
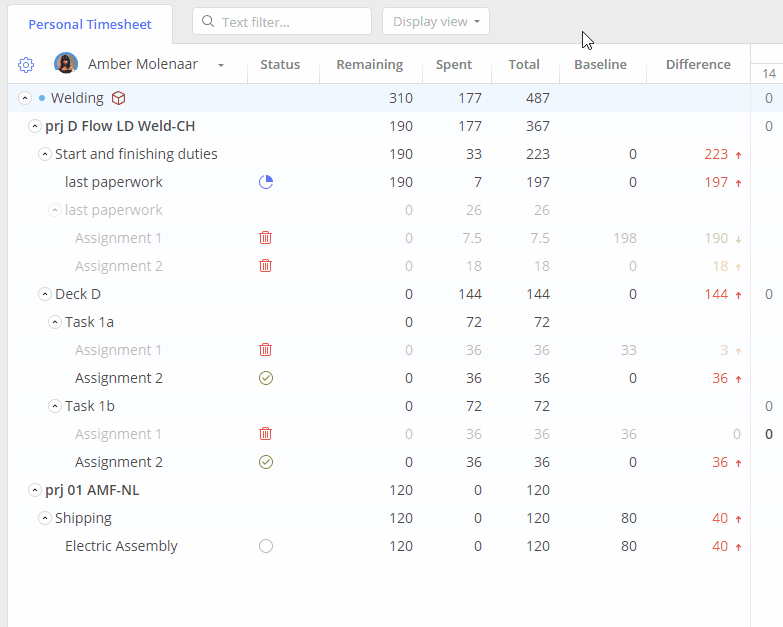
To let you stay focused on what’s important for you at the moment, the system provides an opportunity to modify columns and display particular data.
Click on the “Gear” icon and select the columns you’d like to consider. In the drop-down menu, you can change the order of columns by drag-and-drop.
Screen #23 – Timesheet – Columns configuration
Grid
For convenience, you can also have your reported hours visualized by:
- Month
- Weeks
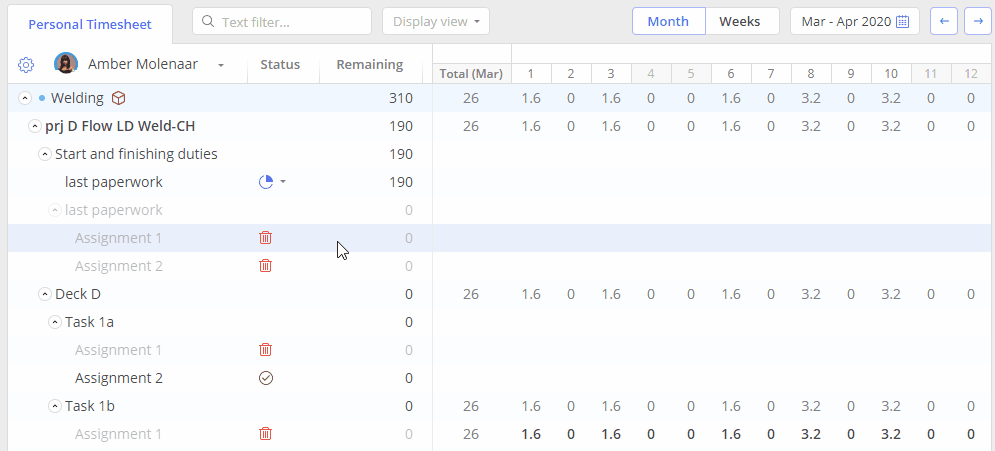
Screen #24 – Timesheet – Date Grid