Introduction
In project management, uncertainty is a constant companion, and the ability to foresee potential outcomes of different scenarios is invaluable. Enter What-if Analysis: a powerful tool that empowers project managers to explore various hypothetical scenarios within their project pipelines, without disrupting real-time operations. This innovative feature provides a lab mode where managers can experiment with adjustments to milestones, workloads, and resources, all while observing the potential impact on project progress.
What-if allows project managers to change whatever they like in the system for the sake of better decision-making process and analysis without impacting real time progress directly.
Screen #1– What-if-analysis (main functions)
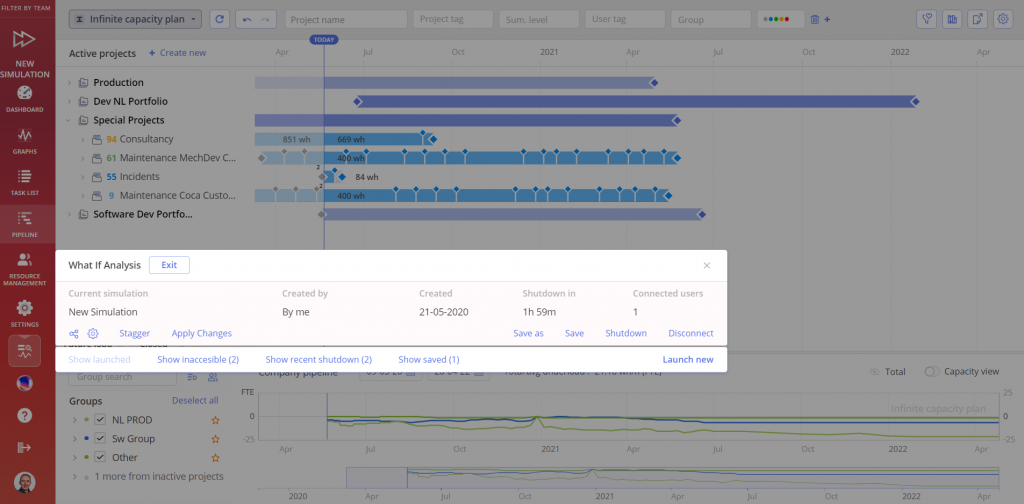
What-If Analysis Simulation Panel
By using the What-If Analysis Simulation Panel, you can create or connect to the desired simulation. You can also access different types of information regarding simulations, such as the simulation name, who created it, how many people are connected to the simulation, when it was created, and when the shutdown will take place. Additionally, you have the possibility to copy the link of the simulation to share it with others and edit the settings of the simulations, view saved and inaccessible simulations, view recent shutdowns and delete simulations.

Screen #2– What-If Panel
Enter What-If Analysis
What-if Analysis is located at the bottom of the menu.
Existing Simulation
- Click on What-If Analysis Icon to access the What-If Panel.
- Click on the connect button next to the Simulation.
Launch New Simulation
- Click on the What-If Analysis button to access the What-If Menu.
- Click on Launch New.
- Enter the Name of the Simulation (Required).
- (Optional) Add users who will have access to the Simulation and specify their permissions:
- Viewer (can connect, view, and make a copy if the simulation).
- Editor (in additional to the above, can make changes).
- Owner (can edit permissions, save and delete the simulation).
- Enable the setting that allows anyone with a link to be added as a Viewer (Optional).
- Click The Lunch Button.
Screen #3– Launch New Simulation and Enter What-If Analysis
Simulation Settings
- Click the What-If icon to access its panel.
- Click the Gear icon next to the simulation to access its settings, such as simulation name, users access, and simulation availability with link usage.

Screen #4– What-If Simulation Settings
Screen #5– What-If Simulation Editing Settings
Delete Simulation
- Click the What-If icon to access its panel.
- Click Show Saved
- Click on Trash icon to delete the Simulation.
Screen #6– Delete Saved Simulation
Main functions
Project Staggering
Project Staggering is a portfolio management strategy integrated in Epicflow’s What-if Analysis that ensures projects are scheduled and sequenced in alignment with the availability of constrained resources while maximizing business value. Instead of initiating multiple projects simultaneously, organizations prioritize and phase their execution to prevent bottlenecks, optimize resource utilization, and improve overall efficiency.
The process begins with assigning a business value to each project, ensuring that high-impact initiatives receive priority. Next, projects are staggered based on the most constraining resource groups, which are identified using Bottleneck Analysis. In Epicflow, this feature ranks resource groups based on their load, allowing managers to pinpoint the most overloaded areas, such as software development teams, mechanical engineering teams, testing departments, or production units. Once identified, one or multiple bottlenecks/constraints can be selected as the basis for staggering projects. This ensures that workload distribution is optimized, preventing overallocation and delays.
By carefully balancing workload distribution, Project Staggering enhances on-time delivery, reduces multitasking inefficiencies, and improves portfolio performance in complex multi-project environments.
Why Use Project Staggering?
Project Staggering is essential for optimizing resource utilization, minimizing delays, and improving overall project efficiency in a multi-project environment. Here’s why organizations use this approach:
- Maximizes Resource Efficiency – Ensures that critical resource groups (e.g., software teams, engineering teams, testing departments) are allocated optimally to prevent overloading and idle time.
- Eliminates Bottlenecks – Uses Bottleneck Analysis to identify and manage constrained resource groups, preventing delays and congestion.
- Improves On-Time Delivery – Balances workloads and reduces multitasking inefficiencies to keep projects on schedule.
- Optimizes Portfolio Performance – Aligns project execution with business priorities, ensuring that resources are allocated to maximize strategic impact and overall portfolio output.
- Ensures Continuous Workflow – Maintains a steady project pipeline, reducing downtime and improving overall execution.
By staggering projects intelligently, organizations can increase efficiency, mitigate risks, and drive maximum business value.
Stagger Projects
- Navigate to What-If Mode
- Click What-If Analysis Icon to access What-If Menu
- Define Project scope for staggering.
- Select an appropriate Group/Team
- Define Threshold value
- Click Run Button
Screen #7– Stagger Projects
Staggering Single project Based on Future Load
Recommendations
- Identify the Bottleneck Resource: You need to identify which resource is the limiting factor for your projects. Once identified, you can stagger tasks based on its availability.
- Set Staggering Based on Future Load: Use the staggering feature to schedule projects based on anticipated future loads. This helps to spread out the work in a way that avoids overwhelming the resource at any given time.
- Adjust Timing: If a project threatens to overload the bottleneck resource, you can shift it to a later time, thus alleviating pressure on the resource. The system helps you visualize the potential impact of such changes.
- Monitor and Adjust: You can adjust your staggering by selecting projects and determining whether moving them to a later quarter or period will reduce the overall load on your resources.
- Minimal Group Selection: When selecting groups for staggering, it’s advised to use as few groups as necessary to ensure the most efficient scheduling without overcomplicating the process.
How to Use
- Navigate to the What-If Mode.
- Go to the Pipeline Page.
- Make the Future Load visible.
- Select the group(s) you want to stagger based on.
- Click the three dots next to the project.
- Select the “Stagger Based on Future Load” option.
- Set your desired threshold.
- Click the ‘Run’ button.
Screen #8– Stagger Single Project based on the Future Load
By using staggering based on future load, you ensure that your project timelines remain realistic and feasible, optimizing the use of available resources.
Save the Simulation
To streamline the process of testing various project scenarios and implementing Epicflow introduces a feature that allows users to save and replay their What-If sessions.
This allows you to retain valuable data when navigating away from the What-if mode, With this functionality, users can save up to four scenarios, preserving their findings for future reference.
- Navigate to What-If Mode
- Create desirable changes in What-If Mode.
- Click the What-If icon to access What-If Panel.
- Click Save Button.
Screen #9– Save Simulation
Edit Content of the Simulation
- Click the What-If Icon to access its Panel.
- Click the Connect Button next to the appropriate simulation.
- Click Connect Button.
- Make the desired changes
- Save the simulation.
Apply Changes and Close What-If Analysis
This option enables you to apply specific changes from the What-If Analysis to the live environment.
✔️ What You Can / ❌ Cannot Apply
| Change type | Can be applied to live? |
| Create a new project in What-If | ❌ No – must be created in live |
| Task changes (effort, assignments, details) | ❌ No |
| Milestone changes (dates, grouping, moving) | ✔️ Yes |
| Project dates (start, end, phases) | ✔️ Yes |
| Resource pool updates (add groups/resources) | ✔️ Yes |
| User/group card modifications | ✔️ Yes |
Permanent Nature of Changes
Any applied changes are permanent and cannot be undone. Only the selected items will be transferred; all other changes in the What-If project remain in the simulation.
How to Apply Changes
1. Make the desired changes (e.g., milestone date updates).
2. Click the What-If icon to open the panel.
3. Use the checkbox list to review and select the changes you want to apply.
4. (Optional) Use the full-text search if the list is extensive.
5. Click Apply to confirm your selection.
Screen #10– Apply changes from the Simulation to real environment,
Close What If Analysis
After you conducted the analysis, you can exit What-If session and you’ll see the system in its initial state.
- Click the What-If Icon to access its menu.
- Click the Exit Button or Disconnet Button to close What-If Analysis.
Screen #11– Close What-If Mode
Conclusion
What-if analysis is a unique instrument that lets us play different versions and schemes of multi-project management routine if there are problems you’d like to solve, but they take a little bit of experimenting before you actually take any steps further.