
An attribute is a feature of a project, its item, or resource that distinguishes it from others. Attributes serve to provide additional information about tasks, resources, or projects, and their high versatility and flexibility enable their use for categorizing, filtering, and sorting data, thus facilitating easier management and analysis.
The main difference between a tag and an attribute is that a tag is a way of representing an element or content while an attribute is a way of providing additional characteristics or properties to that specific element.
Tags should be used to provide basic information about the content of an element like titles, dates etc.
Attributes should be used to provide additional characteristics or properties for the elements.
Attributes Behaviour
Some attributes affect system behaviour (for example, attributes for task completion, leveling or auto-depletion), while others are informational only.
Details on how specific attributes influence system behaviour are described in the corresponding feature articles. Standard attributes not mentioned in those articles are used for categorization, filtering, and analysis only, such as:
-
-
Name
-
Manager
-
Tag
-
Summary Level
-
Custom vs. System Attribute Types
Attribute Types are organized into two groups on the Attributes management page:
- Custom — Attribute types created by your organization’s administrators (users with the “manage attributes” / “attribute administration” permissions — see Attributes Management below). These are fully under your control and can be created, renamed, or deleted as your categorization needs evolve — with one exception: see “Attribute Types cannot be deleted” below.
- System — Attribute types that come built into Epicflow and are tied to specific product features (e.g., Budget). Unlike custom types, system attribute types are predefined by Epicflow and cannot be deleted, since they support underlying feature behavior rather than being purely for categorization (as noted above, some attributes affect system behavior rather than being informational only).
Attribute Kinds
When creating a new Attribute Type, you’ll choose its Kind:
- List — a simple set of values to choose from. This is the most common Kind, used for straightforward categorization.
- Hierarchy — values can be organized in parent-child levels (for example, Continent → Country → City). See “Building nested (Hierarchy) attributes” below for how to structure these.
- User — automatically shows your organization’s current list of users/resources as the available options, rather than using manually created values. See “How User Kind attributes work” below.
Attributes Management
To add or delete a list of attributes in your system, you need to have the ‘System Maintenance’ permission. Please contact your administrator to obtain this permission. Once granted, refer to this article for more information on how to upload attributes to your system.
After the attributes have been uploaded to the system, the PO (Product Owner) or Administrator must grant the user special rights directly in the settings by choosing global permissions and checking the “manage attributes” and “attribute administration” options. Once this is done, users with these rights can manage the attributes by adding or deleting them directly in projects, their items, and resources.
Adding attributes
Attributes can be added to a project, its items: task, summary, milestone and resource: user, group.
When creating an attribute type, you’ll also choose its Scope — which areas of the system it can be used in. Scope options include:
- Users
- Groups
- Tasks, Milestones and Summaries
- Projects
- Project groups
- Teams
An attribute type isn’t limited to a single kind of element — the same type can be made available across multiple areas depending on how its scope is configured.
Adding attributes to a project:
- Go to pipeline
- Open project card
- Click on add attribute and choose attribute from the list then save
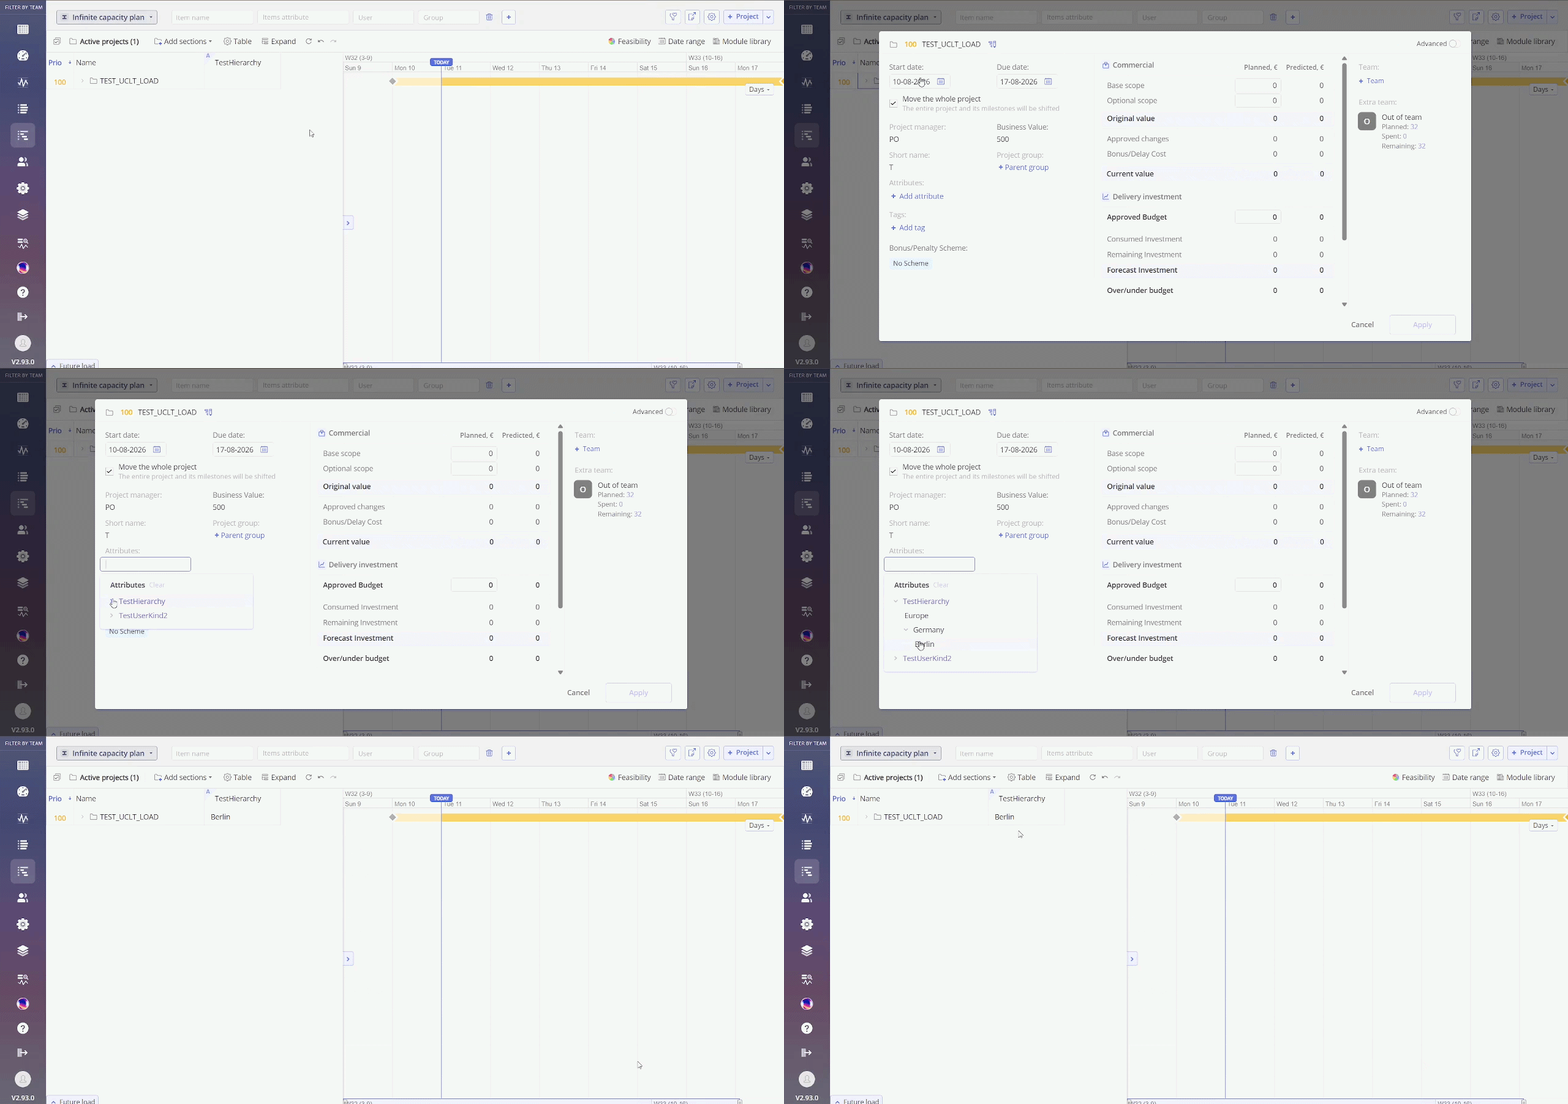
Screen #1 – Add Project Attribute
Adding attributes to items (task, summary, milestone):
- Open item card (task, summary, milestone)
- Click on add attribute and choose attribute from the list then save
Adding attributes to resources (user, group):
- Open resource management page
- Open card of specific user or group
- Click on add attribute and choose attribute from the list then save
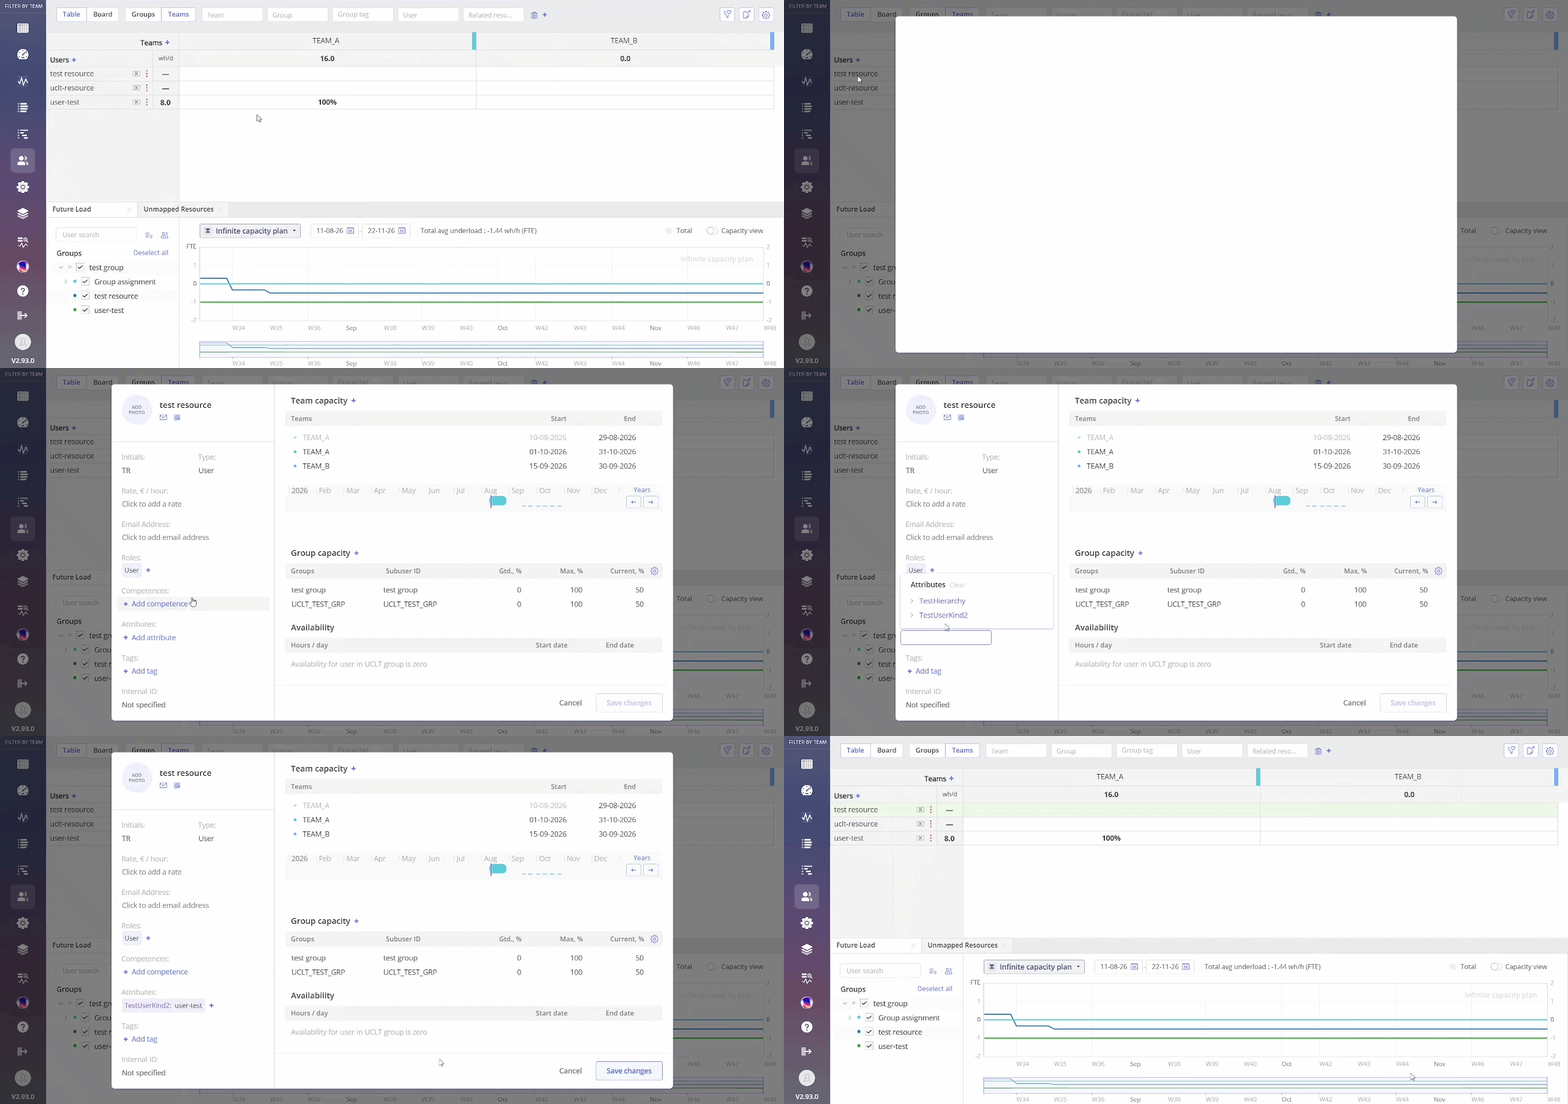
Screen #2 – Add User Card Attribute
Support for emoji code, which can be used as an integral part of any text in the system, including as text for Attributes.
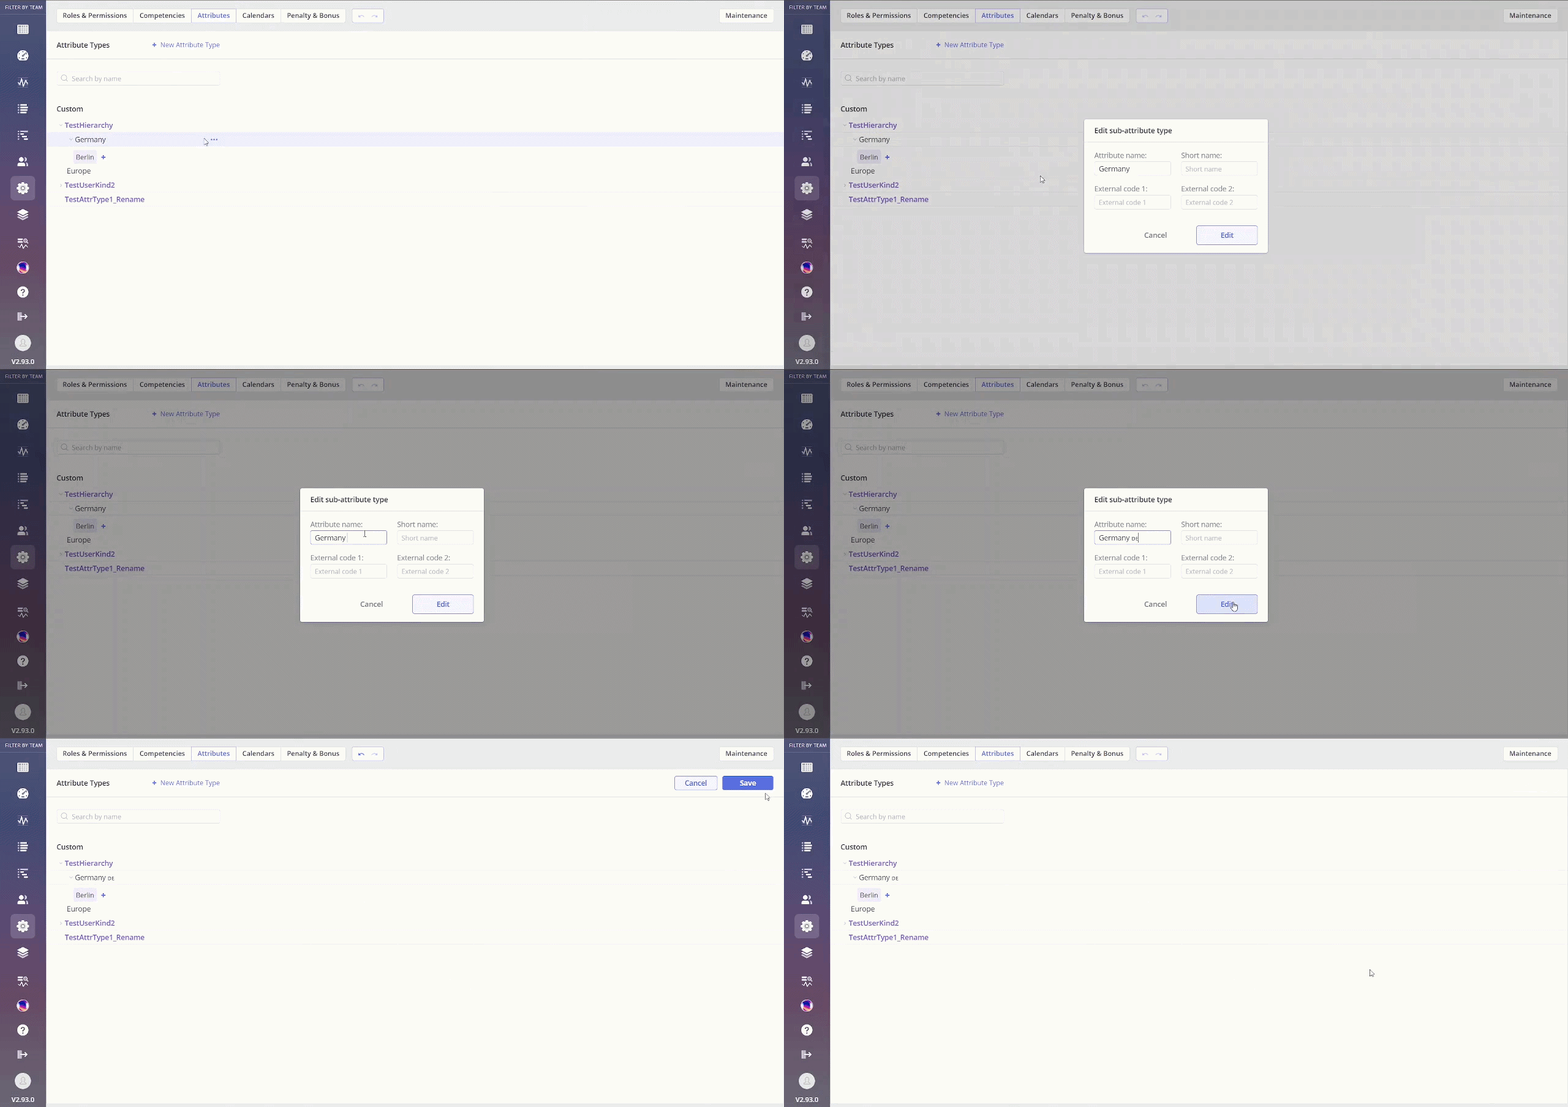
Screen #3 – Support for emoji code
Tip: Attribute fields not showing on a card?
The “Attributes” and “Inherited attributes” fields are hidden by default on task, summary, and milestone cards. If you’ve added attributes but don’t see them on the card, enable the fields via the card’s field customization option (the gear icon on the card), then check the box for “Attributes” (and “Inherited attributes,” if relevant) in the field list. Once enabled, this preference is saved for future viewing.
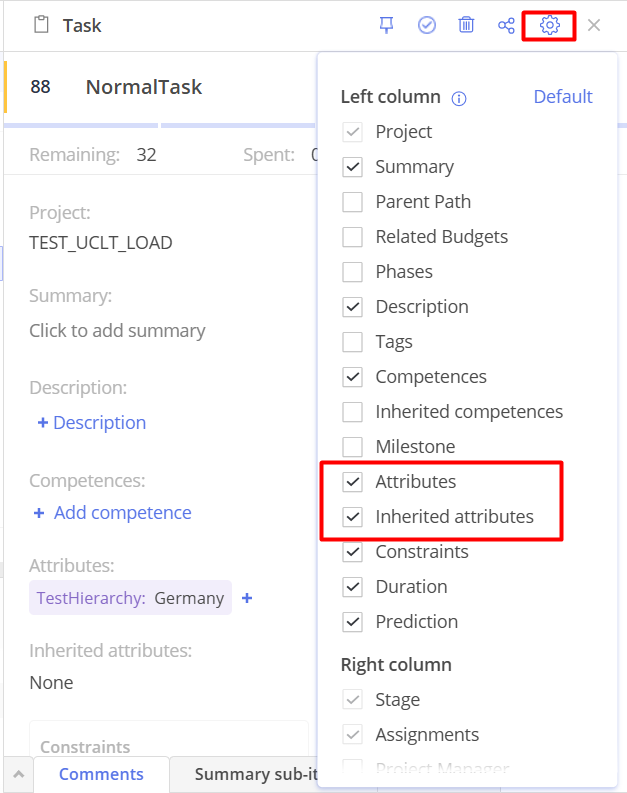
Screen #4 – Enabling attribute fields
External Codes
When adding a value to an attribute type, you can optionally specify External Code 1 and External Code 2. These are used to map the attribute value to a corresponding identifier in an external system, which is helpful if your organization integrates Epicflow with other tools and needs attribute values to stay in sync across systems.
How User Kind attributes work
Unlike List or Hierarchy attributes, a User-kind attribute doesn’t use manually created values. Instead, it automatically shows your organization’s current list of users/resources as the available options. You don’t add or manage values for this Kind — the list stays in sync with your resource pool automatically.
Building nested (Hierarchy) attributes
For Hierarchy-kind attributes, values can be organized in parent-child levels. To add a nested value under an existing one, use that value’s own menu and choose “Add sub-attribute type” — this creates a proper child underneath it.
Be careful: the “+” button that appears at the end of the value list adds a new top-level value, not a nested one. Use the value’s own menu when you want to build out a hierarchy.
Both top-level and nested (parent-level) values can be assigned to tasks, projects, or resources — you’re not restricted to only the deepest level in the hierarchy.
Inherited attributes
All sub-elements of a given element inherit the attributes of their parent element. For example, if ‘Summary’ contains specific attributes, when you create a task within that ‘Summary’, the task will automatically inherit the attributes from the ‘Summary’. In the task card, it will be displayed as ‘Inherited Attributes.’ On the task list, it will be shown in the ‘Task Attributes’ column. You can remove and restore the inherited attributes later if you wish.
Deleting attributes
You can delete attributes from a project, its items and resources.
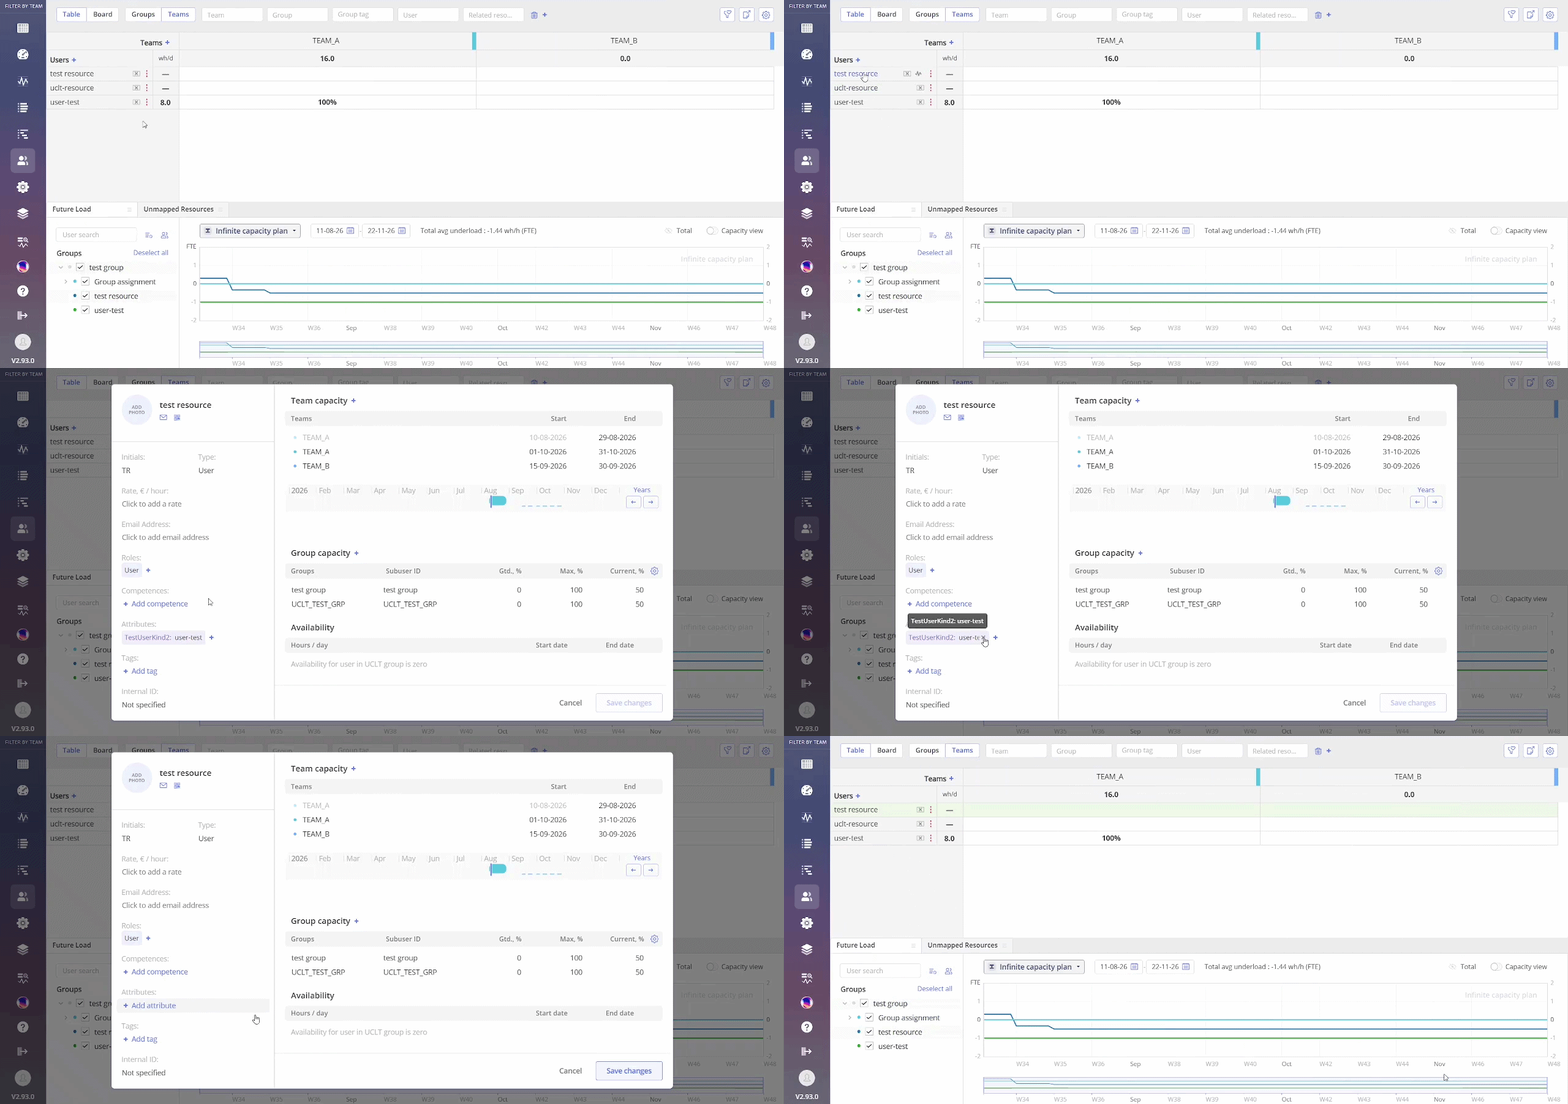
Screen #5 – Delete User Card Attribute
Filtering attributes
It’s possible to filter by attribute. In pipeline view, attribute filters aren’t shown by default — to reveal them, click the “+” next to the Item name / User / Group filter boxes at the top of the Pipeline. This opens a full filter picker with an “Attribute” option under each category:
- Project Group → Attribute
- Projects → Attribute
- Items (tasks/milestones/summaries) → Attribute
- Resources → User attribute / Group attribute
Selecting one adds a new filter field to the toolbar. Picking a value — including a nested Hierarchy value — filters your list to only the items that have that attribute assigned.
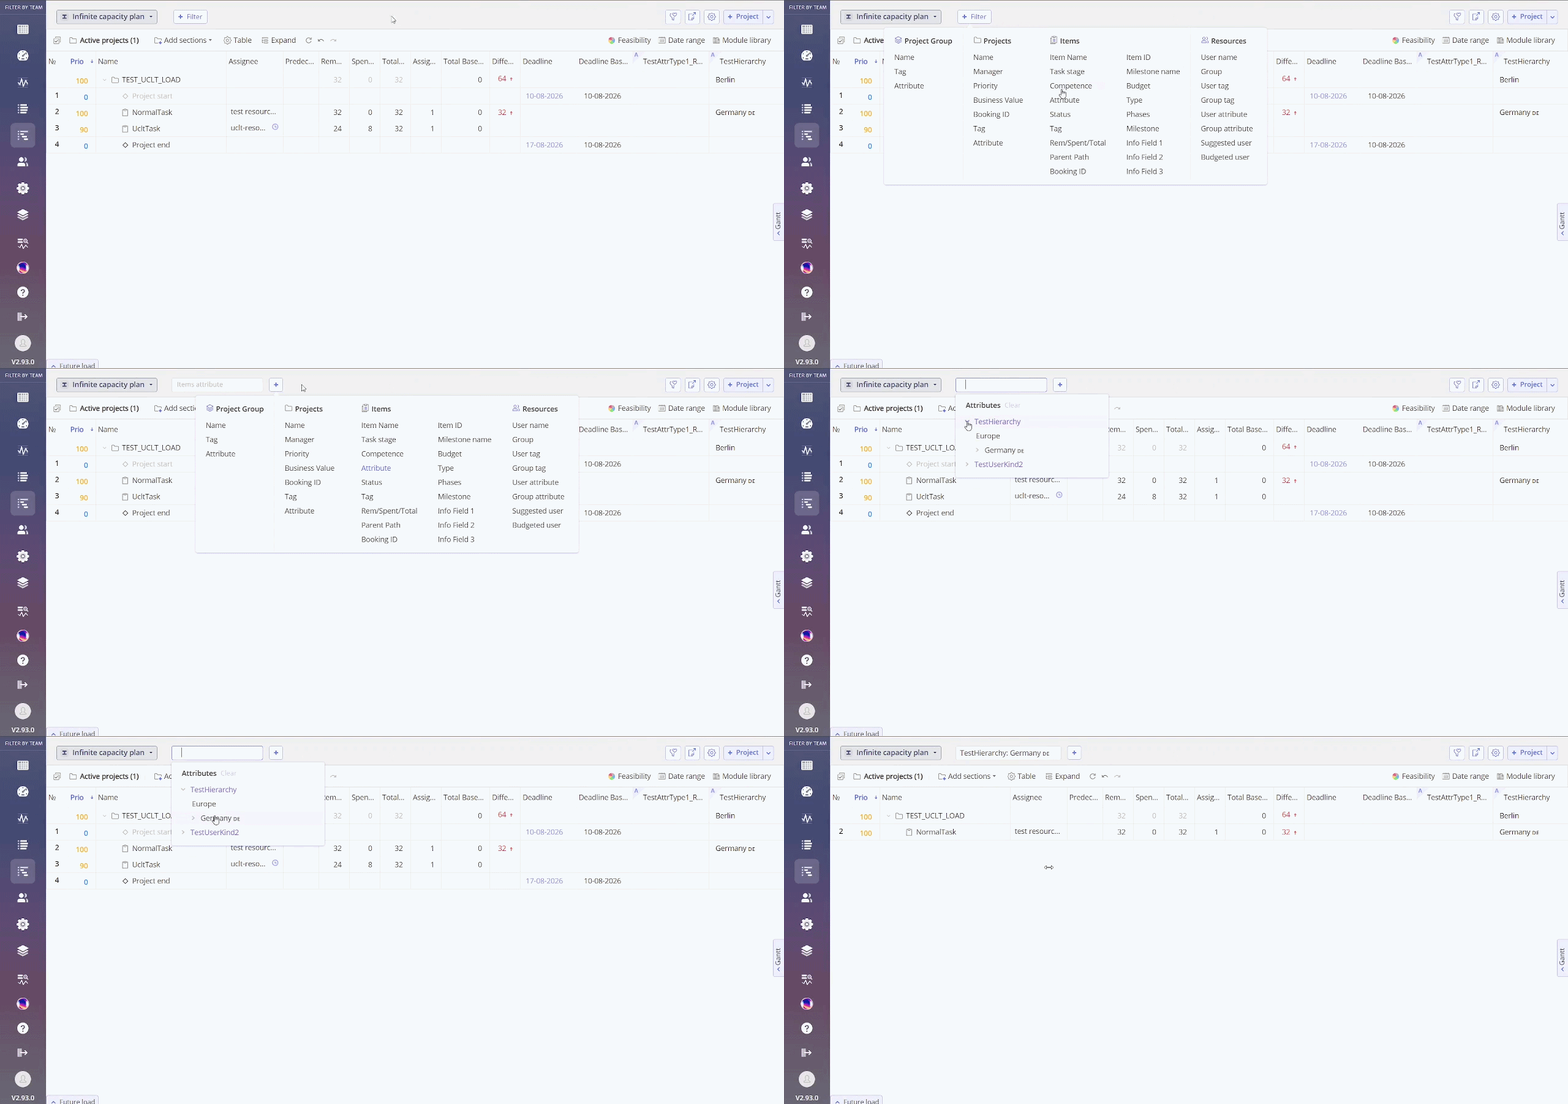
Screen #6 – Filtering attributes