What Is a Phase In a Project?
In project management, a phase refers to a distinct stage or step in the project lifecycle where specific activities are carried out to achieve predefined objectives. Each phase typically represents a significant milestone in the project’s progression and is characterized by a unique set of tasks, deliverables, and objectives.
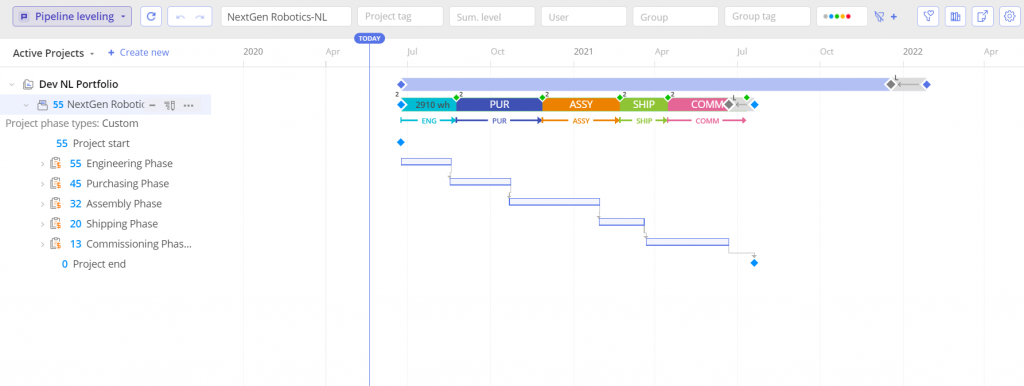
Screen #1 – Phases
The Most Popular Approaches to Project Phase Management
- Agile/Scrum Sprints and Releases
- Prince2 Phases
- Stage Gates
Agile/Scrum Sprints and Releases
Agile/Scrum methodology breaks projects into short, iterative cycles called sprints, typically lasting 1-4 weeks, where teams deliver incremental portions of work. Releases occur at the end of sprints, providing stakeholders with usable product increments.
Prince2 Phases
Prince2 divides projects into manageable stages, each with defined objectives, roles, and deliverables. These stages, such as initiation, planning, execution, and closure, ensure structured project management from start to finish.
Stage Gates
Stage gates are key decision points in project management, marking the transition between project phases. At each gate, project progress is assessed against predetermined criteria, enabling stakeholders to approve or reject the project moving forward.
What is the purpose of using phases?
The purpose of using phases in a project is to facilitate structured planning, execution, and control of the project activities. Using phases in a project can improve project management efficiency, enhance communication, and increase the likelihood of successful project completion within the defined constraints of time, cost, and quality.
When should phases be used, and when should they be skipped?
Determining whether to use phases in a project or not depends on several factors, including the project’s complexity, size, duration, and specific requirements. Here are some considerations to help you decide when to use phases and when to skip them:
Use Phases When:
- Complexity: For large, complex projects involving multiple teams, stakeholders, and dependencies, breaking the project into phases can provide clarity and structure.
- Clear Project Lifecycle: Projects with well-defined stages or natural breakpoints in their lifecycle benefit from a phased approach.
- Resource Allocation: When resources need to be allocated and managed efficiently across different project activities, using phases allows for better resource planning and utilization.
- Risk Management: Phased approaches enable early identification and mitigation of risks by addressing them in specific phases before they escalate and impact the entire project.
- Regulatory or Compliance Requirements: Projects subject to regulatory or compliance standards may benefit from a phased approach to ensure that each phase meets the necessary requirements.
Skip Phases When:
- Simple Projects: For small, straightforward projects with limited scope and few dependencies, a phased approach may introduce unnecessary complexity. It may be more efficient to manage such projects without distinct phases.
- Urgency: In urgent or time-sensitive projects where speed is paramount, adding phases could slow down progress. In such cases, a more streamlined, iterative approach may be more appropriate.
- Flexible Requirements: Projects with evolving or uncertain requirements may not lend themselves well to a phased approach. Agile or iterative methodologies may be more suitable for adapting to changing needs without rigid phase boundaries.
- Limited Resources: If resources are scarce or constrained, adding additional phases may strain resource availability further. Simplifying the project structure by skipping phases can help in optimizing resource utilization.
- Preferences: Sometimes, you may prefer a more flexible, adaptive approach without distinct phases.
Ultimately, the decision to use phases in a project or skip them depends on a careful evaluation of the project’s characteristics, objectives, constraints, and preferences.
Phase types in Epicflow
We distinguish three specific phase types
- Sprint Phase: A Sprint is a time-boxed iteration in Agile project management methodologies, such as Scrum. During a Sprint, a cross-functional team works collaboratively to complete a set of pre-defined tasks or user stories. Sprints typically have fixed durations, commonly ranging from one to four weeks. The goal of each Sprint is to deliver a potentially shippable increment of the product, adding value to the project.
- Release Phase: The Release phase marks the culmination of a series of Sprints or development iterations. It involves packaging, testing, and deploying the completed features or product increments to end-users or customers. A Release often corresponds to a significant milestone in the project, representing the delivery of a set of features or functionalities that provide value to customers.
- Customized Phase: A Customized Phase in project management allows the customer or project manager to tailor a specific phase according to their unique requirements. In addition to defining the phase type and specifying the date range, users have the option to choose a color for visual distinction. This color customization feature enhances clarity and organization within project management software by allowing users to visually differentiate between various phases based on their preferences.
Create Phase
In Epicflow, phases can be applied either at the project level (single project phases) or at the project group level (global phases).
- A single project phase is specific to an individual project, designed to reflect the unique needs and timelines of that project.
- A global phase, on the other hand, is created at the project group level and can be applied across multiple projects within the group, helping to maintain consistency and efficiency across various projects.
Single Project Phase
- Navigate to the pipeline page
- Click on the three dots next to the project name
- Click “Create Phase”
- Choose the Phase Type – Sprint, Release, or Custom
- Specify the date range
- Optionally, type in a short name (not required)
- If you’ve chosen a customized phase, select a color (not required)
- Click “Create”
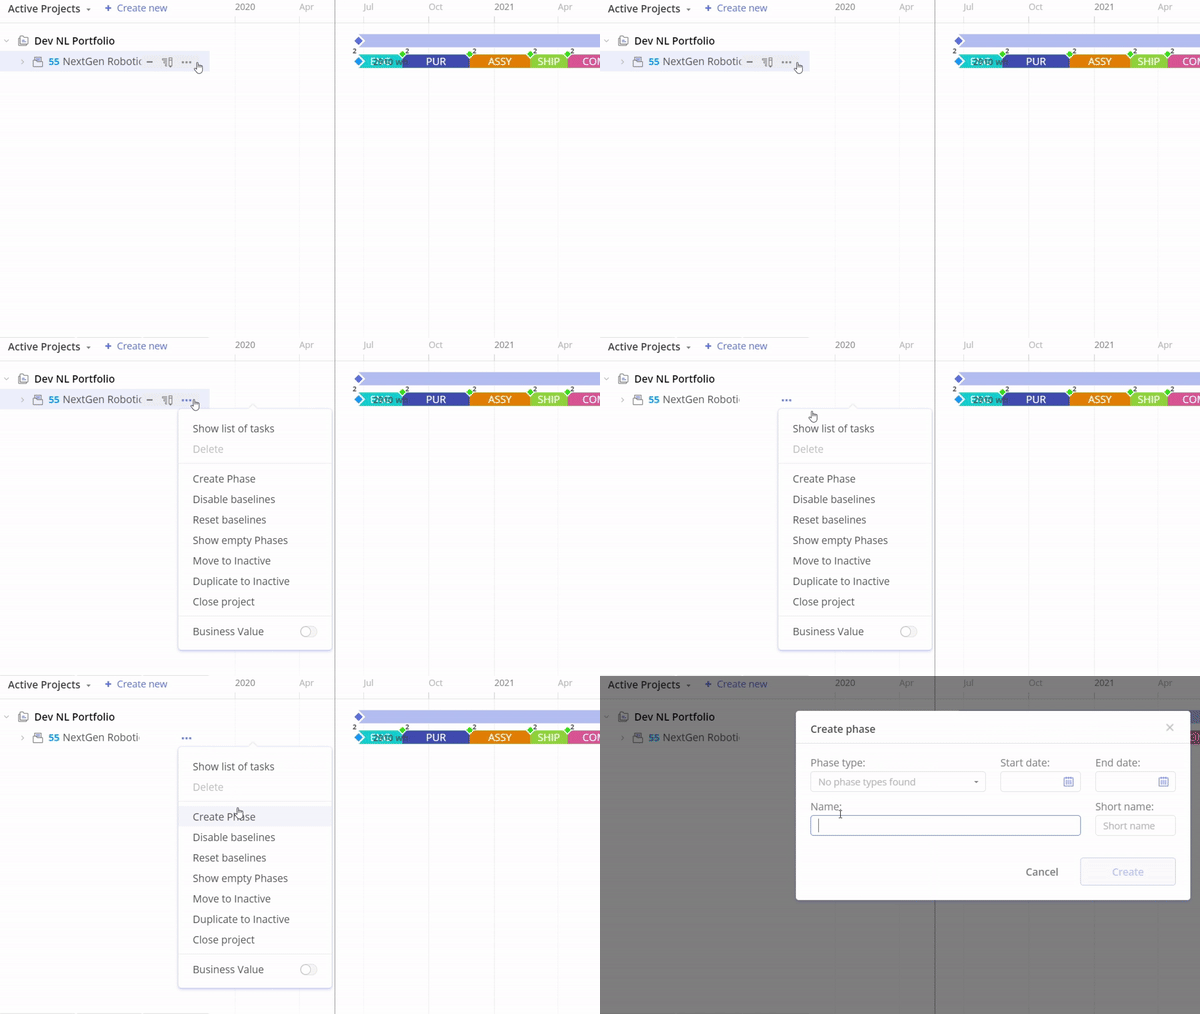
Screen #2 – Create Single Project Phase
Global Phase
- Navigate to the pipeline page
- Click on the three dots next to the Project Group Name
- Click “Create Phase”
- Choose the Phase Type – Sprint, Release, or Custom
- Specify the date range
- Optionally, type in a short name (not required)
- If you’ve chosen a customized phase, select a color (not required)
- Click “Create”
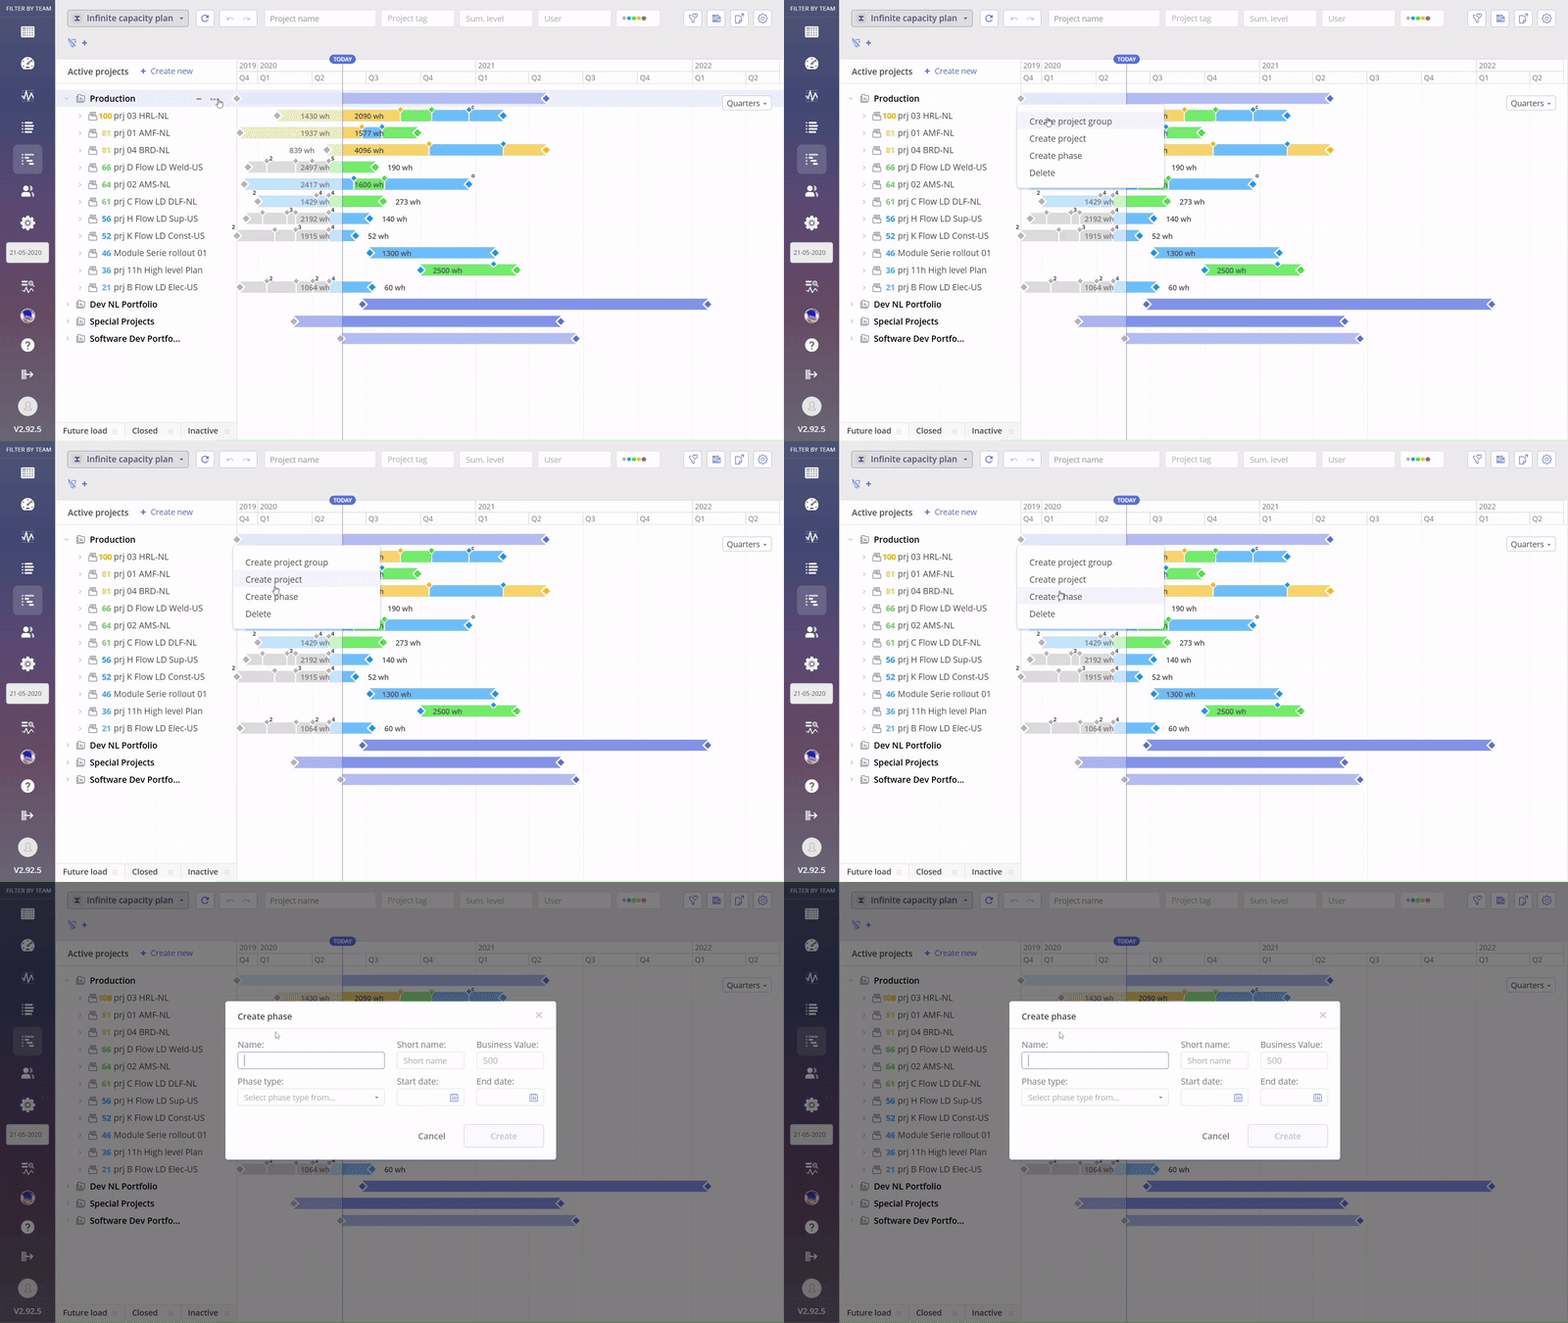
#Screen #3 – Create Global Phase

Screen #4 – Adjust a Phase
View Phase in a Project
You have three options to view phases in your project. By default, empty phases (those with no items) are hidden; to display them, enable the ‘Show Empty Phases’ option directly within the project. Another option is to view arrows representing phases by expanding the project to show its items. Additionally, you can set up a customizable phases view in the settings, which marks phases directly on the pipeline. All options can be used simultaneously.
Show Empty Phases
- Navigate to the Pipeline page.
- Click on three dots next to the Project Name.
- Enable the ‘Show Empty Phases’ option.
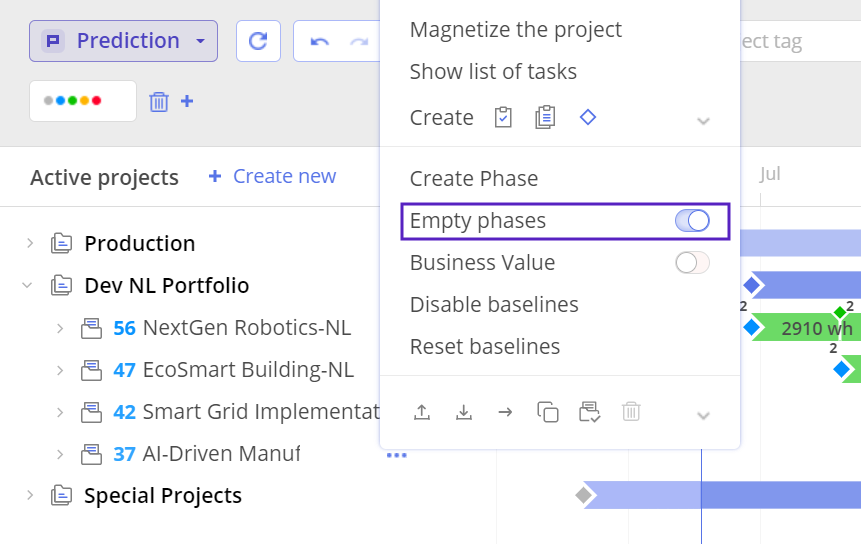
Screen #5 – Show Empty Phases
Arrows representing phases under the pipeline
- Navigate to the pipeline page
- Expand a project summary
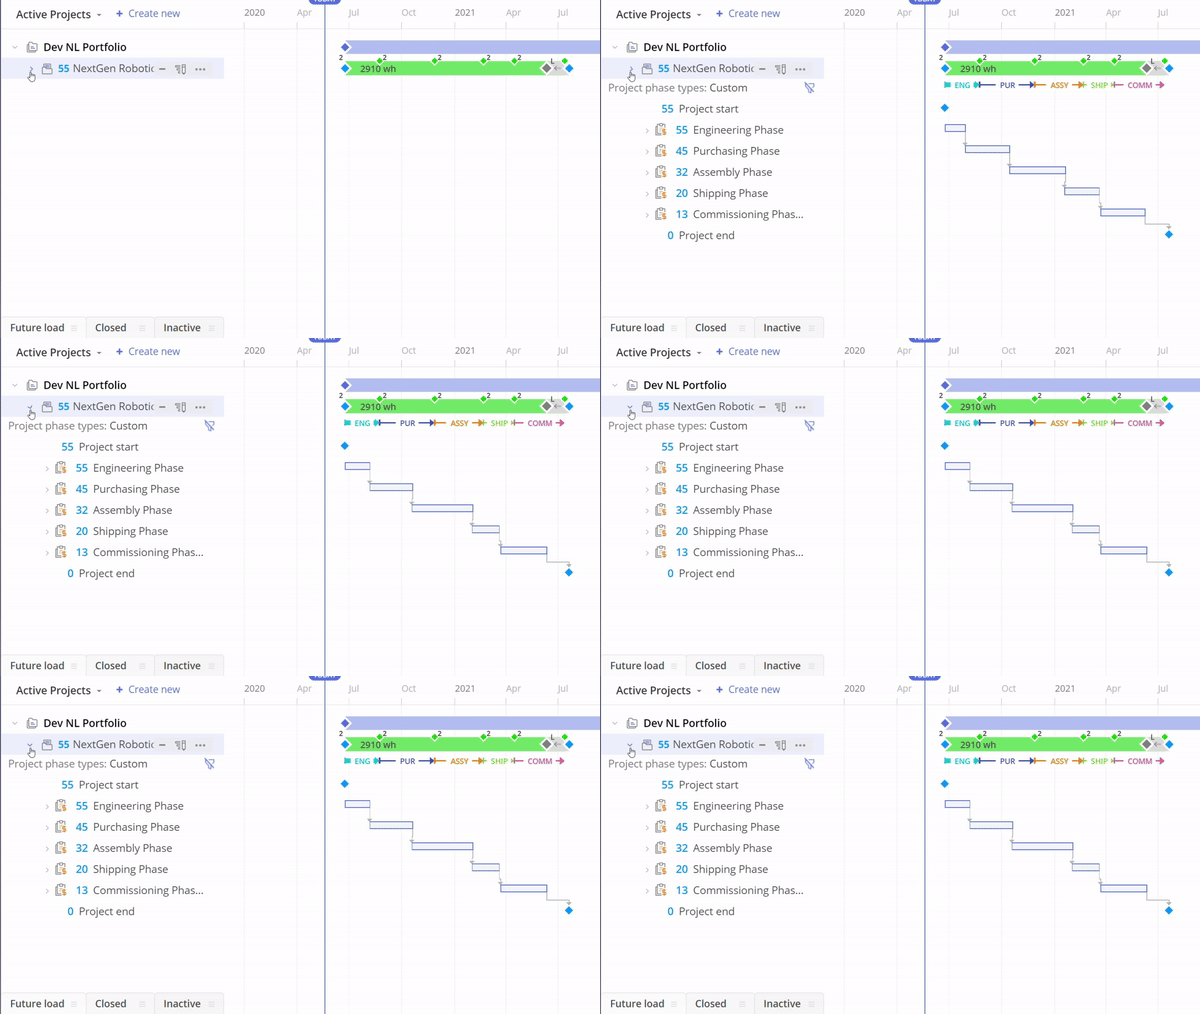
Screen #6 – Arrows representing phases under the pipeline view
Customizable phases view
- Navigate to pipeline page
- Open settings
- Mark the customizable phases field
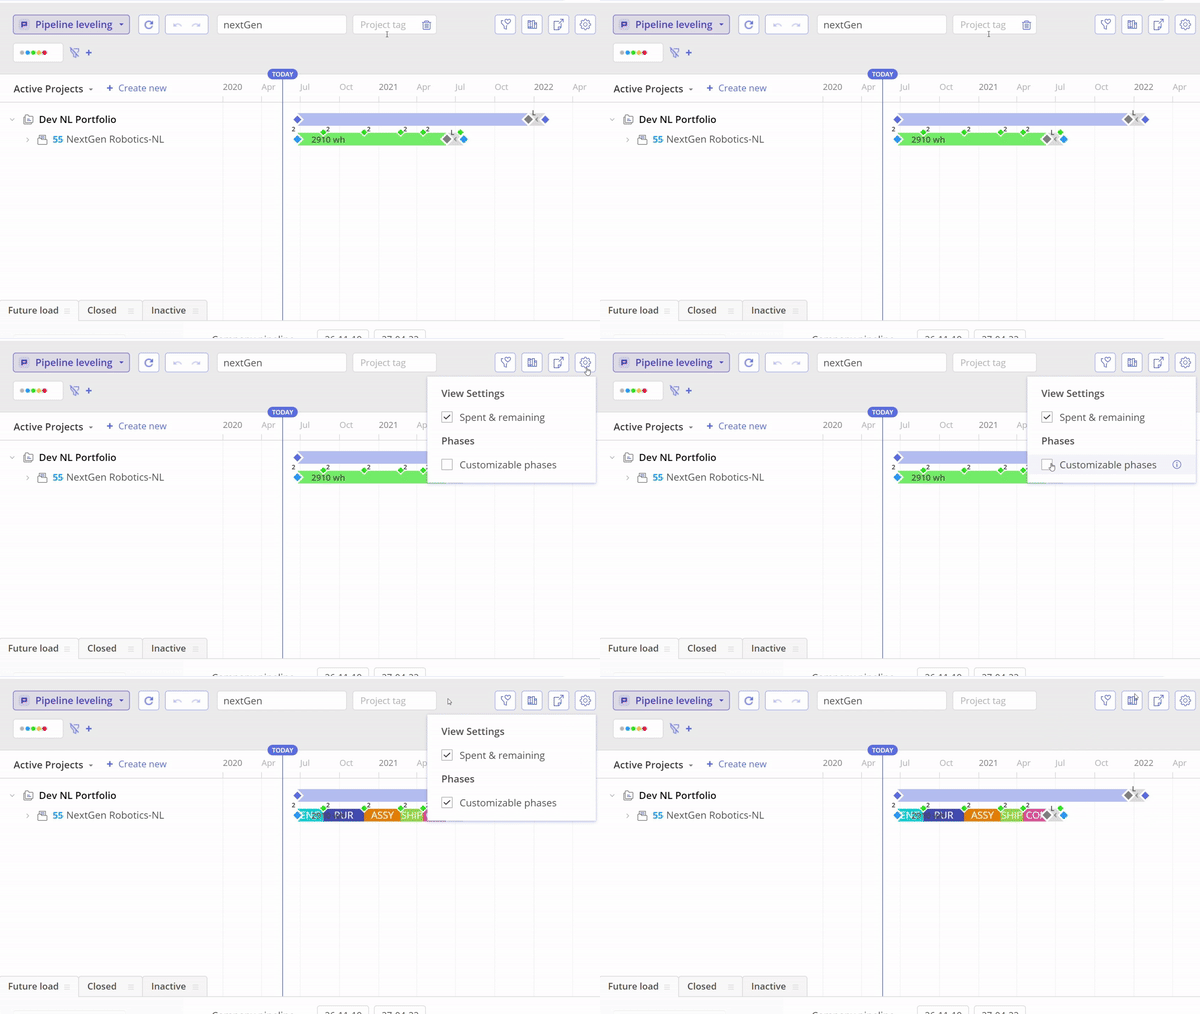
Screen #7 – Customizable phases view
Filter by Phase on The Pipeline Page
Apply filter
- Navigate to the Pipeline page
- Make phases visible, you need to see arrows representing phases under the pipeline
- Click on Phase Arrow to Apply its Filter.
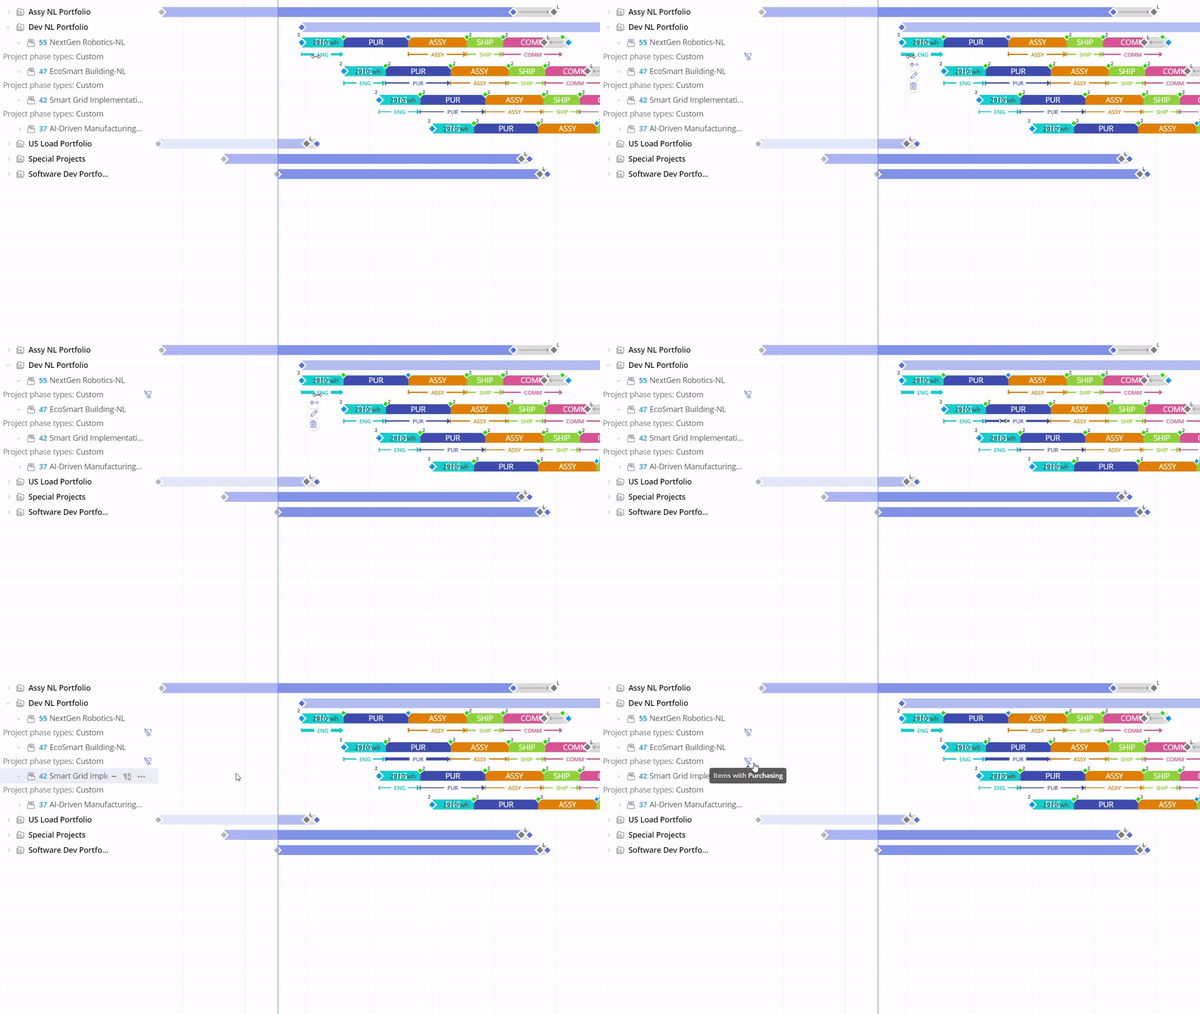
Screen #8 – Apply phase filter Pipeline View
Clear Filter
- Click on the clear filter icon that appears next to the Project Phases Types right under Project Name.
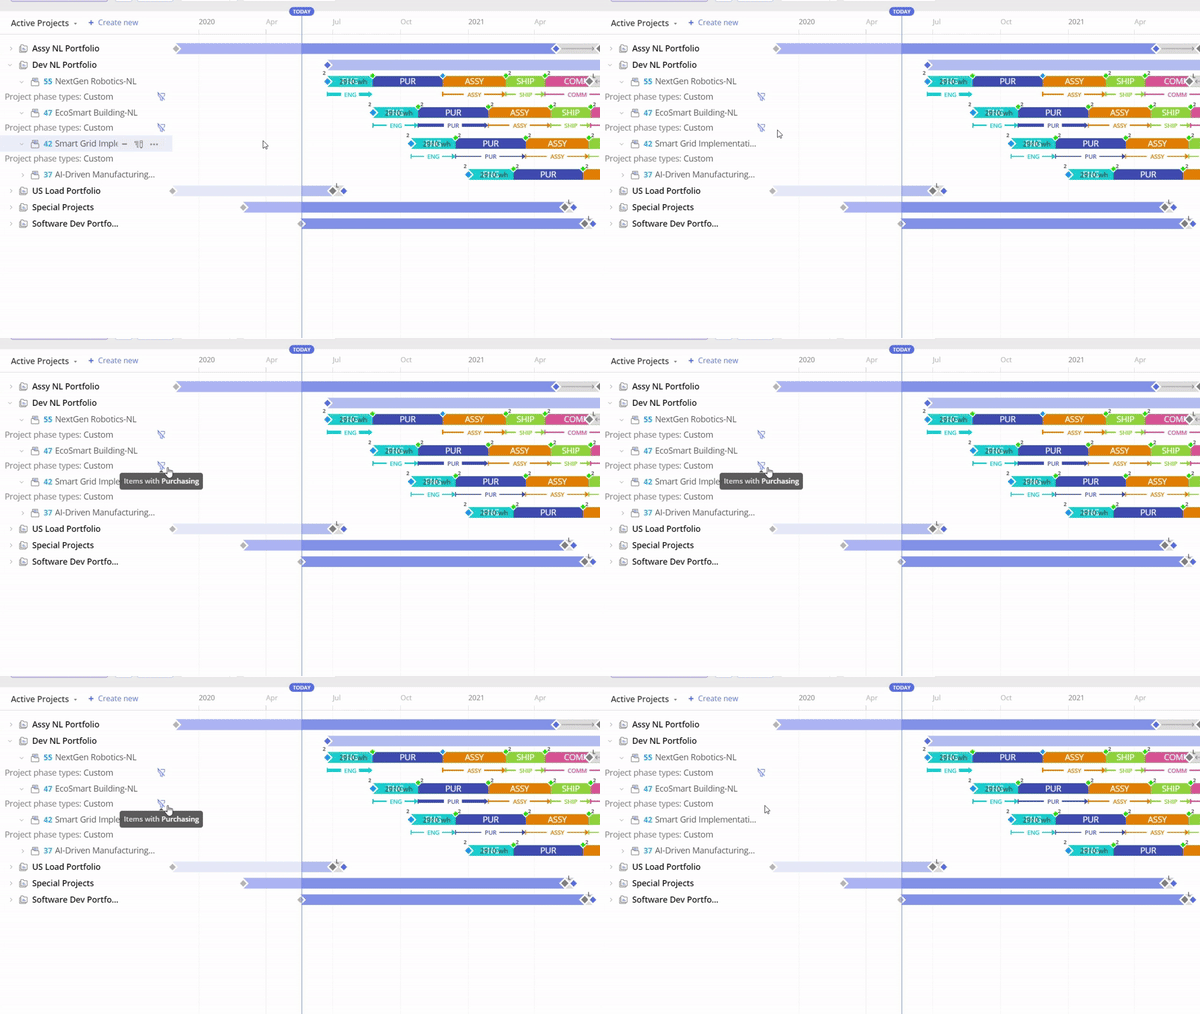
Screen #9 – Clear phase filter Pipeline View
Edit Phase
- Hover over the Phase: Locate the phase you want to edit within the pipeline view. Move your cursor over the phase to reveal the available options.
- Click Edit
- Make Appropriate Changes: Within the edit interface, you’ll be able to modify various aspects of the phase, such as its name, type, start and end dates, short name, color, phase status, as well as start and end baseline dates.
- Review Changes
- Click Update Button: to apply the changes to the phase.
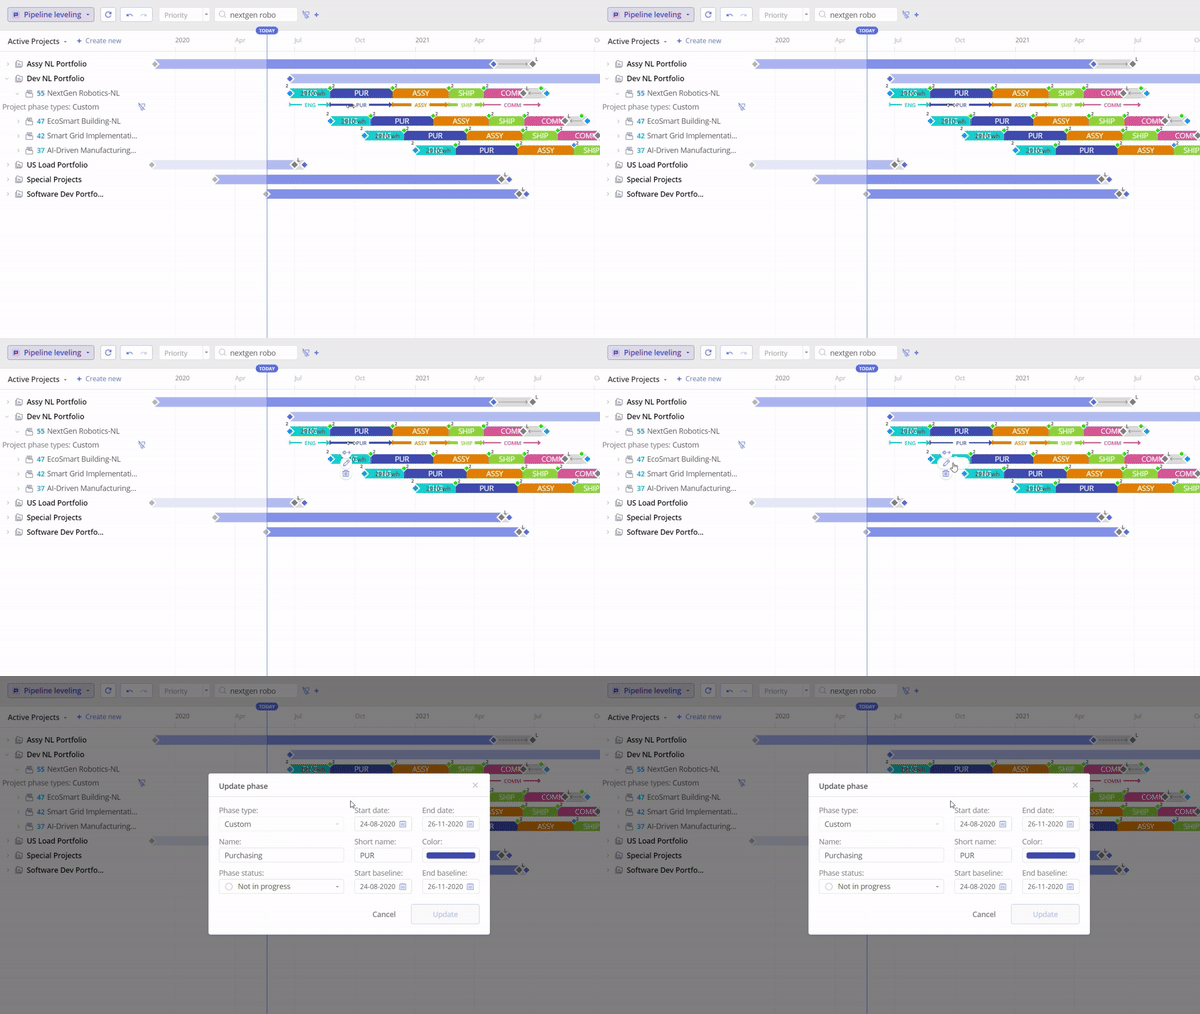
Screen #10 – Edit Phase
Close Phase and Move Items
Close Phase
- Hover over the Phase: Locate the phase you want to edit within the pipeline view. Move your cursor over the phase to reveal the available options.
- Click Edit
- Change status of the phase to Completed.
- Review Changes
- Click Update Button: to apply the changes to the phase

Screen #11 – Warning message during closing Phase
Move uncompleted items to another Phase
- Decide if you want to move uncompleted items to another phase.
- Click Confirm Button.
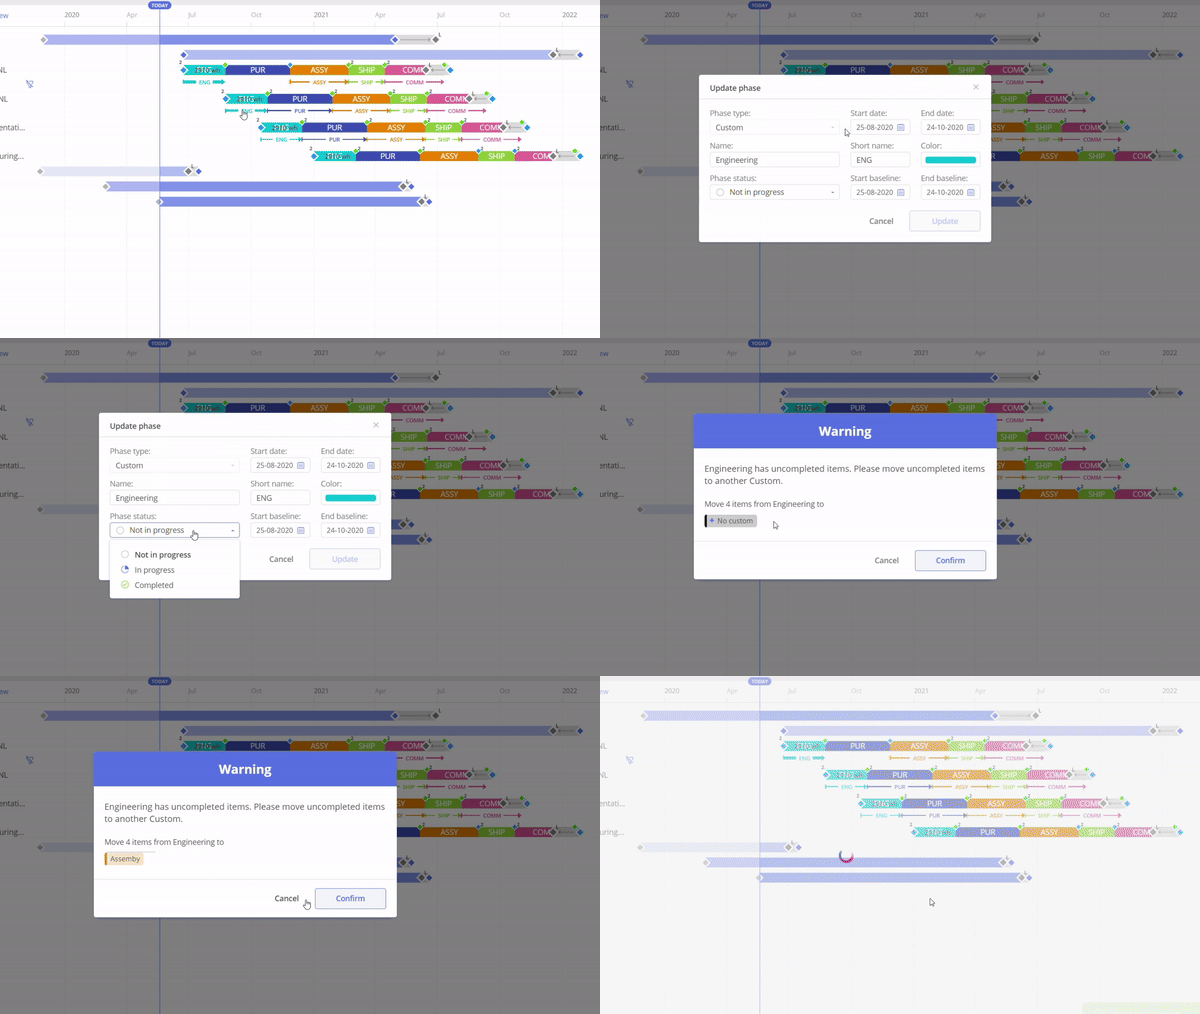
Screen #12– Close Phase and move its items to another.
Delete Phase
To delete a project phase, hover over its arrow. This action requires expanding the Project Summary to reveal its items. The phases’ arrows can be found under the project’s pipeline.
- Expand a project summary
- Hover over phase’s arrow
- Click on trash icon to delete phase
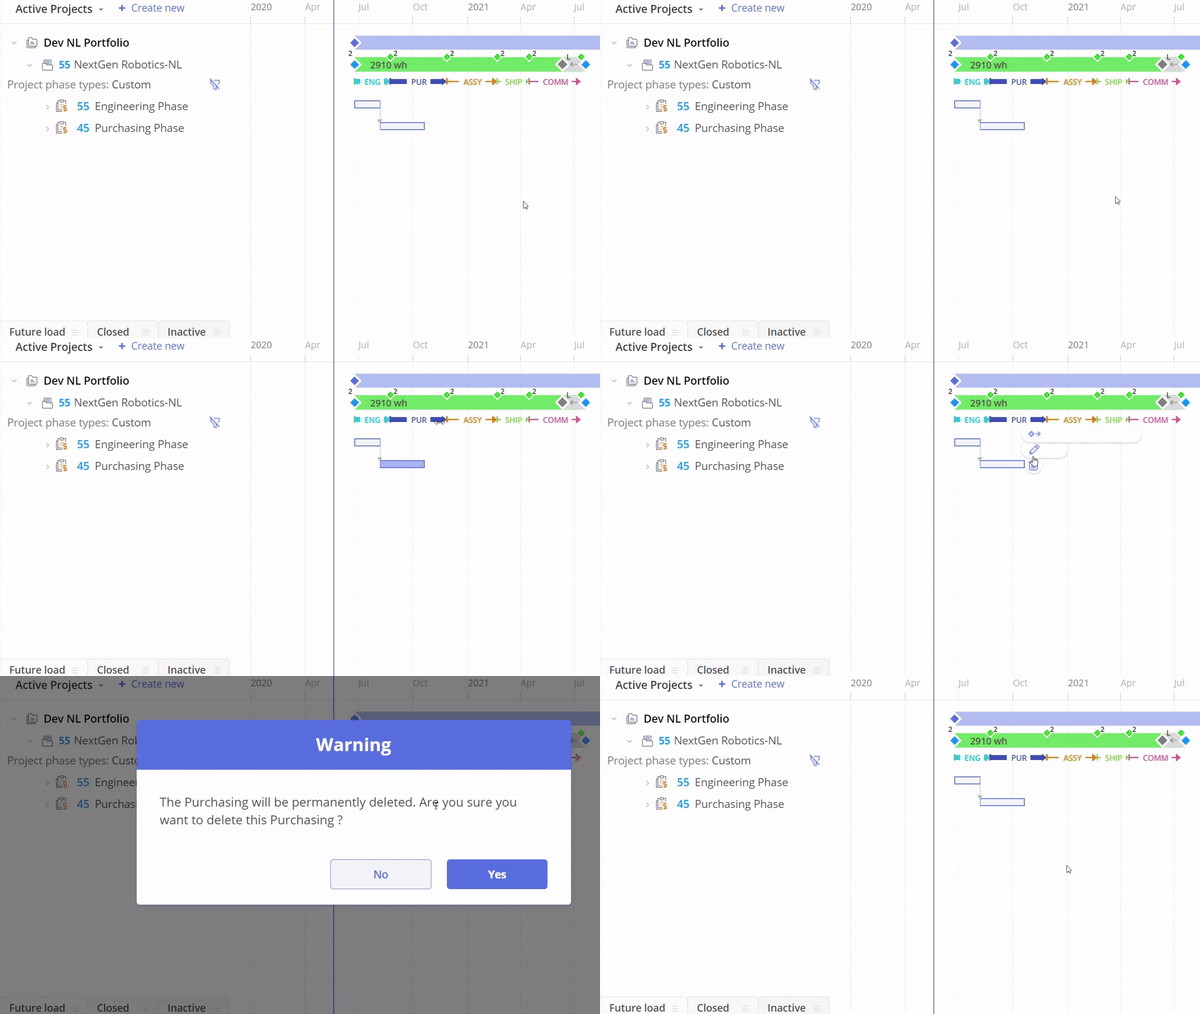
Screen #13 – Delete phase
