It represents a sorted by priority list of tasks of a particular resource in a way of grouping those by their statuses. This functionality helps your resources to organize and control their workflow in a faster and transparent way.
Unlike Task List mode Personal Task List depicts only tasks assigned to the selected resources.
Be aware that only tasks that belongs to the active projects are shown in the Personal Task List.
Overview
Personal Task List is a page opened by default when you log in to the system.
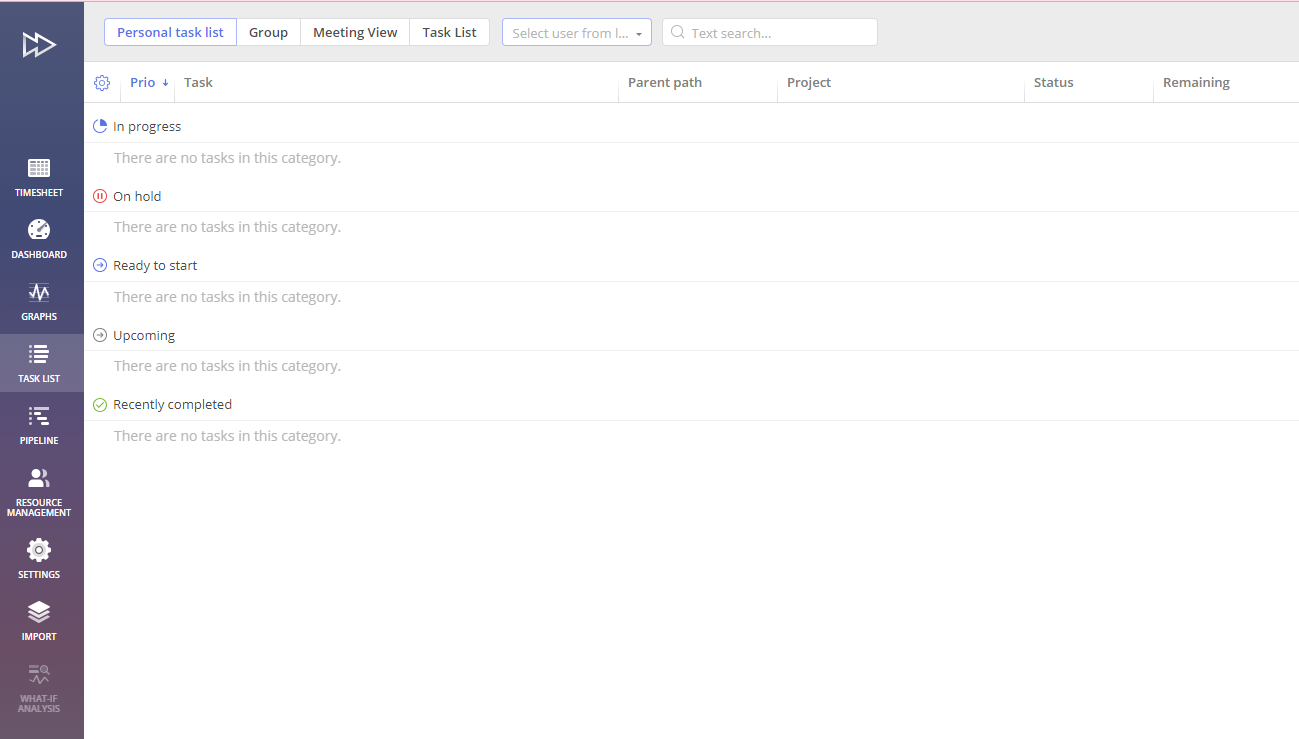
Screen #1 – Personal Task List selection
To open Personal Task List mode
- Go to the “Task List” page and select Personal Task List
Tasks Grouping
There’s several categories by which Personal Task List represents information:
- In progress
- On hold
- Ready to start
- Upcoming
- Recently completed
- Not ready to start
- Not estimated
For some of categories (Ready to start, Upcoming, Not ready to start, Not estimated) system display a toggle “Include Group Tasks” which allows to review tasks assigned to the group(s) of the selected resources.
This toggle is unavailable for the following categories:
- In progress,
- On hold,
- Recently completed.
Assignee review
If you belong to a certain group and there are tasks assigned to anyone from this group or the whole group, you can easily check the assignee.
- Enable the “Include group tasks” toggle,
- Hover over an icon next to the task’s name,
- Check the tooltip (assigned to a group / assigned to anyone from the group).
Assigning Group Tasks
If you belong to a certain group and there are tasks assigned to anyone from this group, you can assign or reassign one of the tasks that belong to the “ready to start”, “upcoming”, “not ready to start”, “not estimated” categories to yourself.
- Open the Personal Task List tab,
- Enable “group tasks” toggle for a certain category,
- Hover over the task,
- Hover over the newly appeared “Assign to me” icon,
- Click “assign to me”.
User Selector
User Selector provides an opportunity to choose a user from the list and check out his or her personal tasks in accordance to granted permissions.
When you log in to the system, Personal Task List is a page were you are redirected by default with your name selection in the header.

Screen #2 – Choosing User
If you would like to change a resource for the Personal Task List tab, just click on its name and the drop-down will appear. You can either select one of the users of type a name and the system will suggest you all the variants based on the coincidences of the letters you entered.
- If you enter a name that doesn’t exist, you’ll see the message “User is not found”.
- If you have any group visibility restrictions, you won’t see any users’ personal task lists who belong to this group.
If you have the rights to see all tasks, you can easily select any user you like from the drop-down list and check their personal tasks.
When you select a user in the User Selector drop-down list, this user will be shown even after a page refresh/logging out/duplicating the page/going to another page and returning.
Columns and Categories
Click on the gear icon at the top left side of the page to set up columns and categories. There you can hide and unhide columns and categories.

Screen #3 – Columns selection and reordering
As you can see, categories indicate the statuses of your tasks, whether they’re in progress, on hold, completed, etc.
Columns are the instruments that provide you with additional information about each task: for example, what project they belong to, how much time is left for task completion, and data alike.
By default, some of the columns and categories are checked and some of them are unchecked or hidden. You can easily set them up according to your needs or preferences by ticking the corresponding boxes or get them back to the default settings by clicking the “Default” option.
The picture below shows you what columns and categories are checked and unchecked by default:

Screen #4 – Resetting columns to default
The only thing you can’t uncheck is the Item Name, otherwise, you won’t be able to distinguish between the tasks.
If you uncheck all the categories, they will be shown at the bottom of the page in one line.
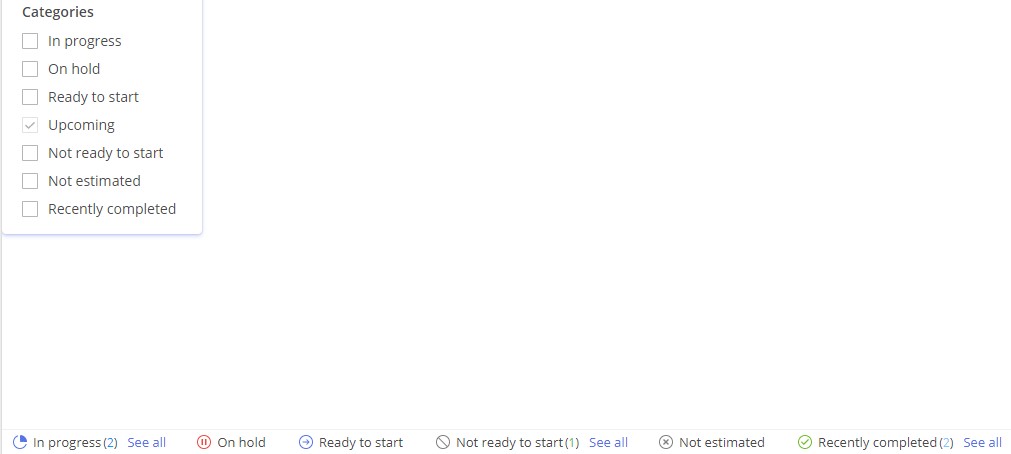
Screen #5 – Unchecked categories
If you have several tasks that belong to a certain category (up to 5), you’ll see all of them near the corresponding category.
If the number of tasks that belong to the same category is more than 5, you’ll see the number of your tasks in brackets in front of the category name and a “See all” blue button. Click it to check all tasks that belong to this category.
Items Reordering
You can reorder columns and categories by dragging them. The item will change its location after you drop it to the right place in the list.
You can also reorder unchecked items, and their order will be altered in the list as well as at the bottom of the Personal Task List page.
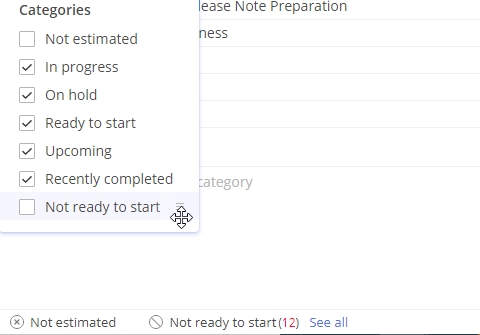
Screen #6 – Reordering unchecked
Column Customization
You can resize the columns by dragging the border between them to the minimum or maximum size if you want to make them smaller or bigger, accordingly. If you choose the minimum size of the column, you will see the item name tooltip when hovering over the column header.
All the changes are saved regardless of your further actions (refreshing or duplicating the page, logging in or out, going to another page and returning).
Additionally, for the context of the Parent Path column, you have an ability to Truncate it by Start\End in case when column’s width is not enough to view the whole string.
Screen #7 – Parent Path column alignment
Working with Task
Sorting
by Priority
You can sort out your tasks according to the priority in either ascending or descending order.
- Go to the Personal Task List tab,
- Enable all categories,
- Enable the Priority column,
- Click the priority arrow up or down.
by Business Value
Besides, you can sort out your tasks in either ascending or descending order according to the business value parameter.
- Go to the Personal Task List tab,
- Enable all categories,
- Enable the Business value column,
- Click the Business value arrow up or down.
by Remaining
You can sort out your tasks in either ascending or descending order according to the remaining time parameter.
- Go to the Personal Task List tab,
- Enable all categories,
- Enable the remaining column,
- Click the remaining column arrow up or down.
by Spent Time
You can also sort out your tasks in either ascending or descending order according to the spent time parameter.
- Go to the Personal Task List tab,
- Enable all categories,
- Enable the spent time column,
- Click the spent time arrow up or down.
by Total Time
You can also sort out your tasks in either ascending or descending order according to the total time parameter.
- Go to the Personal Task List tab,
- Enable all categories,
- Enable the total time column,
- Click the total time arrow up or down.
Editing
You can implement changes in the Personal Task List tab, then cancel them by using an undo function and get them back by applying the redo function. Then the changes will be applied in Epicflow and the external system that’s connected to it (MSP, Jira).
For example, you can change the task’s name, save the changes by clicking on the “Save Changes” button and undo the changes. You’ll see the cancellation of any alterations in both, the internal and external systems.
Then you can click the ‘redo’ button and all the changes will be applied back.
You can implement the following changes in the system and then undo/redo them:
- Change task’s name,
- Complete the task,
- Delete the task,
- Change task hours,
- Change the task’s description in the task card,
- Change a blocking task when setting the task on hold,
- Change/add/remove task’s predecessors/successors in the task card,
- Change task assignment in the task card
- From a user to a group,
- From a group to a user,
- From a user to anyone,
- Outside the group.
- Change the summary’s name,
- Delete a summary,
- Complete the task with several assignments,
- Change the task’s summary in the task card,
- Change the number of task assignments in the task card,
- Change/add/delete comments to tasks,
- Change task’s tags,
- Change all fields in the task card.
Searching
You can search for a necessary task by the item’s name, project’s name or group’s name in the Personal Task List tab given all categories are enabled and there are different tasks belonging to different categories.
NB:
- If the categories are hidden, the search results won’t show any tasks.
- If you enter a task/group/project name that doesn’t exist in the system, you won’t see any results.
- You won’t see any tasks either, if you search for other users’ personal tasks (enter other resources’ task/project/group names) in the Personal Task List tab.
Recently Completed Task Category
You can check up to 5 tasks on the Personal Task List tab that have been completed during the recent two weeks. You’ll also see the number of recently completed tasks in front of the “Recently completed” category and the “See all” button. So, if you want to check them all, click “see all”.
Status change
You can change statuses for the tasks assigned to you. Thus, if you have different tasks that belong to different categories and change the status of any task (for instance, put a task “on hold” or “in progress”), given that all categories are enabled, the task will change its category, and the number of tasks in different categories will change, accordingly.
Completing and Editing/Logging Hours
To complete the task assigned to you that belongs to one of the following categories
- in progress,
- on hold,
- ready to start,
- upcoming”,
- not ready to start
- not estimated,
hover over the task and click the newly appeared “complete” icon.
NB: You won’t find the “complete” icon when hovering over the task from the “recently completed” category.
You can also log your hours and edit them right in the Personal Task List tab. The changes will be applied either by pressing “Enter” or after a left-mouse click on any place on the screen. To learn more about logging hours and editing them, read the corresponding article.
Export
You can export basic or advance reports if you have corresponding permissions.
- Click the “Export” button in the Personal Task List tab.
- Choose an option from the newly appeared pop-up: “export all items”, “export filtered only”.
- Select a file format: CSV (zip) or Excel.
- Confirm by clicking the Export button or cancel it.