Introduction
In terms of Epicflow system management we have functionality which grants an ability to seamlessly Import/Upload (further Import will be used) and Export data files such as: Project Data, Resource Pool, Attributes, Calendars, Competences, Availability of Resources and Project directly through User Interface. Additionally, for Export there is system logs option, which provides valuable insights into operations. Worth to say that such operation is critical in prospective of data consistency and further analysis, so only System Administrator and PO are allowed to assign corresponding permission for the role.
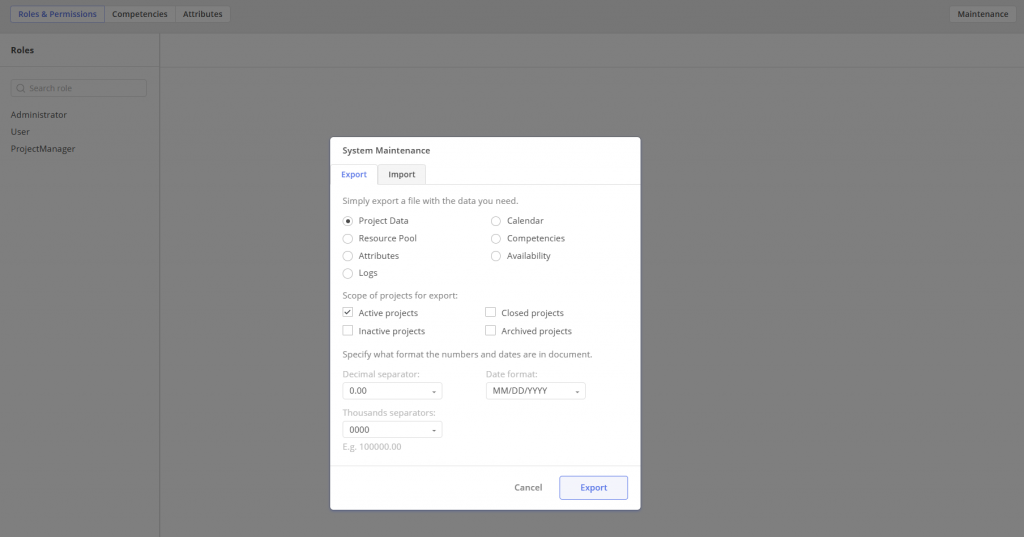
#Screen 1 System Maintenance: Competences- Export, Update, Upload
With this functionality, users gain the capability to seamlessly upload and update data directly from their desktops. For those seeking to automate this process, we encourage reaching out to Epicflow Support at support@epicflow.net.
Options overview
Maintenance Page
- Attributes – An attribute is a feature of a project, its item, or resource that distinguishes it from others. More about attributes you can read in this article.
- Availability – Availability is a data that show us the accessibility of resources.
- Calendar – Each company that uses Epicflow has it’s own calendar, allowing them to specify holidays, weekends, and the number of working hours, which can vary depending on company policies and practices.
- Competences – Competence for employees in the system refers to the specific skills, knowledge, and abilities that individuals possess to perform their job roles effectively. More about competences you can read in this article.
- Project Data – Refers to details related to a project card, like the project’s start and end dates, the project manager, and everything else that can be found in the project card. This option supports bulk uploads for multiple projects.
- Resource Pool – A resource pool is a data file containing information about all available employees within an organization, including details such as their names, availability, skills, and other relevant attributes.
- Logs – System logs are concise records generated by a computer system, capturing events, actions, and errors that occur during its operation. Due to the nature of these data, which are used for system analysis, only exporting is possible.
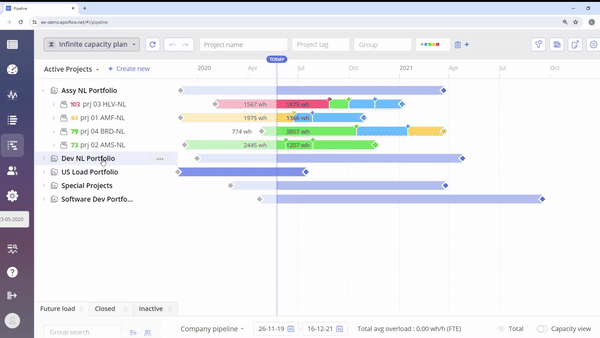
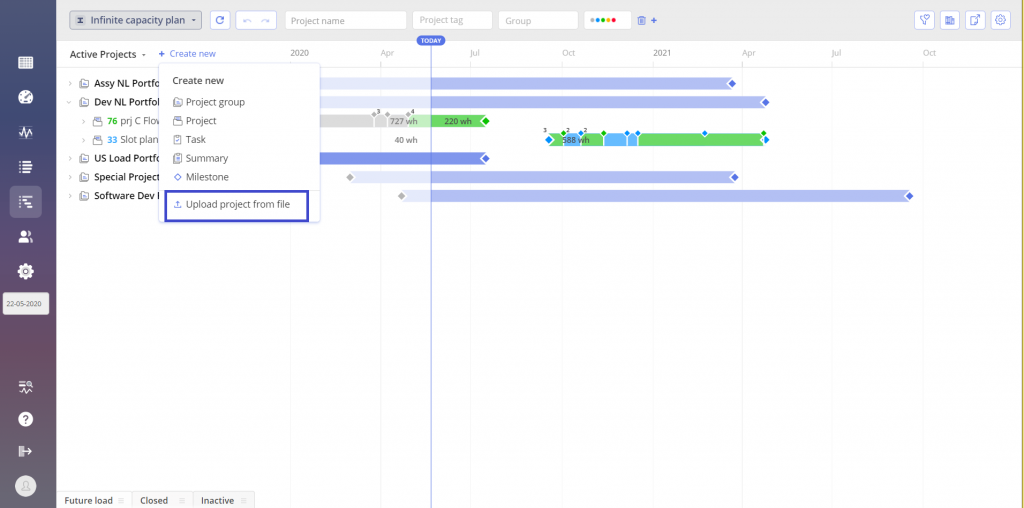
Pipeline Page
- Project – Includes all project data along with additional information such as tasks, summaries, milestones, relationships, and other elements that make up the entire project. This option is available for individual projects, unlike the ‘Project Data’ option, which allows multiple projects to within a single file.
Permissions configuration
Be aware that Import\Export functionality is critical in prospective of data consistency and further analysis, so its usage is limited only to those users to which corresponding permission is assigned by System Administrator or PO.
For relevant permissions adjustment “Administrator” role is required. Generic permissions description can be found in this article.
In case of Import\Export Data Files functionality you need to set “System Maintenance” permission from the “Global Permission” group.
Important to say that “System Maintenance” is also required for Projects Import\Upload via the Pipeline page.
#Screen 2 “System Maintenance” permission
Guidelines for Uploading Data: Understanding the Different Methods
Depending on the type of data you’re working with, there are two methods for uploading it into our system. Below, we outline the different categories of data and the corresponding upload methods:
- Project Data, Resource Pool, Attributes, Availability, Calendars, Competences:
- These types of data can be conveniently uploaded using the Maintenance Page feature.
- Project:
- For Project we utilize the Pipeline Page.
#Screen 3 System Maintenance: Project Data, Resource Pool, Calendar, Competences, Attributes, Availability, Logs
#Screen 4 System Maintenance: Project
Templates
To successfully import data, it’s crucial to ensure that files are prepared correctly. To assist you in this process, we have a set of templates that you can download and utilize as examples.
Please visit Downloads Website to download template files from the corresponding subsection labeled as ‘System Maintenance – Import\Export’.
If you have already data in the system it’s also good approach to export data, edit and upload it again
CSV File Structure Overview
This section outlines the key requirements and formats for CSV files used within the Epicflow system, ensuring users can manage their data with precision and efficiency. Understanding and implementing the correct CSV file structure is crucial for various system operations, including importing, exporting, updating, and deleting data.
– Competences
This CSV file provides a way to specify competences and their structure.
- Example #1: Create Competences in the system
1. Below, you can see the table representing competence headers and values.
| RecordType | Id | Name | ParentId |
| C | Analytical thinking |
The 1st row – contains column names.
The 2nd row – contains record name: C that stand for competence and competence’s name which is Analytical Thinking.
2. In CSV File this example looks like this:
C;;Analytical thinking;
3. After upload in Epicflow this example looks like this:
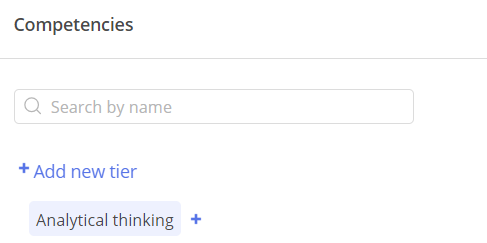
#Screen 5 Competences in Epicflow
Minimum Required Fields to Upload Competences
RecordType: C, Name
Upload:
Read here how to upload competences to the system.
Export:
Read here how to export competences from the system.
Update:
To update competences, you must first obtain their unique IDs. This requires exporting the competences file to access this information. Once you have retrieved the IDs, you can proceed with updating the competences by modifying the desired fields, excluding the ID. Once your file is prepared you can update competences by uploading the file to the system.
- Example #2: Update Competences in the system.
1. You have exported file that looks like this:
C;;Analytical thinking;
| RecordType | Id | Name | ParentId |
| C | 1 | Analytical thinking |
The 1st row – contains column names.
The 2nd row – contains record name: C that stand for competence and competence’s name which is Analytical Thinking.
2. To update Competence in the system your file needs to look like this:
C;1;New_name_for_Analytical_thinking;
| RecordType | Id | Name | ParentId |
| C | 1 | New_name_for_Analythical_thinking |
The 1st row – contains column names.
The 2nd row – contains record name: C that stand for competence, competence’s Id and updated competence’s name which is New_name_for_Analythical_thinking.
Add:
Previously, you saw an example of uploading new competences to the system when none were present. Now, we’ll demonstrate the correct procedure for adding additional competences to existing ones. This procedure is very similar to the update procedure. You need to export Competences file from the system, then edit this file by adding a new competence without specified ID.
- Example #3: Add additional competences to existing ones in the system.
1. You have exported file that looks like this:
C;;Analytical thinking;
| RecordType | Id | Name | ParentId |
| C | 1 | Analytical thinking |
The 1st row – contains column names.
The 2nd row – contains record name: C that stand for competence and competence’s name which is Analytical Thinking.
2. To add new Competence to the system your file needs to looks like this:
C;1;Analytical thinking;
C;;New_Competence;
| RecordType | Id | Name | ParentId |
| C | 1 | Analytical thinking | |
| C | New_Competence |
The 1st row – contains column names.
The 2nd row – contains record name: C that stand for competence and competence’s name which is Analytical Thinking.
The 3rd row – defining new competence named ‘”‘New_Competence’ that will be added to the system.
Delete:
To delete all competences from the system, you can upload a file containing only column names with empty values. This action will remove all competences from the system.
- You can remove all competences via uploading this file.
- Upload file to the system via Maintenance page as described in header: Import Resource Pool, Calendar, Attributes and Competences
Competences Structure: Nesting
Nesting means creating a parent–child structure, where one item contains or groups other items. It is possible to build a nested structure for competences, which simply means organizing competences into groups.
A nested structure helps you:
- Organize competences in logical categories
- Avoid long unstructured lists
- Keep related competences together
To build this structure, you first create a Competences Group, and then assign competences to it.
To connect competences with a group, you must use a unique Id for the group.
This Id:
- Is only used inside the CSV file
- Helps the system understand the relationship between group and competence
- Will be replaced by a system-generated ID after import
Simple Example of Nested Competences
Let’s say you want to organize competences instead of keeping them in one long list.
Instead of this:
- Leadership
- Budget Planning
- Analytical Thinking
- Risk Management
You want them grouped like this:
Management Skills
- Leadership
- Budget Planning
Analytical Skills
- Analytical Thinking
- Risk Management
How It Works in the File
To do this, you:
- Create a group (RecordType = G)
- Give that group a temporary ID (for example: 1)
- Assign competences to that group using ParentId = 1
Example:
| RecordType | Id | Name | ParentId |
| G | 1 | Management Skills | |
| C | Leadership | 1 | |
| C | Budget Planning | 1 |
In this example:
- “Management Skills” is the group.
- “Leadership” and “Budget Planning” belong to that group because they reference its ID (1).
- The ID is only used during import. The system will generate its own internal ID automatically.
You can read more about the requirements regarding the CSV file here.
- Example #4: Build a nested structure for competences.
1. Below you can see the table that represents competences headers and values in nested structure.
| RecordType | Id | Name | ParentId |
| G | 1 | Competences_Group | |
| C | Competence_1 | 1 |
The 1st row – contains column names.
The 2nd row – contains the Record Type: ‘G’, which stands for a Competences Group named Competences_Group with an ID of 1, which we will later use as a reference to this group.
The 3rd row – contains record Type C that stands for a Competence named Competence_1 with ParentId 1. That means that this competence belongs to group Competences_Group.
2. CSV File this example looks like this:
G;1;Competences;
C;;Competence_1;1
3. After upload in Epicflow this example looks like this:
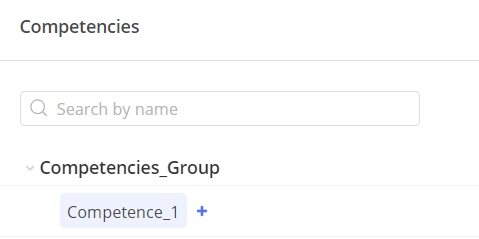
#Screen 6 Competences nested in Group in Epicflow
Competences CSV file contains next columns:
- RecordType – Indicates the type of record, in this case, “C” stands for competence record and “G” stands for competences Group.
- Id – Represents the unique identifier for the competence or competences group.
- Name – The name of the competence or group.
- ParentId – Specifies the identifier of the parent competence(competences group).
More Examples
- Example #5: Build an advanced nested structure for competences.
1. Here you can learn how to build a more advanced nested structure for competences with usage of an ID with an unique ID, such as ‘1’, to refer to the IDs while nesting competences within the groups. You can read more about the requirements regarding the CSV file here.
| RecordType | Id | Name | ParentId |
| G | 1 | Competences_Group1 | |
| G | 2 | Competences_Group2 | |
| C | Competence_1 | 1 | |
| C | Competence_2 | 2 |
The 1st row – contains column names.
The 2nd row – contains the Record Type: ‘G’, which stands for a Competences Group named Competences_Group1 with an ID of 1, which we will later use as a reference to this group.
The 3rd row – contains the Record Type: ‘G’, which stands for a Competences Group named Competences_Group2 with an ID of 2, which we will later use as a reference to this group.
The 4th row – contains record Type C that stands for a Competence named Competence_1 with ParentId 1. That means that this competence belongs to group Competences_Group1.
The 5th row – contains record Type C that stands for a Competence named Competence_2 with ParentId 2. That means that this competence belongs to group Competences_Group2.
2. In CSV File this example looks like this:
G;1;Competences_Group1;
G;2;Competences_Group2;
C;;Competence_1;1
C;;Competence_2;2
3. After upload in Epicflow this example looks like this:
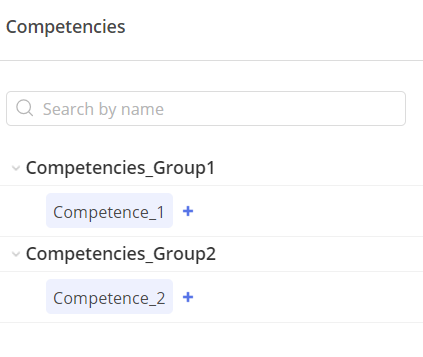
#Screen 7 Competences nested in Groups in Epicflow
– Attributes
This CSV file provides a way to specify attributes and their structure.
- Example #1: Create attributes in the system
1. From this example, you can learn how to create a basic csv attributes file to create attributes in the system.
| RecordType | Name | ShortName | TypeId | TypeKind | ValueId | ValueParentId | ValueCode1 | ValueCode2 | AttributeExtraId | AttributeScope | AttributeVisibility | AttributeIsSingle | AttributeValueOrder | AttributeNameIsHidden | AttributeRepresentation | AttributeDetailedRepresentation |
| A | Location | 1 | ||||||||||||||
| T | Location | 1 | List | |||||||||||||
| V | Germany | 1 |
The 1st row – contains column names.
The 2nd row – contains information about record Type: A that stand for attribute. Attribute Name that is Location and 1 TypeId that will let us refer to this attribute in next rows to associate them with this attribute.
The 3rd row – This record contains information about Type: T, which stands for Type and specifies whether it is a hierarchy or a list in the TypeKind column. Additionally, the Name field mirrors the attribute name associated with this record through the utilization of the same TypeId.
The 4th row – This record contains Record Type: V, representing a Value named “Germany.” It specifies values for the Attribute Location, as indicated in the TypeId column, which references the Attribute Location Id.
2. In CSV Format this example looks like this:
A;Location;;1;;;;;;;;;;;;;
T;Location;;1;List;;;;;;;;;;;;
V;Germany;;1;;;;;;;;;;;;;
3. In Epicflow this example looks like this:

#Screen 8 Attributes in Epicflow
Minimum Required Fields to Upload Attributes File
RecordType: T, Name, TypeId, TypeKind: Hierarchy/List
RecordType: V, Name, TypeId
Upload:
Read here how to upload attributes to the system.
Export:
Read here how to export attributes from the system.
Update:
To update attributes, you must first obtain their unique IDs. This requires exporting the attributes file to access this information. Once you have retrieved the IDs, you can proceed with updating the attributes by modifying the desired fields, excluding the ID. Once your file is prepared you can proceed with importing attributes to the system.
- Example #2: Update Attribute in the System
1. You have exported file that looks like this:
A;Location;;1;;;;;;;;;;;;;
T;Location;;1;List;;;;;;;;;;;;
V;Germany;;1;;7;;;;;;;;;;;
| RecordType | Name | ShortName | TypeId | TypeKind | ValueId | ValueParentId | ValueCode1 | ValueCode2 | AttributeExtraId | AttributeScope | AttributeVisibility | AttributeIsSingle | AttributeValueOrder | AttributeNameIsHidden | AttributeRepresentation | AttributeDetailedRepresentation |
| A | Location | 1 | ||||||||||||||
| T | Location | 1 | List | |||||||||||||
| V | Germany | 1 | 2 |
The 1st row – contains column names.
The 2nd row – contains information about record Type: A that stand for attribute. Attribute Name that is Location and its ID: 1
The 3rd row – This record contains information about attribute type which is List.
The 4th row contains Record Type: V, representing a value named ‘Germany.’ This value belongs to the attribute Location, as indicated by the TypeId that refers to the mentioned attribute. Furthermore, we see ValueId, which is 2. This ID is necessary to proceed with any updates to this value
2. To update the Attributes in the system your file needs to look like this
A;Location;;1;;;;;;;;;;;;;
T;Location;;1;List;;;;;;;;;;;;
V;New_Name_for_Germany;;1;;2;;;;;;;;;;;
| RecordType | Name | ShortName | TypeId | TypeKind | ValueId | ValueParentId | ValueCode1 | ValueCode2 | AttributeExtraId | AttributeScope | AttributeVisibility | AttributeIsSingle | AttributeValueOrder | AttributeNameIsHidden | AttributeRepresentation | AttributeDetailedRepresentation |
| A | Location | 1 | ||||||||||||||
| T | Location | 1 | List | |||||||||||||
| V | New_Name_for_Germany | 1 | 2 |
The 1st row – contains column names.
The 2nd row – contains information about record Type: A that stand for attribute. Attribute Name that is Location and its ID: 1
The 3rd row – This record contains information about attribute type which is List.
The 4th row – contains a record with Record Type: V, representing a value previously named ‘Germany,’ but now we can see that its name is being updated to ‘New_Name_For_Germany’.
Add:
Previously, you saw an example of uploading new attributes to the system when none were present. Now, we’ll demonstrate the correct procedure for adding additional attributes to existing ones. This procedure is very similar to the update procedure.
- Example #3: Add additional attributes to the existing ones in the system
1. You have exported file that looks like this:
A;Location;;1;;;;;;;;;;;;;
T;Location;;1;List;;;;;;;;;;;;
V;Germany;;1;;2;;;;;;;;;;;
| RecordType | Name | ShortName | TypeId | TypeKind | ValueId | ValueParentId | ValueCode1 | ValueCode2 | AttributeExtraId | AttributeScope | AttributeVisibility | AttributeIsSingle | AttributeValueOrder | AttributeNameIsHidden | AttributeRepresentation | AttributeDetailedRepresentation |
| A | Location | 1 | ||||||||||||||
| T | Location | 1 | List | |||||||||||||
| V | Germany | 1 | 2 |
The 1st row – contains column names.
The 2nd row – contains information about record Type: A that stand for attribute. Attribute Name that is Location and its ID: 1
The 3rd row – This record contains information about attribute type which is List.
The 4th row contains Record Type: V, representing a value named ‘Germany.’ This value belongs to the attribute Location, as indicated by the TypeId that refers to the mentioned attribute. Furthermore, we see ValueId, which is 2. This ID is necessary to proceed with any updates to this value
2. To Add new Attribute your file needs to look like this:
A;Location;;1;;;;;;;;;;;;;
T;Location;;1;List;;;;;;;;;;;;
V;Germany;;1;;2;;;;;;;;;;;
V;Netherlands;;1;;;;;;;;;;;;;
| RecordType | Name | ShortName | TypeId | TypeKind | ValueId | ValueParentId | ValueCode1 | ValueCode2 | AttributeExtraId | AttributeScope | AttributeVisibility | AttributeIsSingle | AttributeValueOrder | AttributeNameIsHidden | AttributeRepresentation | AttributeDetailedRepresentation |
| A | Location | 1 | ||||||||||||||
| T | Location | 1 | List | |||||||||||||
| V | Germany | 1 | 2 | |||||||||||||
| V | Netherlands | 1 |
The 1st row – contains column names.
The 2nd row – contains information about record Type: A that stand for attribute. Attribute Name that is Location and its ID: 1
The 3rd row – This record contains information about attribute type which is List.
The 4th row contains a new record with Record Type: V, representing a value previously named ‘Netherlands.’ The TypeID is 1, which means that this value belongs to the attribute Location.
Delete:
You can remove attributes values by uploading file containing only columns names. It’s not possible to remove attributes types by uploading CSV File.
Attributes Structure: Nesting
Attributes in Epicflow are always defined with a type, which determines how their values are organized.
Unlike competences, you cannot create attribute values without specifying whether the attribute is a List or a Hierarchy.
There are two types:
List – values are organized as a simple flat list. There is no parent–child relationship between values.
Hierarchy –values can be nested within other values, creating a parent–child structure.
When to Choose List vs Hierarchy
When creating an Attribute, you must choose its type:
- List
- Hierarchy
Here is how to decide.
Choose List when:
- Values do NOT have sub-levels
- Values are simple options
- No value depends on another value
Think of it like a dropdown menu.
Examples:
Attribute: Location
- Germany
- Netherlands
- France
Attribute: Language
- English
- Spanish
- German
There is no relationship between the values.
They are just selectable options.
Use List when values are flat and independent.
Choose Hierarchy when:
- Values have levels (parent >>> child)
- Some values belong under other values
- You need structured categorization
Think of it like folders inside folders.
Example:
Attribute: Technology
- Hardware
- Keyboard
- Monitor
- Software
- ERP
- CRM
Here:
- “Hardware” is a parent value
- “Keyboard” is a child value of Hardware
Use Hierarchy when values need structure.
To refer to the created Attributes and its Values, you should specify an unique ID. You do this to inform the system about the new record and references to it. Please note that the system will assign its own ID values, so they won’t be the same when you export attributes from the system. You can read more about the requirements regarding the CSV file here.
To specify the parent value for an attribute, we should provide a unique ID for the parent value in the ValueId column. Subsequently, for the child attribute, we should specify this ID in the ValueParentId column.
- Example #4: Build Nested Structure for Attributes.
1. Below, you can see a table representing attributes with a Hierarchy type that allows nesting values within values.
| RecordType | Name | ShortName | TypeId | TypeKind | ValueId | ValueParentId | ValueCode1 | ValueCode2 | AttributeExtraId | AttributeScope | AttributeVisibility | AttributeIsSingle | AttributeValueOrder | AttributeNameIsHidden | AttributeRepresentation | AttributeDetailedRepresentation |
| A | Technology | 1 | ||||||||||||||
| T | Technology | 1 | Hierarchy | |||||||||||||
| V | Hardware | 1 | 2 | |||||||||||||
| V | Keyboard | 1 | 2 |
The 1st row contains column names.
The 2nd row contains information about record Type: A that stand for attribute. Attribute Name that is Technology and 1 TypeId that will let us refer to this attribute in next rows to associate them with this attribute.
The 3rd row This record contains information about Type: T, which stands for Type and specifies whether it is a hierarchy or a list in the TypeKind column. Additionally, the Name field mirrors the attribute name, and this record is associated with the Attribute through the utilization of the same TypeId.
The 4th row of this record contains Record Type: V, representing a Value named ‘Hardware.’ It specifies values for the Attribute Technology, as indicated in the TypeId column, which references the Attribute Technology Id. Additionally, we can specify a ValueId, which we’ll later use to nest another value within the Hardware Value.
The 5th row This record contains Record Type: V, representing a Value named “Keyboard.” It specifies values for the Attribute Technology, as indicated in the TypeId column, which references the Attribute Technology Id. Additionally, we observe that this record has a Value Parent Id 2, indicating that it is nested under the value Hardware.
2. In CSV Format this example looks like this
A;Technology;;1;;;;;;;;;;;;;
T;Technology;;1;Hierarchy;;;;;;;;;;;;
V;Hardware;;1;;2;;;;;;;;;;;
V;Keyboard;;1;;;2;;;;;;;;;;
3. In Epicflow this example looks like this

#Screen 9 Attributes: Value nested in Value in Epicflow
Attributes CSV file contains next columns:
- RecordType – Specifies the type of record (A for Attribute, T for Type: Hierarchy, List, V for Value).
Hierarchy is used when you want to have a nested structure.
- Name – Name of the attribute.
- ShortName – Short name or abbreviation for the attribute.
- TypeId – Identifier for the type of attribute.
- TypeKind – Kind of attribute type.
- ValueId – Identifier for the attribute value.
- ValueParentId – Identifier for the parent attribute value.
- ValueCode1 – First code associated with the attribute value.
- ValueCode2 – Second code associated with the attribute value.
- AttributeExtraId – Extra identifier for the attribute.
- AttributeScope – Scope of the attribute.
- AttributeVisibility – Visibility of the attribute.
- AttributeIsSingle – Indicates if the attribute is single.
- AttributeValueOrder – Order of attribute values.
- AttributeNameIsHidden – Indicates if the attribute name is hidden.
- AttributeRepresentation – Representation of the attribute.
- AttributeDetailedRepresentation – Detailed representation of the attribute.
More Examples:
- Example #5: Create Attributes in the system: filling additional fields.
1. Below, you can see a table representing attributes as a List with specified Scope and Visibility.
| RecordType | Name | ShortName | TypeId | TypeKind | ValueId | ValueParentId | ValueCode1 | ValueCode2 | AttributeExtraId | AttributeScope | AttributeVisibility | AttributeIsSingle | AttributeValueOrder | AttributeNameIsHidden | AttributeRepresentation | AttributeDetailedRepresentation |
| A | Language | 1 | User, Group, Step, Project, ProjectGroup | Public | ||||||||||||
| T | Language | 1 | List | |||||||||||||
| V | English | 1 |
The 1st row contains column names.
The 2nd row contains information about record Type: A that stand for attribute. Attribute Name that is Language and *1 TypeId that will let us refer to this attribute in next rows to associate them with this attribute.
The 3rd row This record contains information about Type: T, which stands for Type and specifies Type Kind that is list in this example. Additionally, the Name field mirrors the attribute name, and this record is associated with the Attribute through the utilization of the same TypeId.
The 4th row – This record contains Record Type: V, representing a Value named “English.” It specifies values for the Attribute Language, as indicated in the TypeId column, which references the Attribute Language Id.
2. In CSV Format this example looks like this
A;Technology;;1;;;;;;;User, Group, Step, Project, ProjectGroup;Public;;;;;
T;Technology;;1;List;;;;;;;;;;;;
V;English;;1;;;;;;;;;;;;;
– Calendar
This CSV file provides a way to specify different average hours for different days of the week or for specific date ranges.
- Example #1: Creating Calendar CSV File.
1. Below, you can see a table representing calendar headers and values.
| Calendar1 | sfsIdCalendar1 | ppmIdCalendar1 | |
| AvgHours | DayOfWeek(optional) | StartDate(optional) | EndDate(optional) |
| 8 | |||
| 0 | Sunday | ||
| 4 | 25-12-2023 | 26-12-2023 |
The first row contains column names that we have replaced with values. The first column is for CalendarId, which remains empty during the addition of new calendars. The second column is for Calendar Name, and the name of the calendar is ‘Calendar1’. The third column is for SuccessFactorsID, where you can observe that we keep the column name and immediately specify sfsId as ‘Calendar1’. The fourth column is for ppmId, with its value being ‘Calendar1’, just as in the third column – we keep column name and right after this we specify its Id.
The 2nd row contains column names.
The 3rd row specifies the Average Hours for all days in the system for 8 hours per day.
The 4th row specifies 0 Average Hours for Sundays.
The 5th row specifies 4 hours as Average Hours in the date range 25-12-2023 to 26-12-2023
2. In CSV Format this example looks like this
;Calendar1;sfsIdCalendar1;ppmIdCalendar1
8;;;
0;Sunday;;
4;;25-12-2023;26-12-2023
Minimum Required Fields to Upload Calendar
CalendarName, AvgHours
Upload:
Read here how to upload Calendar CSV file to the system.
Export:
Read here how to export Calendar from the system.
Update:
To update the calendar, you must first obtain its ID. It’s necessary to export the calendar file to access this information. Once you have retrieved the calendar’s id, you can proceed with updating the calendar records by modifying the desired fields, excluding the calendar name.
- Example #2: Updating the Calendar.
In the example below, you can see the correct procedure for updating calendars in the system.
1. You have exported file that looks like this:
1;My Calendar;sfsId;ppmId26-12-2023
AvgHours;DayOfWeek(optional);StartDate(optional);EndDate(optional)
8;;;
0;;25-12-2023;
| 1 | MyCalendar | sfsId | ppmId |
| AvgHours | DayOfWeek(optional) | StartDate(optional) | EndDate(optional) |
| 8 |
The 1st row contains either column names or values. In this example we can Calendar ID specified as value ‘1’ and CalendarName specified as ‘My Calendar’
The 2nd row contains column names.
The 3rd row specifies the Average Hours for all days in the system for 8 hours per day.
2. To update the calendar, keep the calendar ID, sfsId and ppmId as they are and edit the desired fields such as average hours values, calendar name and dates.
In below example you can update of Calendar Name.
1;NewName;sfsId;ppmId26-12-2023
AvgHours;DayOfWeek(optional);StartDate(optional);EndDate(optional)
8;;;
0;;25-12-2023;
| 1 | NewName | sfsId | ppmId |
| AvgHours | DayOfWeek(optional) | StartDate(optional) | EndDate(optional) |
| 4 | 26-12-2023 |
The 1st row contains value calendar ID which is ‘1’ and updated Calendar Name which is ‘NewName’
The 2nd row contains column names.
The 3rd row specifies the Average Hours for all days in the system for 4 hours per day.
Add:
To add a new calendar to the system, you need to upload it without specifying the calendar’s ID. To add a new calendar to the system, you need to upload it without specifying the calendar’s ID. Additionally, you have to specify a unique calendar name, sfsId, and ppmId. These values must differ from those already present in the system.
- Example #3: Adding new Calendar to the system.
;NewCalendar;sfsIdNewCalendar;ppmIdNewCalendar
AvgHours;DayOfWeek(optional);StartDate(optional);EndDate(optional)
4;;;
| NewCalendar | sfsIdNewCalendar | ppmIdNewCalendar | |
| AvgHours | DayOfWeek(optional) | StartDate(optional) | EndDate(optional) |
| 4 |
The 1st row doesn’t contain the Calendar ID, which is desirable behavior when adding new calendars. Additionally, we can see the name of the calendar, which is specified for ‘NewCalendar’. Furthermore we can see specified Ids for sfsId which is ‘NewCalendar’ and ppmId which is ‘NewCalendar’
The 2nd row contains column names.
The 3rd row specifies the Average Hours for all days in the system for 4 hours per day.
Delete:
It’s not possible to delete the calendar from the system by uploading a CSV file or manually. To do so, you need to contact Epicflow Support by sending an email to support@epicflow.net
Calendar CSV file contains next columns:
- Calendar’s ID – The Calendar’s ID is a unique identifier assigned to each calendar within a system. This ID distinguishes one calendar from another.
- Calendar Name – The Calendar Name is a textual label or identifier given to a calendar within a system. Like the Calendar’s ID, it serves as a unique identifier for different calendars. While the Calendar’s ID is a numerical code used for internal referencing, the Calendar Name provides a human-readable description of the calendar.
- sfsd – SuccessFactorsID, refers to a unique identifier associated with objects or entities within the SuccessFactors Human Capital Management (HCM) suite. It’s needed if you use this system.
- ppmId -ppmId refers to a unique identifier associated with objects or entities within the SAP system.
- AvgHours – This column represents the average hours for users.
- DayOfWeek(optional) – This column, marked as optional, likely denotes the day of the week for which the average hours are specified. If this field is left empty, it means the average hours apply for all days.
- StartDate(optional) – This optional column specifies the start date for which the average hours apply.
- EndDate(optional) – This optional column specifies the end date for which the average hours apply.
– Availability
This CSV file provides a way to specify availability for resources.
Download Availability Template
- Example #1: Add Availability
1. Below, you can see the table representing availability headers and values.
| Name | Start Date | End Date | Availability |
| Anne U | 19-08-2024 | 21-08-2024 | 4 |
The 1st row contains column names.
The 2nd row specifies ‘Anne U’ as the named resource. The date range is from 19.08.2024, to 21.08.2024 with the user available for 4 hours.
2. In CSV Format this example looks like this
Name;Start Date;End Date;Availability
Anne U;19-08-2024;21-05-2020;4
3. in Epicflow this example looks like this:
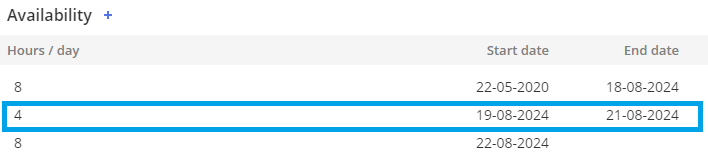
#Screen 10 Resource Card: Availability
Minimum Required Fields to Upload Availability File
All fields are required.
Upload:
Read here how to upload an Availability file to the system.
Export:
Read here how to export Availability file from the system.
Update:
To update a user’s availability, you have two options: either export the existing availability from the system and make updates, or prepare a new file. Keep in mind that the past date threshold can be specified for a maximum of 60 days, so all availability date ranges before this date must be removed from the exported file.
- Example #2: Updating the Resource Availability.
In the example below, you can see the correct procedure for updating resource’s availability in the system.
1. You have exported file that looks like this:
Name;Start Date;End Date;Availability
Anne U;19-05-2020;20-05-2020;8
Anne U;21-05-2020;26-05-2020;4
Anne U;27-05-2020;;8
| Name | Start Date | End Date | Availability |
| Anne U | 19-05-2024 | 20-05-2024 | 8 |
| Anne U | 21-05-2024 | 26-05-2024 | 4 |
| Anne U | 27-05-2024 | 8 |
The 1st row contains column names.
The 2nd row contains Resource Name that is Anne U and availability specified for 8 hours in date range from 19-05-2024 until 20-05-2024.
The 3rd row contains Resource Name that is Anne U and availability specified for 4 hours in date range from 21-05-2024 until 26-05-2024.
The 4rd row contains Resource Name that is Anne U and availability specified for 8 hours starting from day 27-05-2024.
2. To update the availability of the resource, keep its name and change the desired data.
In below example you can see how to update average working hours specified in above date ranges.
Name;Start Date;End Date;Availability
Anne U;19-05-2024;20-05-2024;2
Anne U;21-05-2024;26-05-2024;4
Anne U;27-05-2024;;1
| Name | Start Date | End Date | Availability |
| Anne U | 19-05-2024 | 20-05-2024 | 2 |
| Anne U | 21-05-2024 | 26-05-2024 | 4 |
| Anne U | 27-05-2024 | 1 |
The 1st row contains column names.
The 2nd row contains Resource Name that is Anne U and availability specified for 8 hours in date range from 19-05-2024 until 20-05-2024.
The 3rd row contains Resource Name that is Anne U and availability specified for 4 hours in date range from 21-05-2024 until 26-05-2024.
The 4rd row contains Resource Name that is Anne U and availability specified for 1 hour starting from day 27-05-2024.
Add:
To add availability for the user, you’ll need to prepare a file containing the user’s name and specified dates and hours that you would like to add. Keep in mind that if you intend to add different date ranges for one user, you’ll need to add 2 rows or even more, depending on how many ranges you want to include.
- Example #3: Adding the Resource Availability.
In the example below, you can see the correct procedure for adding resource’s availability in the system.
1. You have exported file that looks like this:
Name;Start Date;End Date;Availability
Anne U;19-05-2020;20-05-2020;8
| Name | Start Date | End Date | Availability |
| Anne U | 19-05-2024 | 20-05-2024 | 8 |
The 1st row contains column names.
The 2nd row contains Resource Name that is Anne U and availability specified for 8 hours in date range from 19-05-2024 until 20-05-2024.
2. To add the availability, add new line with resource name that in this case is used as id.
In below example you can see how to add new line with availability.
Name;Start Date;End Date;Availability
Anne U;19-05-2024;20-05-2024;8
Anne U;21-05-2024;26-05-2024;4
| Name | Start Date | End Date | Availability |
| Anne U | 19-05-2024 | 20-05-2024 | 8 |
| Anne U | 21-05-2024 | 26-05-2024 | 4 |
The 1st row contains column names.
The 2nd row contains Resource Name that is Anne U and availability specified for 8 hours in date range from 19-05-2024 until 20-05-2024.
The 3rd row contains Resource Name that is Anne U and availability specified for 4 hours in date range from 21-05-2024 until 26-05-2024.
Availability CSV file contains next columns:
Name – Refers to the resource name.
Start Date – Indicates the beginning date of the date range for which you want to specify working hours.
End Date – Represents the end date of the date range for which you want to specify working hours.
Availability – Refers to the working hours you wish to specify within the specified date range.
– Resource Pool
This template contains a structured format for importing resource data into a resource management system.
- Example #1: Creating a Resource Pool CSV FIle: including Multigroup.
1. Below you can see a table that represents Resource Pool headers and values such as Multigroup, Group and Resource.
| ResID | ResName | Type | Parent | IsMulti | Color | RiskFactor | BookingId | GroupType | Groups | Roles | Competences | Initials | Tags | Attributes | UserType | Rate | Calendar | Availability | StartDate | EndDate | ExternalID2 | MaterialName | MaterialShortName | MaterialCost | MaterialRate | Teams | TeamLead | AvailabilityPerUnit | |
| Marketing | G | True | |||||||||||||||||||||||||||
| Research | G | Marketing | |||||||||||||||||||||||||||
| Amelia T | R | Research | User |
The 1st row contains column names.
The 2nd row specifies Group named ‘Marketing’ that is Multi Group.
The 3rd row specifies group named ‘Research’ that isn’t Multi Group; however it belongs to the Multi Group specified in the 2nd row.
The 4th row Specifies a Resource Named Amelia T, with a ‘User’ Role and assigned to the Group ‘Research’.
2. In CSV Format this example looks like this
;Marketing;G;;;True;;;;;;;;;;;;;;;;;;;;;;;;;;;;;Research;G;;;Marketing;;;;;;;;;;;;;;;;;;;;;;;;;;;Amelia T;R;;;;;;;;;;;;;;Research;User;;;;;;;;;;;;;;;;
Minimum Required Fields to upload Resource via Resource Pool:
ResName, Type: R, Groups
Minimum Required Fields to upload Group via Resource Pool:
GroupName, Type: G
Upload:
Read here how to upload Resource Pool to the system.
Export:
Read here how to export Resource Pool from the system.
Update:
To update Resources, you must first obtain their unique IDs. This requires exporting the Resource Pool file to access this information. Once you have retrieved the IDs, you can proceed with updating the resources by modifying the desired fields, preserving received IDs.
- Example #2: Updating Resource Pool
1. You have exported file that looks like this:
1;Research;G;;;;;;;;;;;;;;;;;;;;;;;;;;;;
2;Amelia T;R;;;;;;;;;;;;;;Research;User;;;;;;;;;;;;;;;;
| ResID | ResName | Type | Parent | IsMulti | Color | RiskFactor | BookingId | GroupType | Groups | Roles | Competences | Initials | Tags | Attributes | UserType | Rate | Calendar | Availability | StartDate | EndDate | ExternalID2 | MaterialName | MaterialShortName | MaterialCost | MaterialRate | Teams | TeamLead | AvailabilityPerUnit | |
| 1 | Research | G | |||||||||||||||||||||||||||
| 2 | Amelia T | R | Research | User |
The 1st row contains column names.
The 2nd row specifies a Group named ‘Research’ with ID 1. This ID is necessary to proceed with updates of this resource
The 3rd row specifies a Resource named ‘Amelia T’ with ID 2. This ID is necessary to proceed with updates of this resource.
2. To update the Resource Pool your file needs to look like this
1;Research;G;;;;;;;;;;;;;;;;;;;;;;;;;;;;
2;NewUserName;R;;;;;;;;;;;;;;Research;User;;;;;;;;;;;;;;;;
| ResID | ResName | Type | Parent | IsMulti | Color | RiskFactor | BookingId | GroupType | Groups | Roles | Competences | Initials | Tags | Attributes | UserType | Rate | Calendar | Availability | StartDate | EndDate | ExternalID2 | MaterialName | MaterialShortName | MaterialCost | MaterialRate | Teams | TeamLead | AvailabilityPerUnit | |
| 1 | Research | G | |||||||||||||||||||||||||||
| 2 | NewUserName | R | Research | User |
The 1st row contains column names.
The 2nd row specifies a Group named ‘Research’ with ID 1. Everything remains the same, which means this record is not updated.
The 3rd row changes the previous Resource name ‘Amelia T’ to ‘NewUserName’. This change is possible with the record ID, which is 2.
Add:
Previously, you saw an example of uploading new resources to the system when none were present. Now, we’ll demonstrate the correct procedure for adding additional resources to existing ones. This procedure is very similar to the update procedure. You need to export the resource pool from the system, then add a new resource with a specified unique ID.
- Example #3 Adding New Resources to the Resource Pool
1. You have exported file that looks like this:
1;Research;G;;;;;;;;;;;;;;;;;;;;;;;;;;;;
| ResID | ResName | Type | Parent | IsMulti | Color | RiskFactor | BookingId | GroupType | Groups | Roles | Competences | Initials | Tags | Attributes | UserType | Rate | Calendar | Availability | StartDate | EndDate | ExternalID2 | MaterialName | MaterialShortName | MaterialCost | MaterialRate | Teams | TeamLead | AvailabilityPerUnit | |
| 1 | Research | G |
The 1st row contains column names.
The 2nd row specifies a Group named ‘Research’ with ID 1.
2. To add the Resource your file needs to look like this:
1;Research;G;;;;;;;;;;;;;;;;;;;;;;;;;;;;;New_Group;G;;;;;;;;;;;;;;;;;;;;;;;;;;;;;New_User;R;;;New_Group;;;;;;;;;;;;;;;;;;;;;;;;;
| ResID | ResName | Type | Parent | IsMulti | Color | RiskFactor | BookingId | GroupType | Groups | Roles | Competences | Initials | Tags | Attributes | UserType | Rate | Calendar | Availability | StartDate | EndDate | ExternalID2 | MaterialName | MaterialShortName | MaterialCost | MaterialRate | Teams | TeamLead | AvailabilityPerUnit | |
| 1 | Research | G | |||||||||||||||||||||||||||
| New_Group | G | ||||||||||||||||||||||||||||
| New_User | R | New_Group |
The 1st row contains column names.
The 2nd row specifies a Group named ‘Research’ with ID 1. It remains the same as in the exported file.
The 3rd row specifies a new group named ‘New_Group’.
The 4th row specifies a new resource named ‘New_User’ that belongs to ‘New_Group’.
Delete:
To remove resources from the system, you must first obtain their unique IDs by exporting the Resource Pool file. Once you have retrieved the IDs, you can proceed to remove the resources by specifying “-” before their IDs.
Competenies Levels in Resource Pool:
It’s possible to specify competences levels in Resource Pool.
- Example #4: Defining Competencies Levels in Resource Pool
- Below, you can see a table representing resource pool headers with defined resources and their competences, including competences levels.
| ResID | ResName | Type | Parent | IsMulti | Color | RiskFactor | BookingId | GroupType | Groups | Roles | Competences | Initials | Tags | Attributes | UserType | Rate | Calendar | Availability | StartDate | EndDate | ExternalID2 | MaterialName | MaterialShortName | MaterialCost | MaterialRate | Teams | TeamLead | AvailabilityPerUnit | |
| Research | G | ||||||||||||||||||||||||||||
| Tomas Z | R | Research | User | Graphic Design | CalendarName | ||||||||||||||||||||||||
| Amber U | R | Research | ProjectManager | Graphic Design[4], Analytical thinking[1..5] | CalendarName |
The 1st row contains column names.
The 2nd row specifies a Group named ‘Research’
The 3rd row specifies a resource named ‘Tomas Z’ that belongs to group research. User’s role is User, and Competences: Graphic Design. In this example in system will see competences levels as from 1-5 (see picture below.)
The 4th row specifies a resource named ‘Amber U’ that belongs to group research. User’s roles is ProjectManager and competences: Graphic Design[1], Analytical thinking[1..4]
2. In CSV File this example will look like this:
;Research;G;;;;;;;;;;;;;;;;;;;;;;;;;;;;;Tomas Z;R;;;Research;;;;;;User;Graphic ;Design;;CalendarName;;;;;;;;;;;;;;;;;;;;;;;Amber U;R;;;Research;;;;;;ProjectManager;Graphic Design[4]; ;Analytical thinking[1..5];;CalendarName;;;;;;;;;;;;;;;;;;;;;;
3. In Epicflow File this example will look like this:

#Screen 11 Competences Tomas Z

#Screen 12 Competences Amber U
Resource Pool CSV file contains next columns:
- ResID – This field represents the unique identifier for each resource. It’s a numeric value used to distinguish one resource from another within the system. During removing resources you need to specify “-” before Resource ID.
- ResName – This field contains the name or title of the resource. It provides a human-readable identifier for the resource.
- Type – Indicates the type of the resource. For example, it might specify whether the resource is a person or a group or any other relevant type.
- ExternalID2 – Used for mapping a user to an external system. In the resource card, this value is displayed as the Internal ID.
- Parent – This field establishes a hierarchical relationship between resources. It indicates the parent resource for each entry, helping to organize resources into groups or subgroups.
- IsMulti – This field likely indicates whether the resource is multigroup.
- Color – Defines color of the group. Specify # before defining color
- RiskFactor – Indicates the risk factor associated with the resource.
- BookingId – Defines booking id of the group.
- GroupType – Specifies the type of group: Material or UCLT, in case the type of group is ordinary levae this field empty
- Email – Represents the email address associated with the resource
- Groups – Specifies any specific groups to which the resource belongs.
- Roles – Specifies the roles associated with the resource.
- Competences – Indicates the competences possessed by the resource.
- Initials – represents the initials of the resource’s name
- Tags – Provides tags associated with the resource.
- Attributes – Provides attributes associated with the resource
- UserType – Provides information abour UserType: Generic, User, UnitPool. If the
UserTypeparameter is not specified/left empty, by default it will specified as User. - Rate – Specifies the rate associated with the resource.
- Calendar – Indicates the calendar associated with the resource
- Availability – Represents the availability of the resource.
- StartDate and EndDate – Specify the start and end dates for the resource’s availability.
- MaterialName, MaterialShortName, MaterialCost, MaterialRate – These fields are specific to materials associated with the resource, providing details such as name, cost, and rate.
- Teams – Specifies any specific Teams to which the resource belongs.
- TeamLead – The leader or manager of a team.
- AvailabilityPerUnit – The amount of time, specified in hours, allocated for each unit.
More Examples:
- Example #5: Define Group in Resource Pool
1. Below, you can see a table where the group name is specified as ‘Promotion.’ This group does not belong to a multi-group.
| ResID | ResName | Type | Parent | IsMulti | Color | RiskFactor | BookingId | GroupType | Groups | Roles | Competences | Initials | Tags | Attributes | UserType | Rate | Calendar | Availability | StartDate | EndDate | ExternalID2 | MaterialName | MaterialShortName | MaterialCost | Teams | TeamLead | AvailabilityPerUnit | |
| Promotion | G |
The 1st row contains column names.
The 2nd row specifies Group named ‘Promotion’
2. In CSV Format this example looks like this
;Promotion;G;;;;;;;;;;;;;;;;;;;;;;;
- Example #6
1.Below, you can see a table where the group name is specified as ‘Procurement’ and the resource is named ‘Lukas A.’ Other values such as Groups, Competences, Initials, Calendar, and StartDate are also filled.
| ResID | ResName | Type | Parent | IsMulti | Color | RiskFactor | BookingId | GroupType | Groups | Roles | Competences | Initials | Tags | Attributes | UserType | Rate | Calendar | Availability | StartDate | EndDate | ExternalID2 | MaterialName | MaterialShortName | MaterialCost | MaterialRate | Teams | TeamLead | AvailabilityPerUnit | |
| Procurement | G | ||||||||||||||||||||||||||||
| Lukas A | R | Procurement | User, Administrator | LA | CalendarName | 08-02-2023 |
The 1st row contains column names.
The 2nd row specifies Group named ‘Procurement’
The 3rd row Specifies a Resource Named Lukas A with ‘User’ and ‘Administrator’ Roles assigned to the Group ‘Procurement’. Additionally, we have initials specified as ‘LA’, a calendar assigned to the user named ‘CalendarName’, and the user’s start date specified as 08-02-2023.
2. In CSV Format this example looks like this
;Procurement;G;;;;;;;;;;;;;;;;;;;;;;;;
;Lukas A;R;;;Procurement;;;;LA;;User; Administrator;;CalendarName;;08-02-2023;;;;;;;;;;;;;;;;;;
– Project Data
This CSV file allows you to upload project data (project card details), including start and end dates, project manager, and more. For a full list of editable data, refer to the caption: ‘Project Data CSV file contains the following columns’ and search for the word ‘Editable’ next to each column definition.
This option supports bulk uploads, enabling you to upload multiple projects at once.
Use the template that follows a structured format for importing project data into the system.
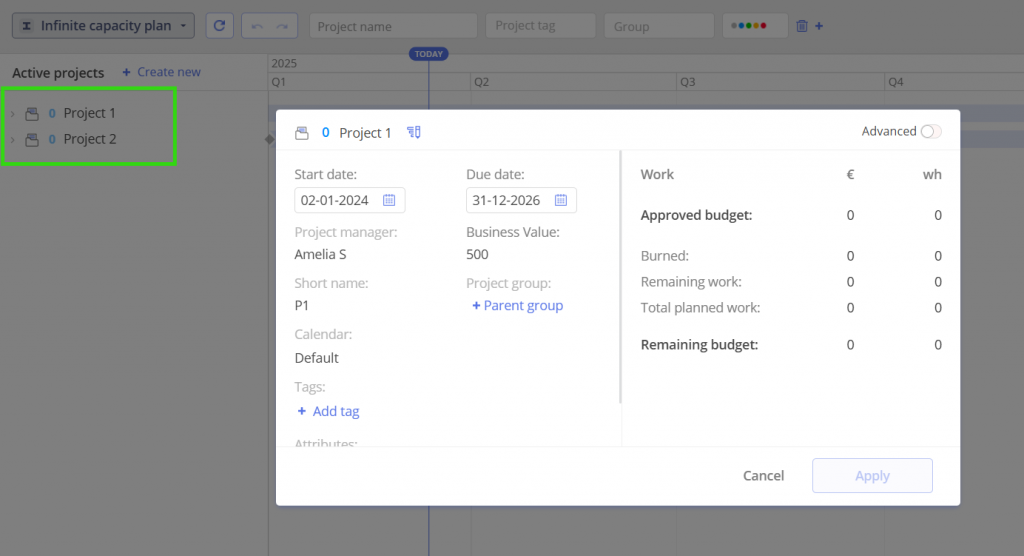
- Example #1: Creating Project Data in CSV File
- Below, you can see a table that represents the project headers and values for 2 Projects.
| ProjectID | ProjectName | Start | Finish | ProjManager | ShortName | Tags | Attributes | ProjectBookingID | ProjectBusinessValue | ApprovedBudget | ApprovedFinancialBudget | ProjectGroup | Teams | TeamBudget | ProjectBuffer | DeletionDate | ProjectCalendar | RemainingApprovedBudget | TotalPlannedWork | ScheduledWork | ActualWork | RemainingWork | RemainingBallparkBudget | BaselineWork | BaselineDifferenceShortageWh | LastSync | SyncBy | ProjectHierarchy | ProjBaselineDueDate | LeveledDueDate | DueDateDifferenceShortageCalendarDays | CreatedAt | CreatedBy | AddedAt | AddedBy | ArchivalDate | Priority |
| Project 1 | 02-01-2024 | 31-12-2026 | Amelia T | ||||||||||||||||||||||||||||||||||
Project 2 | 02-01-2025 | 31-12-2028 | Jim K |
The 1st row – contains column names.
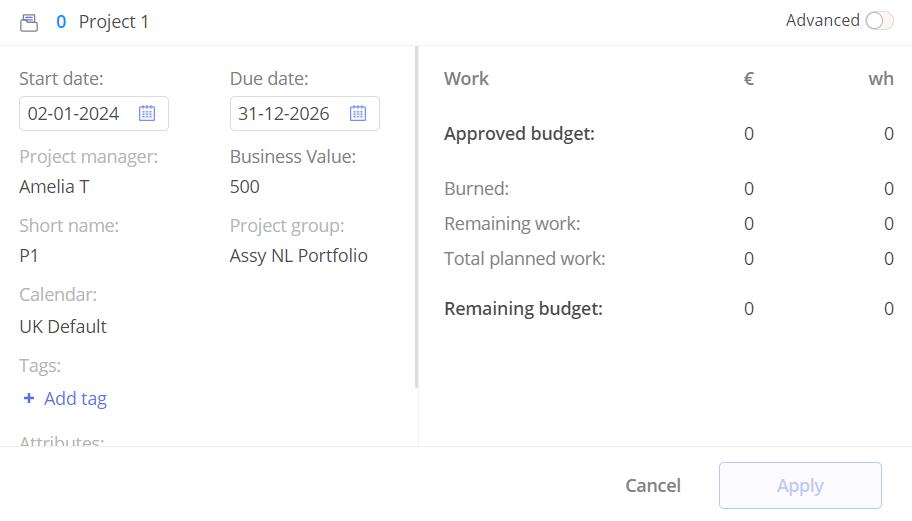
The 2nd row – specifies project data such as project name (Project 1), start date (02-01-2024), end date (31-12-2026), and Project Manager (Amelia T.).
The 3rd row – specifies project data such as project name (Project 2), start date (02-01-2025), end date (31-12-2028), and Project Manager (Jim K.).
2. In CSV Format this example looks like this:
;Project 1;02-01-2024;31-12-2026;Amelia S;;;;;;;;;;;;;;;;;;;;;;;;;;;;;;;;;;
;Project 2;02-01-2025;31-12-2028;Jim K;;;;;;;;;;;;;;;;;;;;;;;;;;;;;;;;;;
3. In Epicflow this Example looks like this:
#Screen 13 Project Data Example
Minimum Required Fields to Upload Project Data
– ProjectName
Import
Read here how to import Project Data to the system.
Export:
Read here how to export Project Data from the system.
Delete:
There is no option to remove project data when using a CSV file; this must be done directly through the Web User Interface. For more information, please refer to the following article: Manage Project.
Update:
To update Project Data, please export the existing Project Data, adjust the required fields, and then import it again.
Project Data CSV file contains next columns:
- ProjectID: A unique identifier for the project, helping distinguish it from other projects in the system. (Not Editable)
- ProjectName: The name of the project. (Editable)
- Start: The date when the project officially begins. (Editable)
- Finish: The date when the project is planned to be completed, marking the end of the project timeline. (Editable)
- ProjManager: The project manager responsible for overseeing the project’s progress and making key decisions. (Editable)
- ShortName: A shortened or abbreviated version of the project name, often used for quick reference. (Editable)
- Tags: Keywords or labels that categorize or describe the project. (Editable)
- Attributes: Additional specific characteristics that define the project. (Editable)
- ProjectBookingID: An identifier used to track the project’s booking in the system. (Editable)
- ProjectBusinessValue: A measure of the project’s value to the business, often used to prioritize projects. (Editable)
- ApprovedBudget: The total approved financial allocation for the project. (Editable)
- ApprovedFinancialBudget: A more detailed breakdown of the approved budget, potentially covering different financial categories. (Not Editable)
- ProjectGroup: Project Group that shares common characteristics. (Editable)
- Teams: The teams assigned to work on the project, responsible for its execution. (Editable)
- TeamBudget: The financial budget allocated specifically for the teams working on the project. (Editable)
- ProjectBuffer: Additional time or resources allocated to manage risks and potential delays in the project. (Editable)
- DeletionDate: The date when the project is marked for deletion, indicating its removal from the system. (Not Editable)
- ProjectCalendar: A calendar outlining the key dates and working hours for the project, providing a schedule for its activities. (Editable)
- RemainingApprovedBudget: The portion of the approved budget that has not yet been spent or allocated. (Not Editable)
- TotalPlannedWork: The total amount of work planned for the project, typically expressed in hours or other units. (Not Editable)
- ScheduledWork: The work that has been planned and scheduled to be completed within a specified time frame. (Not Editable)
- ActualWork: The amount of work that has been completed so far. (Not Editable)
- RemainingWork: The remaining work that still needs to be completed in order to finish the project. (Not Editable)
- RemainingBallparkBudget: An estimated remaining budget, typically used for forecasting purposes. (Not Editable)
- BaselineWork: The planned amount of work set as the baseline for comparison against actual work. (Not Editable)
- BaselineDifferenceShortageWh: The difference between the baseline work and actual work, indicating any shortages. (Not Editable)
- LastSync: The date and time when the project data was last synchronized or updated. (Not Editable)
- SyncBy: The user or system responsible for the last synchronization or update. (Not Editable)
- ProjectHierarchy: The position of the project within a broader portfolio or hierarchy of projects. (Not Editable)
- ProjBaselineDueDate: The expected completion date for the baseline project work. (Not Editable)
- LeveledDueDate: The adjusted due date after considering resource constraints and prediction. (Not Editable)
- DueDateDifferenceShortageCalendarDays: The difference in calendar days between the planned and actual or leveled due dates. (Not Editable)
- BaselineDueDateDifferenceShortageCalendarDays: The difference in calendar days between the baseline due date and the actual due date. (Not Editable)
- CreatedAt: The date when the project record was initially created. (Not Editable)
- CreatedBy: The user or system that created the project record. (Not Editable)
- AddedAt: The date when the project was added to the system. (Not Editable)
- AddedBy: The user who added the project to the system. (Not Editable)
- ArchivalDate: The date when the project was archived, indicating it is no longer actively managed. (Not Editable)
- Priority: The priority level of the project. (Not Editable)
– Project
This CSV file allows you to specify project data, including tasks, summaries, milestones, and their structure, for a single project at a time.
- Example #1: Creating Project in CSV File
- Below, you can see a table that represents the project headers and values. Here, you can observe the basic structure, including references such as nesting tasks under a summary and defining predecessors for tasks.
OrderNumber TaskType ProjectID ProjectName TaskUID Priority TaskName UIDSummary ResUID ResName GroupUID GroupName UniqueIDPredecessors RemainingWork ActualWork ScheduledWork Deadline Start Finish BaselineWork AssignmentID ProjManager Hyperlink ReadyToStartByPM AssignmentUnits TaskRemark1 TaskRemark2 TaskRemark3 Competencies Notes DurationUCLT ShortName PhaseType Color TaskPhases PhaseStage Tags Attributes GlobalPhase ProjectBookingID ItemBookingID BudgetResUID BudgetResName BudgetGroupUID BudgetGroupName BudgetDistributionPercents AutoDepletions ManuallySetDuration StartNotEarlier FinishNotLater ProjectBusinessValue ItemBusinessValue ProjectCalendar ItemCalendar AssignmentCalendar SuggestedResUID SuggestedResName SuggestedGroupUID SuggestedGroupName AverageWorkingHours projsum Project 1 02-01-2024 31-12-2026 Amelia T edd Project external end sms Project start 01-01-2024 idd Project end 31-12-2026 Milestone 1 Milestone Name Summary 2 Summary Name 1 Task Task Name 1 2 Promotion 1
The 1st row – contains column names.
The 2nd row – ProjSum – specifies project data such as project name (Project 1), start date (02-01-2024), end date (31-12-2026), and Project Manager (Amelia T.).
The 3rd row – Edd – specifies the project end date for 31-12-2026. Same as IDD (5th row). Both are needed due to technical reasons.
The 4th row – Sms- specifies the project start date for 01-01-2024.
The 5th row – Idd – same as the 3rd row, specifies the project end date for 31-12-2026. Both are needed due to technical reasons.
The 6th row – Milestone- specifies information regarding milestone such as ID in the column Task_UID (1), which we will later use to refer to this Milestone as a task predecessor. Milestone Name (Milestone Name) and Milestone Deadline (26-04-2024)
The 7th row – Summary – specifies information regarding summaries such as Summaries ID in the column Task_UID – 2, which we will later use to place tasks in a summary.
The 8th row – Task – specifies information regarding tasks such as the task name (Task Name 1), UID_Summary (which will place tasks in a summary), Group Name (Promotion), and Unique_ID_Predecessors 1 (which refers to previously defined milestones).
2. In CSV Format this example looks like this:
;projsum;;Project 1;;;;;;;;;;;;;;02-01-2024;31-12-2026;;;Amelia T;;;;;;;;;;;;;;;;;;;;;;;;;;;;;;;;;;;;;
;edd;;;;;Project external end;;;;;;;;;;31-12-2026;;;;;;;;;;;;;;;;;;;;;;;;;;;;;;;;;;;;;;;;;;;
;sms;;;;;Project start;;;;;;;;;;01-01-2024;;;;;;;;;;;;;;;;;;;;;;;;;;;;;;;;;;;;;;;;;;;
;idd;;;;;Project end;;;;;;;;;;31-12-2026;;;;;;;;;;;;;;;;;;;;;;;;;;;;;;;;;;;;;;;;;;;
;Milestone;;;1;;Milestone Name;;;;;;;;;;26-04-2024;;;;;;;;;;;;;;;;;;;;;;;;;;;;;;;;;;;;;;;;;; ;Summary;;;2;;Summary Name 1;;;;;;;;;;;;;;;;;;;;;;;;;;;;;;;;;;;;;;;;;;;;;;;;;;;;;
;Task;;;;;Task Name 1;2;;;;Promotion;1;;;;;;;;;;;;;;;;;;;;;;;;;;;;;;;;;;;;;;;;;;;;;;;
3. In Epicflow this Example looks like this:
#Screen 14 Project Card First Example
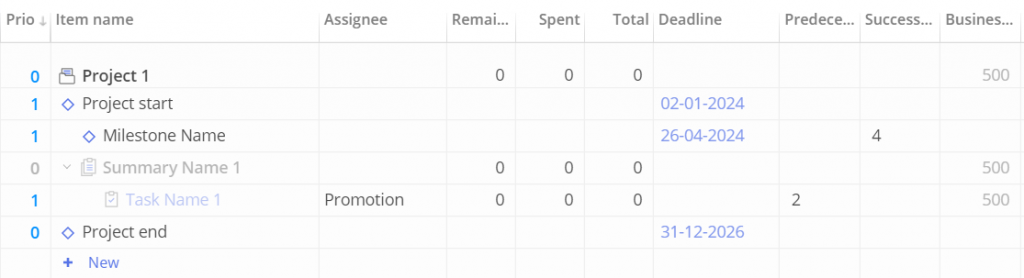
#Screen 15 Project Structure First Example
Minimum Required Fields to Upload Project
– For Project: TaskType: ProjSum, ProjectName
Minimum Required Fields to Upload Additional Items: Task, Milestone, Summary, Phase Data Records
– For Task: TaskType, TaskName, GroupUID or GroupName
– For Milestone, Summary, Phase: TaskType, TaskName
Upload:
Read here how to upload Project to the system.
Export:
Read here how to export Project from the system.
There is no possibility to remove project within CSV file usage and that must be done directly from Web User Interface. For additional information please refer to the next article “Project Card“
Update:
To update project you need to first export Project from the system since you need id’s of project items.
Once you exported the file, access the file, edit desired fields, further sign in Epicflow, navigate to the Pipeline Page, click on three dots next to the Project Name and select an option Update Project from File, Selected the file and Upload it to the system. Once you did it changes will be applied.
#Screen 16 Project Update From File
- Example #2: Updating Project Start and End Dates
1. You have exported file that looks like this:
;projsum;2051;Project 1;;190;;;;;;;;;;;;02-01-2024;31-12-2026;;;Sara H;;;;;;;;;;;;;;;Tag1;;;;;;;;;;;;;;;;;;;;;;;
;sms;2051;Project 1;3;0;Project start;;;;;;;;;;02-01-2024;;;;;;;;;;;;;;;;;;;;;;;;;;;;;;;;;;;;;;;;;;;
;Summary;2051;Project 1;9;190;Summary Name 1;;;;;;;;;;;;;;;;;;;;;;;;;;;;;;Tag1;;;;;;;;;;;;;;;;;;;;;;;
;Task;2051;Project 1;11;190;Task Name 1;9;;;2000000004;Branding;;4;4;8;;;;0;1;Joan G;;;1;;;;;;;;;;;;Tag2;;;;;;;;;;;;;;;;;;;;;;;
;idd;2051;Project 1;5;0;Project end;;;;;;;;;;31-12-2026;;;;;;;;;;;;;;;;;;;;;;;;;;;;;;;;;;;;;;;;;;;
| OrderNumber | TaskType | ProjectID | ProjectName | TaskUID | Priority | TaskName | UIDSummary | ResUID | ResName | GroupUID | GroupName | UniqueIDPredecessors | RemainingWork | ActualWork | ScheduledWork | Deadline | Start | Finish | BaselineWork | AssignmentID | ProjManager | Hyperlink | ReadyToStartByPM | AssignmentUnits | TaskRemark1 | TaskRemark2 | TaskRemark3 | Competencies | Notes | DurationUCLT | ShortName | PhaseType | Color | TaskPhases | PhaseStage | Tags | Attributes | GlobalPhase | ProjectBookingID | ItemBookingID | BudgetResUID | BudgetResName | BudgetGroupUID | BudgetGroupName | BudgetDistributionPercents | AutoDepletions | ManuallySetDuration | StartNotEarlier | FinishNotLater | ProjectBusinessValue | ItemBusinessValue | ProjectCalendar | ItemCalendar | AssignmentCalendar | SuggestedResUID | SuggestedResName | SuggestedGroupUID | SuggestedGroupName | AverageWorkingHours |
| projsum | 2051 | Project 1 | 02-01-2024 | 31-12-2026 | Joan G | ||||||||||||||||||||||||||||||||||||||||||||||||||||||
| sms | 2051 | Project 1 | 3 | Project start | 01-01-2024 | ||||||||||||||||||||||||||||||||||||||||||||||||||||||
| Summary | 2051 | Project 1 | 9 | Summary 1 | |||||||||||||||||||||||||||||||||||||||||||||||||||||||
| Task | 2051 | Project 1 | 9 | Task 1 | 2000000004 | Branding | Tag1, Tag2 | Attribute1, Attribute2 | |||||||||||||||||||||||||||||||||||||||||||||||||||
| idd | 2051 | Project 1 | 5 | 9 | 4 | 4 | 31-12-2026 |
The 1st row contains column names.
The 2nd row specifies a Project named ‘Project 1’ with ID 2051. This ID is necessary to proceed with updates of this resource
The 3rd row specifies a start milestone date with ID 3. This ID is necessary to proceed with updates of this resource.
The 4th row specifies a Summary item with ID 9. This ID is necessary to proceed with updates of this resource.
The 5th row specifies a Task item date with ID 9. This ID is necessary to proceed with updates of this resource.
The 6th row specifies an End Milestone with ID 5. This ID is necessary to proceed with updates of this resource.
2. To update Project from file your file needs to looks like this
;projsum;2051;Project 1;;190;;;;;;;;;;;;02-01-2022;31-12-2028;;;Sara H;;;;;;;;;;;;;;;Tag1;;;;;;;;;;;;;;;;;;;;;;;
;sms;2051;Project 1;3;0;Project start;;;;;;;;;;02-01-2022;;;;;;;;;;;;;;;;;;;;;;;;;;;;;;;;;;;;;;;;;;;
;Summary;2051;Project 1;9;190;Summary Name 1;;;;;;;;;;;;;;;;;;;;;;;;;;;;;;Tag1;;;;;;;;;;;;;;;;;;;;;;;
;Task;2051;Project 1;11;190;Task Name 1;9;;;2000000004;Branding;;4;4;8;;;;0;1;Joan G;;;1;;;;;;;;;;;;Tag2;;;;;;;;;;;;;;;;;;;;;;;
;idd;2051;Project 1;5;0;Project end;;;;;;;;;;31-12-2028;;;;;;;;;;;;;;;;;;;;;;;;;;;;;;;;;;;;;;;;;;;
| OrderNumber | TaskType | ProjectID | ProjectName | TaskUID | Priority | TaskName | UIDSummary | ResUID | ResName | GroupUID | GroupName | UniqueIDPredecessors | RemainingWork | ActualWork | ScheduledWork | Deadline | Start | Finish | BaselineWork | AssignmentID | ProjManager | Hyperlink | ReadyToStartByPM | AssignmentUnits | TaskRemark1 | TaskRemark2 | TaskRemark3 | Competencies | Notes | DurationUCLT | ShortName | PhaseType | Color | TaskPhases | PhaseStage | Tags | Attributes | GlobalPhase | ProjectBookingID | ItemBookingID | BudgetResUID | BudgetResName | BudgetGroupUID | BudgetGroupName | BudgetDistributionPercents | AutoDepletions | ManuallySetDuration | StartNotEarlier | FinishNotLater | ProjectBusinessValue | ItemBusinessValue | ProjectCalendar | ItemCalendar | AssignmentCalendar | SuggestedResUID | SuggestedResName | SuggestedGroupUID | SuggestedGroupName | AverageWorkingHours |
| projsum | 2051 | Project 1 | 02-01-2022 | 31-12-2028 | Joan G | ||||||||||||||||||||||||||||||||||||||||||||||||||||||
| sms | 2051 | Project 1 | 3 | Project start | 01-01-2022 | ||||||||||||||||||||||||||||||||||||||||||||||||||||||
| Summary | 2051 | Project 1 | 9 | Summary 1 | |||||||||||||||||||||||||||||||||||||||||||||||||||||||
| Task | 2051 | Project 1 | 9 | Task 1 | 2000000004 | Branding | Tag1, Tag2 | Attribute1, Attribute2 | |||||||||||||||||||||||||||||||||||||||||||||||||||
| idd | 2051 | Project 1 | 5 | 9 | 4 | 4 | 31-12-2028 |
The 1st row contains column names.
The 2nd row specifies a project named ‘Project 1’ with ID 2051. This ID is necessary to proceed with updates to this resource. You can see that the Start and End Dates are updated compared to the table: Table 33 Update Project from file 2.
The 3rd row specifies an updated start milestone date with ID 3. This ID is necessary to proceed with updates to this resource.
The 4th row specifies a Summary item with ID 9. This ID is necessary to proceed with updates of this resource. In this example nothing was updated in this row.
The 5th row specifies a Task item date with ID 9. This ID is necessary to proceed with updates of this resource. In this example nothing was updated in this row.
The 6th specifies an updated End Milestone with ID 5. This ID is necessary to proceed with updates to this resource.
Delete:
There is no possibility to remove project within CSV file usage and that must be done directly from Web User Interface. For additional information please refer to the next article “Deleting a Project“
Project CSV file contains next columns:
- OrderNumber – Displays the order number of items in Quick Edit Mode. This is not editable and is only for export purposes, making it easier for the user to quickly match items in the file
- TaskType – Type of Item. In Epicflow’s Projects, we distinguish five types of items here is how you should refer to them in csv file.
ProjSum– defines beginning of the Project’s information blockPhase– refers to phase,Milestone– refers to Milestone,Summary– refers to SummaryTask– refers to Task,SMS– refers to a Project Start Date,EDDandIDDboth refer to the Project End Date (External and Internal correspondingly)
- ProjectID – Unique identifier for the project.
- ProjectName – Name of the project.
- TaskUID – Unique identifier for the item.
- Priority – Priority of the item.
- TaskName – Name of the item.
- UIDSummary – Summary task’s unique identifier.
- ResUID – Unique identifier for the resource assigned to the task.
- ResName – Name of the resource assigned to the task.
- GroupUID – Unique identifier for the group assigned to the task.
- GroupName – Name of the group assigned to the task.
- UniqueIDPredecessors – Unique identifiers of task predecessors.
- RemainingWork – Remaining work required for task completion.
- Actual_Work – Actual work completed on the task.
- ScheduledWork – The work scheduled for the task is for export purposes and it is displaying the total work. During importing only the remaining work and actual work (spent hours) are required and used by the system to calculate the total hours for the task.
- Deadline – Item deadline or due date.
- Start – Start date of the item.
- Finish – Finish date of the item.
- BaselineWork – Baseline work for the task.
- AssignmentID – Identifier for the task assignment. This column is filled when exporting project. When importing new project this column should be left empty.
- ProjManager – Project manager responsible for the project.
- Hyperlink
- ReadyToStartByPM – It means that task has status “Force Ready to Start”
- AssignmentUnits – Assignment units for the task.
- TaskRemark1 – Remark or additional information about the task (1st remark).
- TaskRemark2 – Remark or additional information about the task (2st remark).
- TaskRemark3 – Remark or additional information about the task (3st remark).
- Competencies– Competence required for task completion.
- Notes – Additional notes or comments about the task.
- DurationUCLT
- ShortName
- PhaseType – Type of project phase: Sprint, Release, Customized. (If you would like to refer to phase item you need to specify Task_UID for this phase. f.e “1”, and then you can specify this ID in Task_Phases field “1”)
- Color – Only for Customized Phase Type.
- TaskPhases – Phases associated with the task
- PhaseStage – Stage of the project phase
- Tags – Tags associated with the task.
- Attributes – Attributes associated with the task.
- GlobalPhase – This field indicates whether there are any global phases, and can be specified as either true or false.
- ProjectBookingID – This can only be specified for projects, and the value in Epicflow can be found in the project card.
- ItemBookingID – This can be specified for tasks, summaries, and milestones, and the value in Epicflow can be found in the item card.
- BudgetResUID – A unique identifier for a specific budgeted resource.
- BudgetResName – The name of a budgeted resource.
- BudgetGroupUID– A unique identifier for a group of budgeted resources.
- BudgetGroupName – The name of a group of budgeted resources.
- BudgetDistributionPercents – The percentage distribution of a budget among various resources.
- AutoDepletions – Value: True/False – A feature that automatically depletes tasks. Setting it to True enables the feature. If the value is not specified or left empty, the default is False.
- ManuallySetDuration – A user-defined time period specifying the duration of tasks.
- StartNotEarlier – The earliest possible start date for a project item.
- FinishNotLater – The latest possible finish date for a project item.
- ProjectBusinessValue – The assigned business value of the entire project.
- ItemBusinessValue – The assigned business value of an individual item within the project.
- ProjectCalendar – The calendar defining the working days and hours for the entire project.
- ItemCalendar – The calendar defining the working days and hours for a specific item (task or summary).
- AssignmentCalendar – The calendar specifying the working days and hours for an individual assignment/resource.
- SuggestedResUID – A unique identifier (UID) for the suggested resource to be assigned to a task.
- SuggestedResName – The name of the suggested resource to be assigned to a task.
- SuggestedGroupUID – A unique identifier (UID) for the suggested resource group for a task.
- SuggestedGroupName -The name of the suggested resource group for a task.
- AverageWorkingHours – The average number of working hours per task assignment.
More Examples
- Example #2: Creating Project in CSV File Including Phases.
- Below, you can see a table representing the project headers and values. Here, you can observe the structure, including phases and defining these phases for tasks.
OrderNumber TaskType ProjectID ProjectName TaskUID Priority TaskName UIDSummary ResUID ResName GroupUID GroupName UniqueIDPredecessors RemainingWork ActualWork ScheduledWork Deadline Start Finish BaselineWork AssignmentID ProjManager Hyperlink ReadyToStartByPM AssignmentUnits TaskRemark1 TaskRemark2 TaskRemark3 Competencies Notes DurationUCLT ShortName PhaseType Color TaskPhases PhaseStage Tags Attributes GlobalPhase ProjectBookingID ItemBookingID BudgetResUID BudgetResName BudgetGroupUID BudgetGroupName BudgetDistributionPercents AutoDepletions ManuallySetDuration StartNotEarlier FinishNotLater ProjectBusinessValue ItemBusinessValue ProjectCalendar ItemCalendar AssignmentCalendar SuggestedResUID SuggestedResName SuggestedGroupUID SuggestedGroupName AverageWorkingHours projsum Project 1 02-01-2024 31-12-2026 Joan G edd Project external end sms Project start 01-01-2024 idd Project end 31-12-2026 Phase 1 Phase 1 Sprint Phase 2 Phase 2 Release Milestone Milestone Name Summary 4 Summary Name 1 Tag1, Tag2 Attribute1, Attribute2 Task Task Name 1 4 Promotion 4 4 1, 2
The 1st row – contains column names.
The 2nd row – ProjSum – specifies project data such as project name (Project 1), start date (02-01-2024), end date (31-12-2026), and Project Manager (Joan G.).
The 3rd row – Edd – specifies the project end date for 31-12-2026. Same as IDD (5th row). Both are needed due to technical reasons.
The 4th row – Sms- specifies the project start date for 01-01-2024.
The 5th row – Idd – same as the 3rd row, specifies the project end date for 31-12-2026. Both are needed due to technical reasons.
The 6th row – Phase – specifies information regarding Phase, such as Phase Name (Phase 1) and Phase Type (Sprint). We have also specified information regarding the Phase’s ID in the column Task_UID (1), which we will later use to refer to this Phase as a Task Phase.
The 7th row – Phase – specifies information regarding Phase, such as Phase Name (Phase 2) and Phase Type (Release). We have also specified information regarding the Phase’s ID in the column Task_UID (2), which we will later use to refer to this Phase as a Task Phase.
The 8th row – Milestone- specifies information regarding milestone such as Milestone Name (Milestone Name) and Milestone Deadline (26-04-2024)
The 9th row – Summary – specifies information regarding summaries, such as the Summaries ID in the column Task_UID – 4, which we will later use as a reference to place tasks in a summary. Additionally, we can see tags and attributes added to the summary in columns Tags (Tag1, Tag2) and Attributes (Attribute1, Attribute2).
The 10th row – Task – specifies information regarding tasks, such as the task name (Task Name 1), UID_Summary (ID: 4 from the 9th row), Group Name (Promotion), Remaining Work (4), Actual Work (4), and Task_Phases (1, 2), which refer to previously defined phases.
2. In CSV Format this example looks like this:
;projsum;;Project Name;;;;;;;;;;;;;;02-01-2024;31-12-2026;;;;;;;;;;;;;;;;;;Tag1, Tag2;;;; ;;;;;;;;;;;;;;;;;;;
;sms;;;;;Project start;;;;;;;;;;01-01-2024;;;;;;;;;;;;;;;;;;;;;;;;;;;;;;;;;;;;;;;;;;;
;idd;;;;;Project end;;;;;;;;;;31-12-2026;;;;;;;;;;;;;;;;;;;;;;;;;;;;;;;;;;;;;;;;;;;
;Phase;;;1;;Phase 1;;;;;;;;;;;;;;;;;;;;;;;;;;Sprint;;;;;;;;;;;;;;;;;;;;;;;;;;; ;Phase;;;2;;Phase 2;;;;;;;;;;;;;;;;;;;;;;;;;;Release;;;;;;;; ;;;;;;;;;;;;;;;;;;;
;Milestone;;;3;;Milestone Name;;;;;;;;;;26-04-2024;;;;;;;;;;;;;;;;;;;;;;;;;;;;;;;;;;;;;;;;;; ;Summary;;;4;;Summary Name 1;;;;;;;;;;;;;;;;;;;;;;;;;;;;;;Tag1, Tag2;;;;;;;;;;;;;;;;;;;;;;;
;Task;;;;;Task Name;4;;;;Marketing;3;4;4;;;;;;;;;;;;;;;;;;;;1, 2;;;;;;;;;;;;;;;;;;;;;;;;;
3. In Epicflow this example looks like this:
#Screen 17 Project Structure Second Example
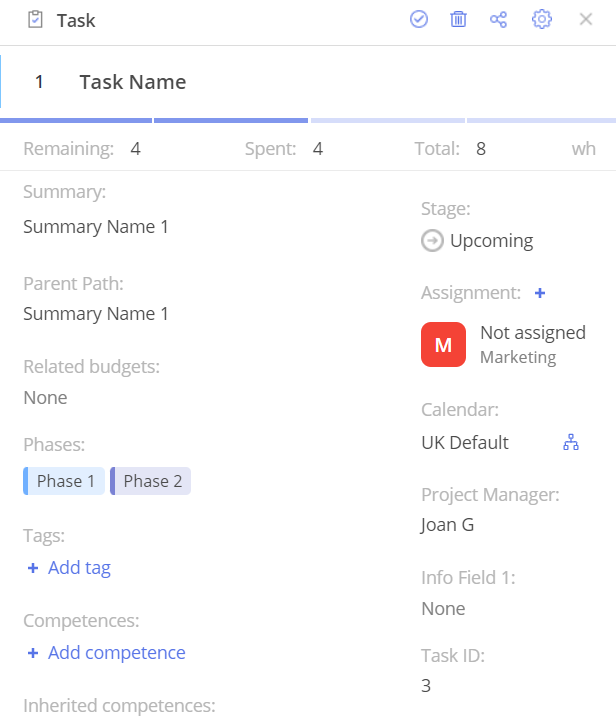
#Screen 18 Task Card displaying Phases
Colors in Epicflow
In Epicflow, you have the possibility to choose the color that a group or phase will be represented in. However, in CSV files, the naming is different, and you need to use unique codes to specify specific colors. Here are the codes:

#Screen 19 Epicflow Colors
#4FC3DE – Light Blue #70B0FF – Sky Blue #7A82D4 – Lavender Blue #B4D769 – Lime Green
#8BC874 – Light Green #60B5AB – Turquoise #FCDA00 – Yellow #F8BC00 – Orange Yellow
#DC7772 – Salmon Pink #E56597 – Pink #00BCD4 – Cyan #2196F3 – Blue
#3F51B5 – Indigo #8FC435 – Green #4CAF50 – Medium Green #009688 – Teal
#FCC400 – Golden Yellow #FA9C00 – Dark Orange #F44336 – Red #E91E63 – Rose
#3396AA – Steel Blue #2D6FDE – Royal Blue #3136A9 – Sapphire Blue #70A100 – Olive Green
#488F14 – Olive #287869 – Dark Green #FFAC00 – Bright Orange #EC8200 – Amber
#F32D45 – Cherry Red #B9225F – Raspberry Pink #1E5F65 – Dark Cyan #1940AB – Cobalt Blue
#1A1787 – Midnight Blue #3C6B00 – Dark Olive Green #295E00 – Deep Olive Green #0074D3 – Azure
#FF7C02 – Deep Saffron #DB5900 – Pumpkin #CA1F07 – Cardinal Red #811355 – Red Wine
Rules and Recommendation for CSV preparation
- New CSV file must be always created in accordance to the defined above CSV file Structure. Such can be downloaded from the page Wiki page.
- Keep in mind that defined changes will override old values for specified range in case of Update.
- Verify used separators and date format right before upload of the file
- Next separators of CSV file must be used
- for columns – ” ; “
- The date format should be compatible with the date format of your local Operating System.
- Next separators of CSV file must be used
- Structure of the CSV file verification is strongly advised (Example: you should not have extra separators at the end of the line which are not expected in accordance to the file structure)
- Before applying\introducing any new changes (Import) into the system backup preparation is advised. For that you can use Export functionality for the corresponding files.
- During the creation of any items, it’s not required to specify item IDs. However, if you need to build a structure in attributes, competences, or projects, each ID should be unique.
Import and Export
Be aware that Import\Export functionality is critical in prospective of data consistency and further analysis, so its usage is limited only to those users to which corresponding permission is assigned by System Administrator or PO.
For relevant permissions adjustment please refer to Permission configuration item.
Be aware that only CSV files of the corresponding structure are allowed for upload. Please use templates beforehand for data preparation. Do not hesitate to follow-up our Recommendations at CSV file preparation. Once you have all of the above, you can proceed with the Import or Export file functionalities.
Be aware that in contradistinction to Import \ Export of the Resource Pool, Calendar, Attributes, Competences, Logs (Export Only), which is done from the “System Maintenance” frame located at Settings page, Import \ Export of Projects is done from the Pipeline page.
Date Format Verification
- Verify your local date format
- It’s crucial to ensure that the same date format is selected during Project Export in Epicflow to avoid possible errors during the edit.
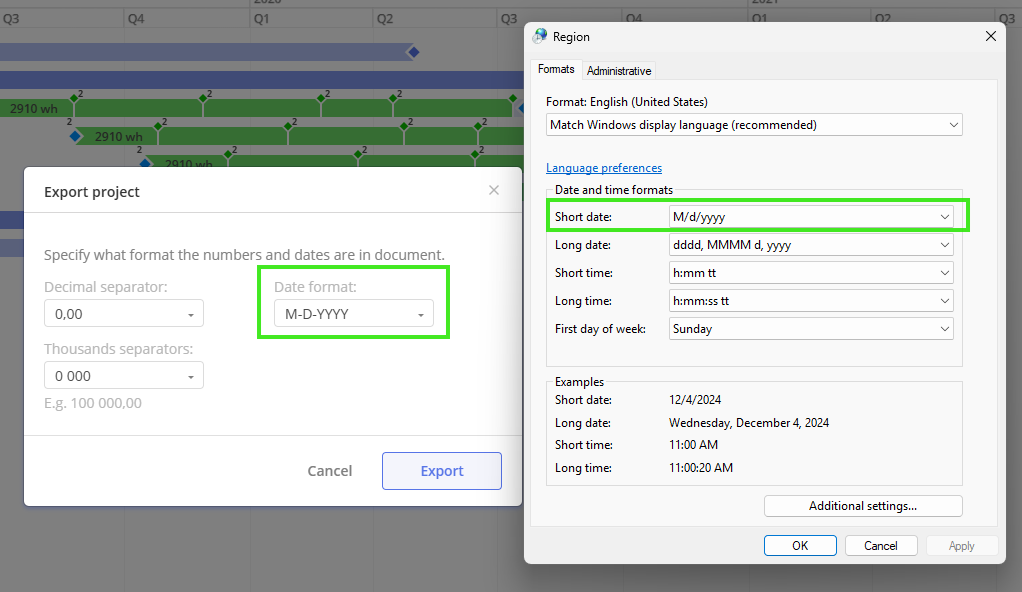
#Screen 20 Date Format Compatibility
Column Separator Verification
- Verify your local column separator
- Windows – use this link for further guidance
- MacOS – the CSV separator depends on the system’s region settings, which also affect number and date formats. For example, the US uses a comma (“,”) as the separator, while Germany and France use a semicolon (“;”). Changing the region can solve compatibility issues with 3rd party tools like f.e Excel, however will also change how dates and numbers are displayed. If you decide to change your region please refer to this link for detailed guidance.
- Change your local column separator to ‘;’ if required
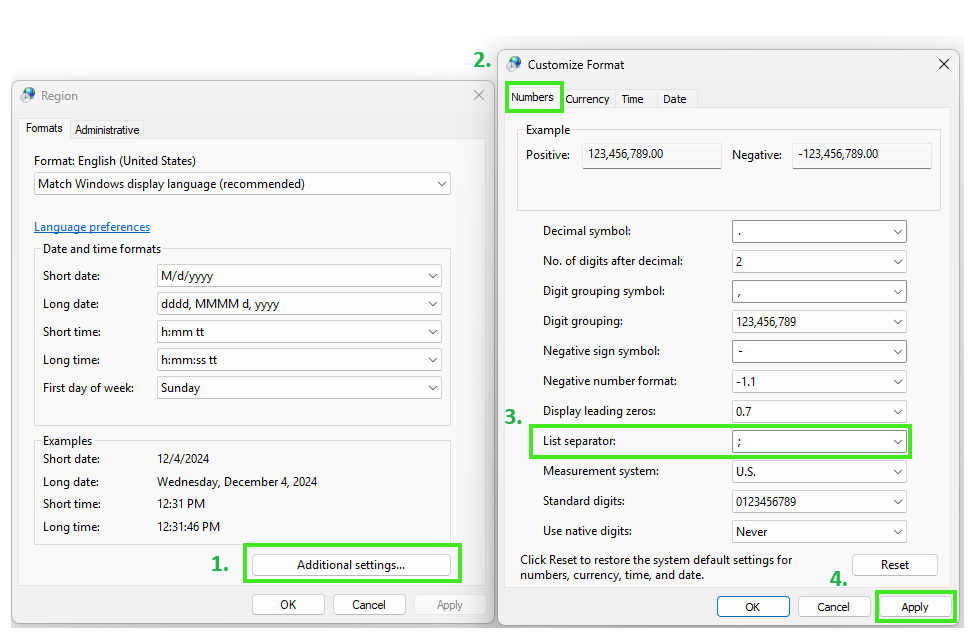
#Screen 21 Local Column Separator Windows Verification
Below more in details about each of such.
Import Project
- Prepare file: export Project from the system and edit it or download template
- Verify that the column separator in your file is set up as a semicolon (‘;’)
- Navigate to Pipeline Page.
- Click on + Create New Icon.
- From Drop-Down Menu select option Upload Project From File.
- Select a date format compatible with your local date format.
- Select a file.
- Click Upload Button.
#Screen 22 Import Project
Export Project
Project Export
- Verify your local date format (as described in the item above).
- Navigate to Pipeline Page
- Click on three dots icon next to the Project Name.
- From Drop-Down Menu select the ‘Export Project’ option.
- Specify the following settings for the exported file
- (Optional) Decimal Separator
- (Required) Date format
- (Optional) Thousands separators
- Click the ‘Export’ Button to download the file.
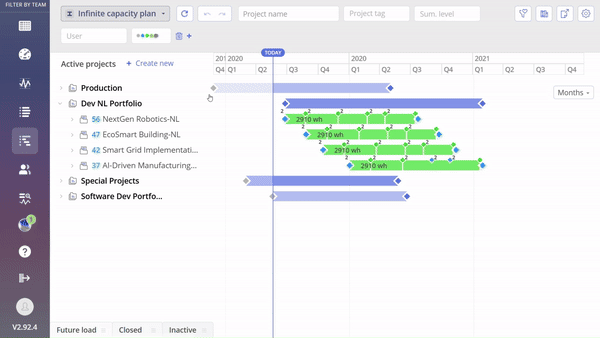
#Screen 23 Export Project
Import Resource Pool, Calendar, Availability and Project Data
- Prepare file: export data from the system and edit it or download template
- Verify that the column separator in your file is set up as a semicolon (‘;’)
- Navigate to the settings.
- In the top right corner click on Maintenance button.
- Choose Import Field.
- Select an appropriate file type: Resource Pool, Calendar , Availability or Project Data.
- Specify Decimal Separator compatible with your file.
- Specify a date format compatible with your local date format.
- Specify Thousands separators compatible with your file.
- (only for Availability Import) Specify Past date threshold.
- Select a file.
- Click Import Button

#Screen 24 Import Data File
Import Attributes and Competences
- Prepare file: export data from the system and edit it or download template
- Verify that the column separator in your file is set up as a semicolon (‘;’)
- Navigate to the settings.
- In the top right corner click on Maintenance button.
- Choose Import Field.
- Select an appropriate file type: Attributes or Competences.
- Select a file.
- Click Import Button
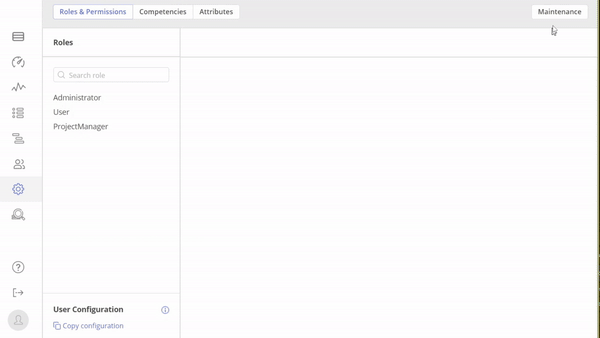
#Screen 25 Import Data Files
Export Resource Pool, Calendar, Availability and Project Data
- Verify local date format.
- Navigate to the settings.
- In the top right corner click on Maintenance button.
- Choose Export Field.
- Select an appropriate file type: Resource Pool, Calendar, Availability or Project Data.
- Specify Decimal Separator compatible with your file.
- Specify a date format compatible with your local date format (See step 1).
- Specify Thousands separators compatible with your file.
- (Required only during Resource Pool Export) Specify the scope of resources for export: Groups, Users, or Both.
- (Required only during Project Data Export) Specify the scope of projects for export: Active projects, Inactive Projects, Closed Projects, Archived Projects
- Click Export button.
#Screen 26 Export Data Files
Export Attributes, Competences and Logs
- Navigate to the settings.
- In the top right corner click on Maintenance button.
- Choose Export Field.
- Select an appropriate file type: Attributes, Competences or Logs.
- (Required only during Logs Export) Specify date range.
- Select the saving location on your computer.
- Click Export button.
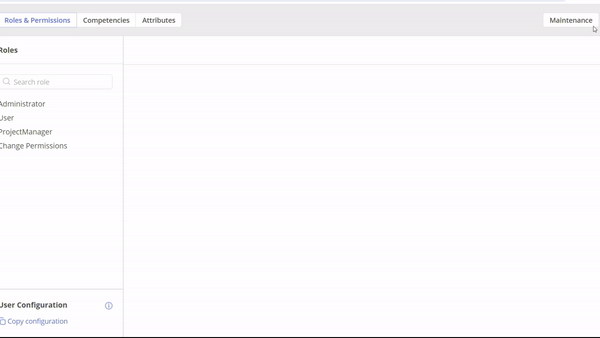
#Screen 27 Export Data File
Common Import Errors and How to Resolve Them
- 1. Invalid Date Format … (Row …)
Description: This error occurs when the date format in a specific row does not match the format selected during import in Epicflow.
How to Proceed: Locate and correct the specified row. It’s important to ensure that the date format in all date-related columns and their corresponding rows in the third-party tool (e.g., Excel) matches the date format selected in Epicflow. After making the adjustments, reattempt the import.
- 2. End date is not corresponding availability end date (row …)
Description: This error occurs when you try to import a resource pool that has incorrect format of Availability column.
#Screen 28 End date is not corresponding availability end date (row …) error
How to Proceed: Locate and correct the specified row. It’s important to ensure that each row with Availability values have Start Date and End Date. The correct format is shown in the screenshot below:
#Screen 29 Availability format in Resource Pool file
If you want to simply change the Availability value for a user without specifying their Start Date and End Date, you need to use an Availabilty export file.