The Role of Multigroups
Multigroup is a group that contains other groups but no resources/users can have a specified capacity in it directly.
You can use a Multigroup to analyze different Resource Groups. For example, it can be used as a representation of one department.
Multigroup in Epicflow is identified by a special “star” icon located to the left of the Multigroup name.
Creating a Multigroup
- To create a Multigroup in Epicflow press a “plus” icon located to the left of the column names in the top left corner. In a newly appeared context menu, you’ll see an option “create a group” and “create a multigroup”. To complete the creation of a multigroup, specify its name and color.
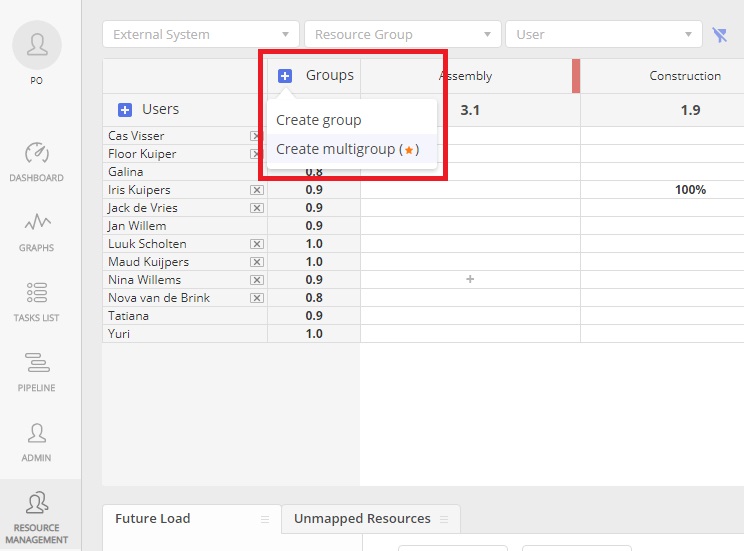
Screen #1 – Adding a Multigroup
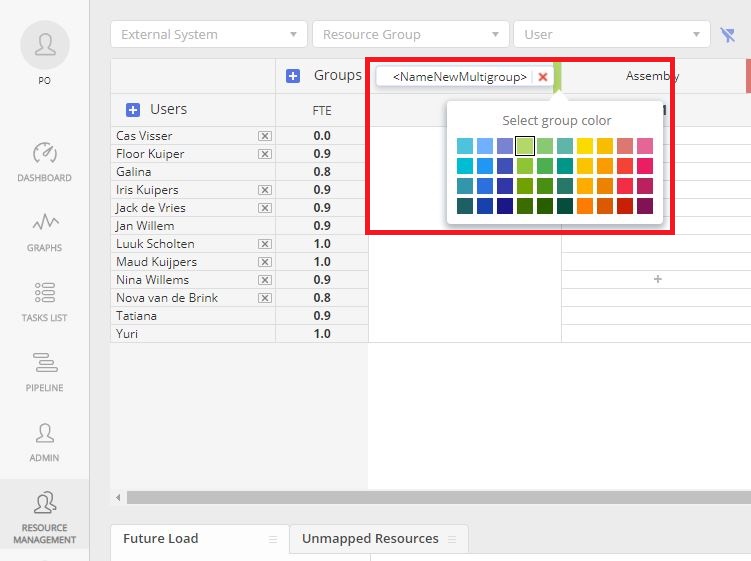
Screen #2 – Adding a Multigroup – Name and color specification for a newly created Multigroup
- You may need to create a special group in the External system which must be linked to a Multigroup in Epicflow.
- As soon as such a group is created and Resource Pool is synchronized with Epicflow, to map (link) external Multigroup to the previously created Multigroup in Epicflow, open an “Unmapped Resources” tab and
- drag the Multigroup from the Group list directly to the name of the previously created one.
- or, if the name of the Multigroup created in Epicflow and external system is the same, open the “Unmapped Resources” tab, locate the required Multigroup, and press the “arrow” icon located to the right of the Multigroup’s name.
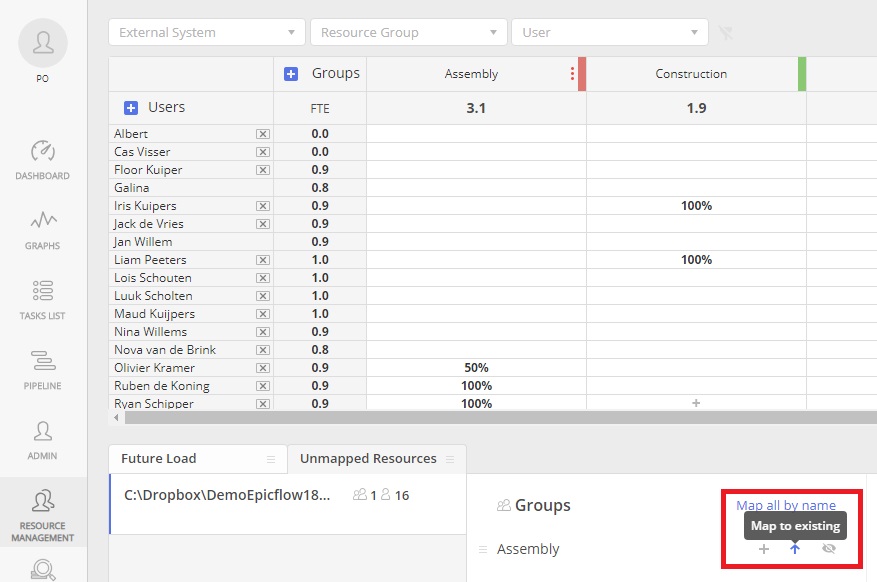
Screen #3 – Mapping Multigroup
- The last step is specifying the Multigroup context. To this end, link groups with a Multigroup by dragging and dropping the Group’s name to the Multigroup.
Screen #4 – Multigroup with Linked Groups
Nested Multigroups
In Epicflow, a multigroup can contain other multigroups as well as regular groups. This allows you to build a multi-level hierarchy that reflects how your organization is actually structured — for example, a worldwide production multigroup that contains regional sub-multigroups, each holding their own local groups and resources.
A typical use case: a WW Production multigroup contains NL PROD (Netherlands) and Sw Group (Sweden) as child multigroups. Each of those holds the local resource groups. This way, a resource manager can analyze capacity at the regional level by entering a child multigroup, or get a global view from the parent.
Nested multigroups follow the same rules as regular multigroups: no resources are assigned to them directly, and capacity is always held at the group level within them.
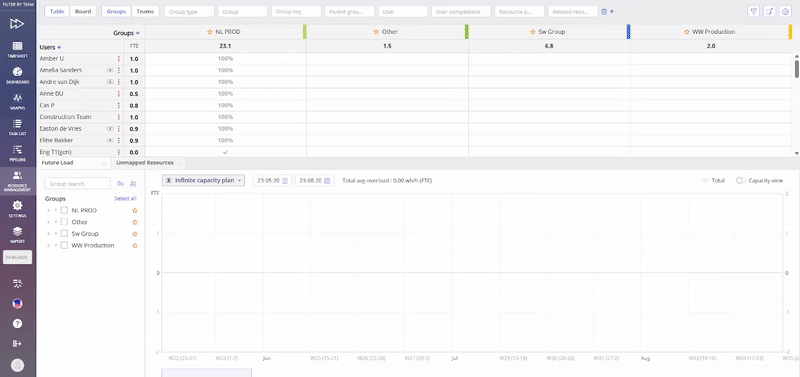
Screen #5 – Example of nested Multigroups
Checking Users and Their Groups in Multigroups
To check the list of users and their groups in a multigroup,
- Go to the Resource Management page and find a necessary multigroup,
- Click on the name of a multigroup to enter it,
- Now you can see the list of groups and users with their names within the multigroup.
Adding Users to Multigroups
In order to add a user to a multigroup,
- Go to Resource Management page where there is a multigroup with groups,
- Click on the multigroup name,
- Add a necessary user.
Checking Future Load Graph Inside Multigroup
To check the Future load graph inside a multigroup,
- Go to the Resource Management page and find a multigroup with groups,
- Select the ‘all groups’ level on a Future load tab,
- Click on the multigroup’s name to enter and check the list of groups that belong to the multigroup on a Future load tab.
Transferring a Group to a Multigroup
To transfer a group into a Multigroup take the following steps:
- remove all resources from the group by clicking on a corresponding capacity cell and remove the link by selecting the “trash” icon.

Screen #6 – Removing Resources from the Group
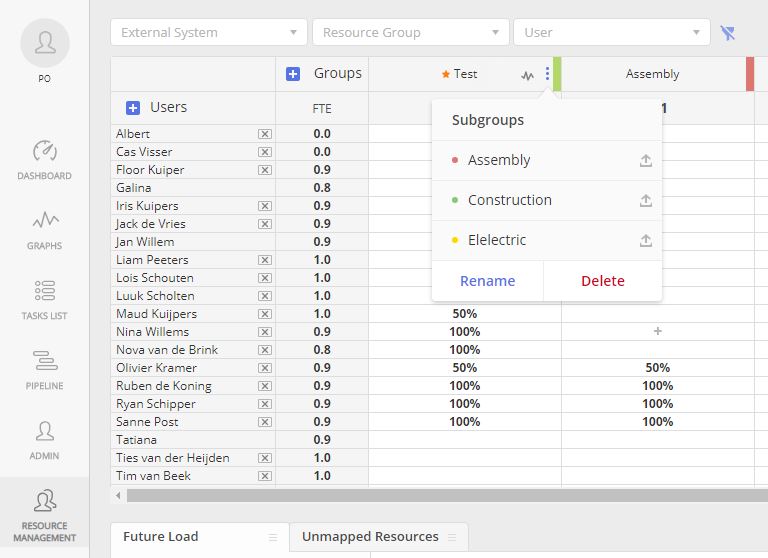
- Click on the “three dots” icon to the right of the group name and in the appeared context frame click on the “star” icon.
![]()
Screen #7 – Transfer Group to Multigroup
- The last step is specifying the Multigroup context. Link groups with the Multigroup by dragging the Group’s name and dropping it right on the Multigroup.
Multigroup of the Multigroup
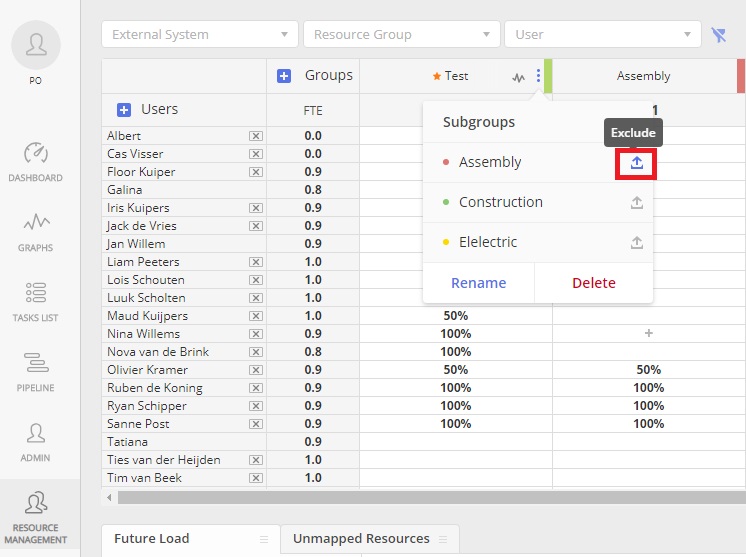
Deleting a Multigroup
- To delete a Multigroup
- remove/exclude all Groups from the Multigroup by clicking on the “three dots” icon to the right of the Multigroup’s name and select the “exclude” icon to the right of the Group’s name.
- As soon as the Multigroup contains no groups click on the “three dots” icon menu located to the right of it and press the “Delete” button.
Screen #8 – Deleting a Multigroup