Resource Management is a fundamental part of the concept of Epicflow which allows you to control and manage the capacity, availability and belonging of each imported resource to a groups in the Epicfow system. It’s dedicated to be used by Project Managers who want to run projects at the resource level and keep balance between the workloads and the actual capacity, and follow Epicflow’s approaches of project management from the perspective of resource availability.
-
To go to the RESOURCE MANAGEMENT page you need to select menu item Resource Management.
Screen #1– Resource Management – Overview
The resources are divided accordingly between groups that were imported from Jira or CSV or MS Project environment, depending on the tool you’re using in tandem with Epicflow right now. All resources and groups in Epicflow can be mapped to external resources on import but you also allowed to create groups and users only in Epicflow system.
Control Elements
-
To create a user in Epicflow press “plus” icon located above the users list in the top left corner of the page. On this action you’ll be redirected to User Card frame in which you’ll need to specify all mandatory information such as user name, role, email address and finish user creation by granting confirmation via pressing “Save changes” button.
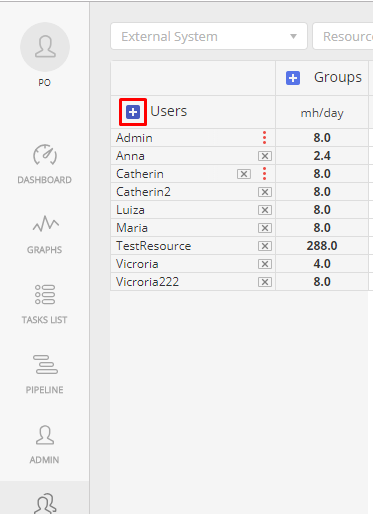
Screen #2– “New user” button
-
To invite user into Epicflow system press left mouse button on the user name to open User Card and specify email address in corresponding field. As soon as previous action is done press “Invite” button appeared at the bottom of the frame page to finish invite procedure.
-
To map(link) external resource to previously created user in Epicflow open “Unmapped Resources” tab and drag required user from the Users list directly to the name of previously created one. To create new resource\user and map(link) such to external one open “Unmapped Resources” tab and press “plus” icon located to the left from the User’s name.
-
To unlink external resource with the user in epicflow hover over mouse cursor on the user name and after the click of left mouse button on “three dots” icon menu, located to the right from such, press “trash” button in front of the specified link in newly appeared “External Resources” context frame.
-
To delete user from Epicflow press left mouse button on “three dots” icon menu, located to the right from such, and press “Delete user” button in newly appeared context menu.
-
Filter Parameters
At the Resource Management page, the following filters are available:
- Group filter with ‘Name’, ‘Tag’, ‘Type’, and ‘Parent group’ options,
- User filter with ‘Name’, ‘Skill’, ‘Role’, ‘Tag’, and ‘Status’ options,
- General filter with ‘Resource pool’ and ‘Related resources’ options.
Checking Available Filters
To check the list of available filters at the Resource Management page,
- Choose an internal project,
- Go to the Resource Management page,
- Click on the ‘add filter’ button to open the filter configuration menu.
Hiding Filters
To hide filters for an internal project at the Resource Management page,
- Click on a trash icon in the filter field.
Adding Filters
To add a filter to an internal project at the Resource Management page,
- Choose an internal project,
- Go to the Resource Management page,
- Click on the ‘add filter’ button to open the filter configuration menu,
- Click on ‘filter’ in the filter menu to add it to the RM page.
Applying Group Filter
When working with the group filter, the following rules and principles should be taken into account:
- If you enter a unique group name in the filter field, the only one selected group will be shown.
- And if you enter a common group name, all corresponding group names will be shown.
- In case you enter a group name that is absent in the list, the filter won’t be applied.
- To show all groups, click on ‘select all groups’ in a group drop-down list.
- To deselect all groups, click on the ‘deselect all’ or ‘clear’ button.
- If you want a certain group to be shown at the RM page, click on its name in the group filter drop-down (upon a condition all groups are deselected).
- To deselect a group (upon a condition all groups are selected), click on the group name in the group filter field.
Group Tag Filtering
You can also filter groups by their tags. To apply this filter effectively, keep in mind the following principles:
- If you enter a unique group tag, the only group with this tag will be shown.
- If you enter a group tag that is not unique and is present in several groups, all groups having this tag will be shown.
- If you enter a group tag that doesn’t exist, no groups will be shown.
- If you enter two or more different tags that are contained in several groups and choose the ‘OR’ option, then all groups having these tags will be shown.
E.g., there’s group1 with tag A, group2 with tag B, and group 3 with tags A and B. When a user sets A and B in the group tag filter and selects the ‘OR’ option, then all 3 groups are shown.
- If you enter two or more different tags that are contained in several groups and choose the ‘AND’ option, then only the group having all these tags will be shown.
E.g., there’s group1 with tag A, group2 with tag B, and group 3 with tags A and B. When a user sets A and B in the group tag filter and selects the ‘AND’ option, then only group 3 is shown.
Group Types
To check the available group types, open a Resource Management page, and click on the Group type field. You can see the following group types in a drop-down list:
- Group,
- Multigroup,
- Top-level multigroup,
- Material,
- UCLT.
Working with Group Types
You can select or deselect all group types in a group type drop-down to have them either shown or hidden at the Resource Management page.
- To show all group types, click on ‘select all group types’ in a group drop-down list.
- To deselect all group types, click on the ‘deselect all’, or ‘clear’ button.
- If you want a certain group type to be shown at the RM page, click on its name after the group type filter field is opened (upon a condition all group types are deselected).
- To deselect a group type (upon a condition all group types are selected), click on the group type name in the group type filter field.
Checking the List of Parent Groups
To see the list of parent groups,
- Click on the Parent group filter field,
- Choose Parent groups.
E.g., there is MG0 with subgroup MG1, MG1 is a subgroup of MG2, and MG2 is a subgroup of MG3, and group1 is a subgroup of MGA, and MGB has no sub-groups. If a user clicks on the Parent groups filter field and clicks on Parent groups, the list of presented parent groups is shown with MG0, MG1, MG3, and MGA.
NB: If an MG has a subgroup with a group inside, you can see the ‘Select all related’ button when hovering over the main MG in the parent filter field. And this button won’t be shown if an MG has another ordinary group or MG inside.
Working with Parent Groups
You can select or deselect all parent groups.
To select them,
- Click on the Parent groups filter field,
- Click on ‘select all’ in the drop-down.
Then all parent groups are selected in the drop-down.
To deselect them,
- Click on the ‘deselect all’ or ‘clear’ button.
Then all parent groups are deselected and all groups presented in RM are shown.
Applying User Name Filter
When working with the user name filter, consider the following rules and principles:
- If you enter a unique user name, the only user with this name will be shown (upon a condition all users are deselected and shown).
- If you enter a user name that is not unique and there are several users with this name, all users having this tag will be shown (upon a condition all users are deselected and shown).
- If you enter a user name that doesn’t exist, no users will be shown i.e. the filter won’t be applied.
- To have all users shown at the Resource Management page, click on the User filter field and choose ‘select all’.
- To deselect all users at the Resource Management page, click on the User filter field and choose ‘deselect all’ or ‘clear’.
- To select a certain user, click on a User filter field and choose a user’s name you want to be shown in RM.
- To deselect a certain user when all users are selected, click on a User filter field and choose a user’s name you want to be hidden from RM.
- If you delete a user who is selected in the RM filter, they’re automatically deselected after deletion.
Applying Skill Filter
You can filter your resources by their skills. To apply a skill filter,
- Go to the RM page.
- Click on the input field of the skill filter.
- Select a necessary filter from the drop-down list.
When working with the skill filter, consider the following rules and principles:
- If you enter the name of a unique skill, the only user having this skill will be shown (upon a condition all users are deselected and shown).
- If you enter a skill name that is not unique and there are several users who have it, all users having this skill will be shown (upon a condition all users are deselected and shown).
- If you enter a skill name that doesn’t exist, no users will be shown i.e. the skill filter won’t be applied.
- You can filter users by several existing skills by applying the ‘OR’ option. E.g., there are user1 with skill1 and user2 with skill2. When a user sets skill1 and skill2 in the skill filter and selects the ‘OR’ option, the user1 and user2 are shown.
- You can filter users by several existing skills by applying the ‘AND’ option. E.g., there are user1 with skill1 and user2 with skill2. When a user sets skill1 and skill2 in the skill filter and selects the ‘AND’ option, the user2 is shown.
Applying User Roles
To check the list of existing user roles,
- Go to the Resource Management page,
- Click on the field in the user role filter.
When working with the user roles, consider the following rules and principles:
- If you enter a unique user role in the filter field, the only user having this role will be shown (upon a condition the user role filter is enabled).
- If you enter a user role that is not unique and there are several users who have it, all users having this role will be shown (upon a condition the user role filter is enabled).
- If you enter a role that doesn’t exist, no users will be shown i.e. the user role filter won’t be applied.
- To have all user roles shown at the Resource Management page, click on the Role filter field and choose ‘select all’.
- To deselect all users at the Resource Management page, click on the Role filter field and choose ‘deselect all’ or ‘clear’.
- To select a certain user role, click on a User filter field and choose a user’s name you want to be shown in RM.
- To deselect a certain role when all user roles are selected, click on a User filter field and choose a user’s name you want to be hidden from RM.
- If you delete a user with a role that is selected in the RM filter, the filter by the role remains untouched after the deletion of the user.
- If the User role filter is applied and there is a user with role1, and you remove the role from the user, it gets removed but the filter on this role remains untouched.
Applying Tags in RM
You can filter your resources by their unique user tags. When working with user tags, consider the following rules and principles:
- If you enter a unique user tag, the only user with this tag will be shown.
- If you enter a tag that several users have, you’ll see all the users who have this tag.
- If you enter a user tag that doesn’t exist, no users will be shown, and the filter won’t be applied.
- You can filter users by several existing user tags by applying the ‘OR’ option. E.g., there are user1 with tag A, user2 with tag B, and user3 with tags A and B. When a user sets tag A and tag B in the tag filter and selects the ‘OR’ option, all three users are shown.
- You can filter users by several existing tags by applying the ‘AND’ option. E.g., there are user1 with tag A, user2 with tag B, and user3 with tags A and B. When a user sets A and B tags in the tag filter and selects the ‘AND’ option, only user3 is shown.
Working with User Status Filter
There are the following user statuses in the Epicflow RM:
- Invited,
- Not invited,
- Active.
To check the list of user statuses in RM,
- Go to the Resource Management page,
- Enable the user status filter,
- Click on the field in the user status filter.
To filter by the user status,
- Go to the Resource Management page,
- Enable the user status filter,
- Click on the user status filter field,
- Select the name of the status.
To select all users with different statuses,
- Go to the Resource Management page,
- Enable the user status filter,
- Click on the user status filter field,
- Select all statuses.
To deselect all users with different statuses,
- Go to the Resource Management page,
- Enable the user status filter,
- Click on the clear button.
Working with Resource Pool
If you have projects from MSP, JIRA, and CSV and internally created users and groups in Epicflow, you can check the list of corresponding resource pools in RM after enabling the Resource Pool filter by clicking on the field in the Resource Management filter to see the list of existing pools.
To filter users by a resource pool,
- Open the Resource Management page,
- Enable the Resource Pool filter,
- Click on the Resource Pool filter field,
- Select MSP, Jira, SCV, or internal resource pool in the list.
When working with resource pools, consider the following rules and principles:
- To select all resource pools (if you have MSP, Jira, CSV, and internal projects) and see all users and groups, enable the Resource Pool filter at the Resource Management page and select all resource pools.
- To deselect all resource pools (if you have MSP, Jira, CSV, and internal projects), enable the Resource Pool filter at the Resource Management page and click the ‘deselect all’ or ‘clear’ button. Then you won’t see any resource pools but all users and groups in RM.
- You can create a new internal user or a group when the internal resource pool filter is applied.
- You can also map a new internal user or a group when the internal resource pool filter is applied.
- If you delete all resources when the internal resource pool filter is applied, the resources become unmapped but the resource pool filter remains uncleared and the resource pool option remains available as a filter.
- You can select several resource pools at one by selecting a set of resource pools (E.g., | internal + MSP, internal + MSP + Jira, MSP + Jira + CSV) and you’ll see all users and groups who belong to them.
- If you have an external project with internally created users and a group, and the resource pool filter is applied for the external one, when you delete an external resource pool it gets cleared and the external resource pool option gets removed from the filter.
Working with Related Resources
The Related resources filter can show you
- All resources,
- Show only users of filtered groups,
- Show only groups of filtered users.
To check them, click on the Related resources filter to open the menu.
When working with resource pools, consider the following rules and principles:
- To have all existing users and groups shown in RM using the Related Resources filter (if you have projects from MSP, Jira, CSV, and internally created users and groups), open the RR filter and select the ‘show all’ option.
- If you apply the ‘Show only groups of filtered users’ option to the group that has no user capacity (if you have projects from MSP, Jira, CSV, and internally created users and groups), it’ll be filtered out anyway.
- If you select a group that contains users with capacity in group filter and select ‘Show only users of filtered groups’ option, only group 1 and users who have the capacity in it will be shown.
- If you select a user who has capacity in several groups in the user filter and select the ‘Show only groups of filtered users’ option, only this user and only the groups he or she belongs to will be shown.
Saving and Applying Filters
- To save a filter or a set of applied filters with valid data, push the ‘saved filters’ button, and click on a’ ‘save new’ button. Then enter the filters’ names and save changes. The filters are added to the saved filters pop-up.
- If you save a new filter without any data that hasn’t been applied yet, it’ll be saved without it as an empty filter.
- To save a set of applied filters,
- To check the saved filters, click on the ‘saved filters’ button in the saved filter pop-up.
- To edit the filter’s name, click on the ‘saved filters’ button and hover over the filter’s name. Then click on a pencil sign, change the name and save it.
- You can also share the saved filters. Just click on the ‘saved filters’ button and hover over the filter name. Then click on the ‘share link’ button to copy the link to the filter.
- You as a user can open the link to a filter if you have the same permissions as the person who shared it with you. Just click on the link to apply the filter and the ‘save’ button to save it at the Resource Management page.
- If a user without permission gets a link to the filter, he or she appears at the Task List page after clicking on the link.
- To apply a saved filter click on the saved filter’s name in the saved filter pop-up.
- If a user changes the filter’s name, there’ll be a mark ‘edited’ after its saved name.
Deleting Saved Filters
- To delete a saved filter, hover over its name, click on the trash icon, and select ‘Yes’ in the confirmation window.
- If you have some applied filters at the RM page and click on the link to a deleted filter, the RM page gets refreshed and the applied filters remain untouched.
Applying Saved Filters on Graphs
- A logged-in user who has permissions to see all groups on graphs but has no capacity in groups and no saved filters checks graphs can’t see the ‘choose filter’ button on a graph when checking it.
- A logged-in user who has permissions to see all groups on graphs but has no capacity in group1 and group2 and no saved filters can see the ‘choose filter’ button with ‘all groups filter’ and ‘my group filter’ buttons on a graph.
- A logged-in user who has permissions to see all groups on graphs but has no saved filters can see the ‘choose filter’ button with ‘all groups filter’, ‘my group filter’, and ‘hidden groups filter’ (if there are some hidden groups) buttons on a graph.
- If a logged-in user with permissions to view all groups on graphs filters by a user filter (name, skill, role, tag, status) and clicks on ‘choose filter button’ he or she can’t see any saved filters on a graph.
- Empty group filters are not available on graphs
- Saved empty general filters are not available on graphs, either.
- You can apply a filter to the list of groups on graphs. Just save a filter and click on the ‘choose filter’ button on a graph and then select a user filter.
- To filter by the saved resource pool filter on graphs, select a resource pool filter, save it, click on ‘choose filter button on a graph’ button, and select the saved filter.
- To apply the ‘Show only users of filtered groups’ filter to the list of groups with users on graphs, select a group with users in a group filter, choose the ‘related to groups’ option in the Related resources filter, save it, click on the ‘choose filter’ button on a graph, and select the saved filter.
- To apply ‘Show only groups of filtered users’ filter to the list of groups on graphs, select a user having the capacity in several groups in a user filter, choose ‘Users related to groups’ option in the Related resources filter, and save it. Then click on the ‘choose filter’ button on a graph and select the saved filter.
NB: Here and in the cases above, a user must have permission to view all groups.
- If a user has permission to view ‘my groups’ on graphs and saves a filter, and clicks on the ‘choose filter’ button on a graph, it’s not saved.
- If a user has permission to view ‘only my groups on graphs’ and saves a filter, and clicks on the ‘choose filter’ button on a graph, it’s not saved.
- If there are several projects (MSP, Jira, and CSV) as well as internally created users and a group where several users have the capacity and a user selects user1 in a user filter and chooses ‘Show only users of filtered groups’ option in the Related resources filter, the filter is absent on a graph, i.e. nothing is filtered.
- If there are several projects (MSP, Jira, and CSV) as well as internally created users and groups and a user selects group1 where several users have the capacity in a group filter and choose ‘Groups related to groups’ option in the Related resources filter, the groups with user capacity are shown and the filter is present on a graph
- You can’t create a multigroup loop at the RM page.
Applying Filters to New Users
When working with filters and new users, pay attention to the following principles and rules:
- If a filter by a user is applied, when a user creates a new user who doesn’t match the applied filter, he or she remains visible until refresh or filter change.
- If a filter by a user is applied, when a user creates a new user who doesn’t match the applied filter and changes any of his or her data, the new user remains visible.
- If a filter by a group is applied, when a user creates a new group that doesn’t match the applied filter, it remains visible until the filter change or a refresh.
- If a filter by a group is applied, when a user creates a new group that doesn’t match the applied filter, when a user makes some changes in the related data, the new group remains visible.