Preparation
MS-project file preparation
To prepare your MS Project environment, you’ll have to invest some effort in checking your data in MS Project first. Check the following items which are described in the MS-project basics wiki:
- Project Title (on line 0), Project Manager, Project Start & Finish Date. See Defining Project Settings.
- A project network with clear defined task relations, Resources assigned, Work estimated ad milestones defined as required for Epicflow.
- The shared resource pool attached to the MS-project files.
- Keep each project in a separate MS Project file.
RECOMMENDATIONS:
- Avoid usage of the huge files which are hard to maintain.
- Use the Epicflow Templates to create the resource pool and project files to ensure you have the rights settings and custom fields available.
Shared File Location
Define a shared location of:
- Resource pool: Must be accessible by all users that have access to an MS-project planning that is uploaded to Epicflow.
- MS-project files: Must be accessible to the users that have to maintain that plan
You can use a network drive, Dropbox or any other approach which is applicable to you. Keep in mind that you and your team must use one location and the same files to work with.
To prevent issues with the shared resource pool and Epciflow synchronisation:
- It’s forbidden to use a local copy of Project files to work with Epicflow.
- It’s forbidden to change the location of the files after uploading into the Epicflow system. In case of this restriction violation, synchronization issues are possible.
- Setup automatic backup of the location with all project Files and Resource Pool. This is your own responsibility since Epicflow has no access to your files.
MS-Project Plugin Installation
Prerequisites
Please NOTE that Plugin is not compatible with Windows XP or previous OS version. Microsoft .NET Framework 4.5.x or newer must be installed as well.
Installation of the Plugin
- Install prerequisite files if it’s not done yet.
- Run provided installer and on appeared Security messages you will need to confirm that you would like to install it anyway.
Please note that appearance of the Security notification depends on applied Security Policy on your Operating System and may require System Administrator account to proceed with installation.
By pressing “More info” Operation System will give you an option to proceed with installation.
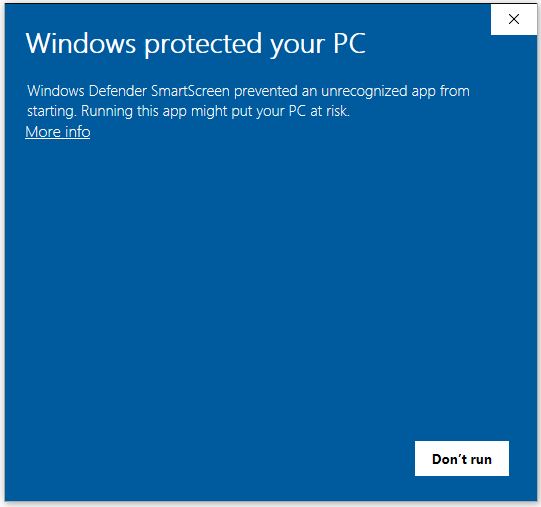
Screen #1 – Security Confirmation request
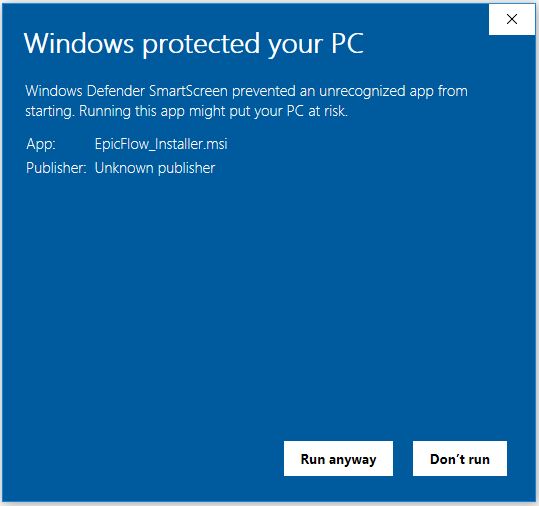
Screen #2 – Security Confirmation request
- On appeared installation window you will need to specify installation path. By default it’s set to “C:\Program Files (x86)\EpicFlow\”. Change it to “C:\EpicFlow\” by removing “Program Files (x86)” part.
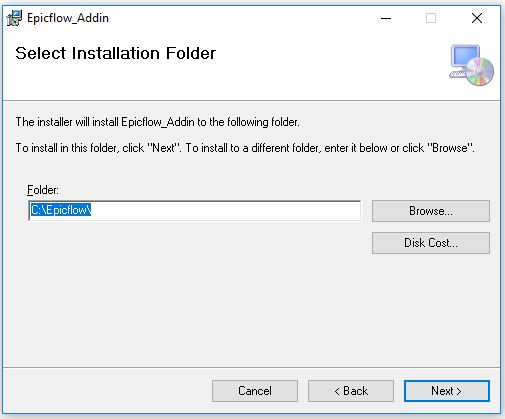
Screen #3 – Installation Path Specification
- As soon as you confirm installation and Operation System’s security request installation will be accomplished.
MS Project Configuration and Installation verification
This part contains verification step and last configuration steps.
- Start MS project and confirm installation of the plugin by pressing “Install” button.
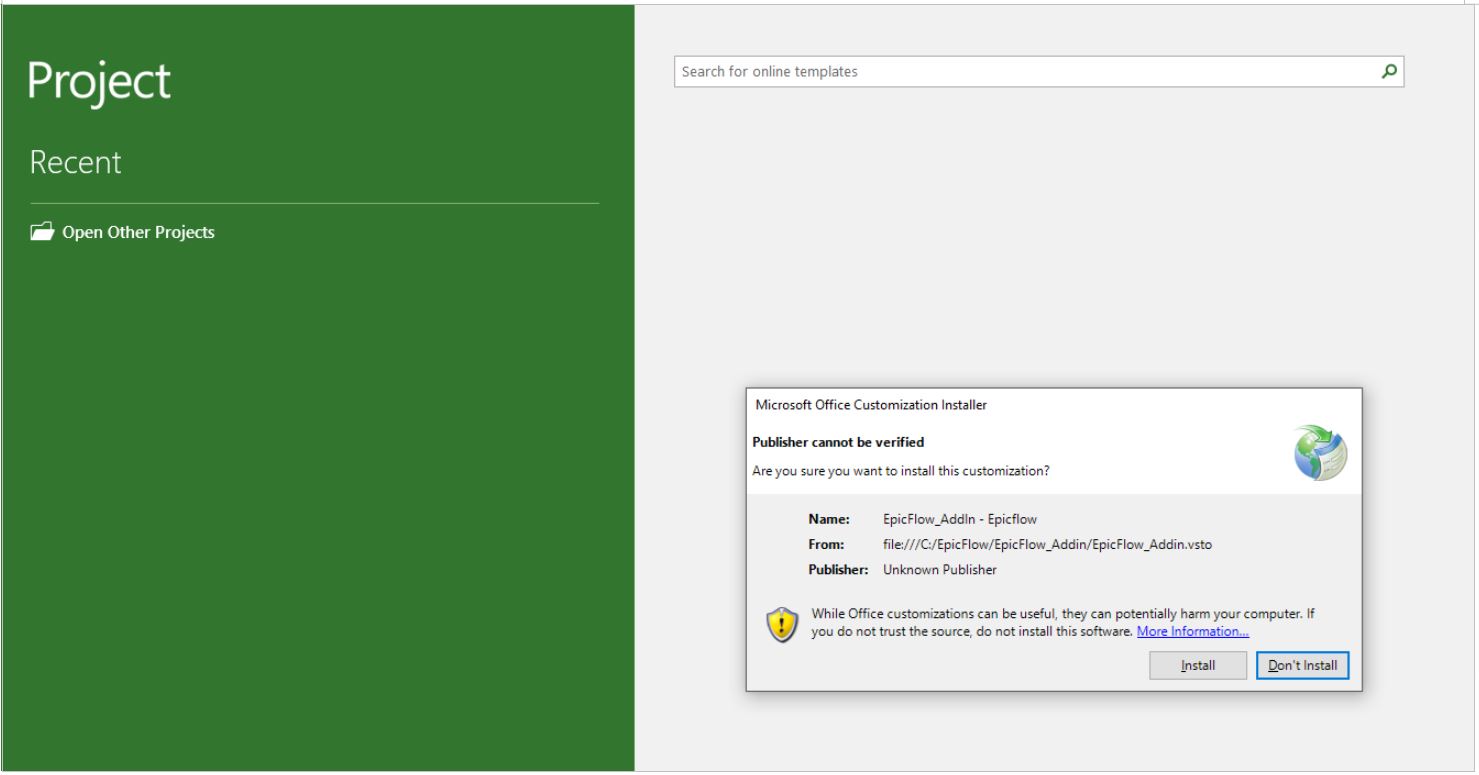
Screen #3 – Plugin installation in MS Project
- Open any previously uploaded project and verify that “EpicFlow” tab is appeared in the Menu list.
Custom Fields
In the task list, you can select a variety of columns. Three columns are can be used as custom fields. Text added to the MSP file will be displayed in Epicflow. Note that these are real-only fields that can’t be edited in Epicflow.
- MSP field “Text 21” is displayed in the task list as “Team Lead Engineer”.
- MSP field “Text 22” is displayed in the task list as “Info Field 1″.
- MSP field “Text 23” is displayed in the task list as “Info Field 3″.
Adding attributes
- The MSP field ‘Text 26’ is used to add an ‘Attribute’.
Upload your files
Make sure you have done the actions as described by the Preparation instructions and that you have the MS-project plugin installed.
Upload of Resource Pool
The first time you upload a resource pool, Epciflow will create all resources and groups automatically. If you are adding resources at a later stage you have to add them manually after synchronizing the resource pool. So make sure your resource pool is well prepared before you upload it for the first time.
- Open the resource pool in read write mode ()
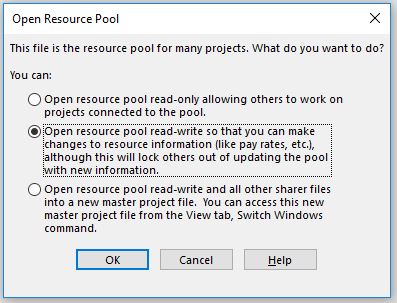
Screen #5 – Open Resource Pool
- In the menu list go to Epicflow tab -> choose Advanced-> Select add resource pool to Epicflow and Save
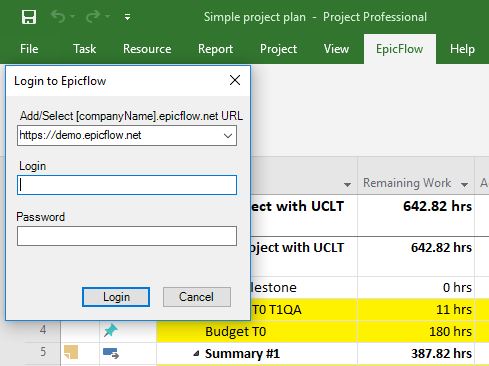
- At first run you would need to specify URL address of your system in accordance to the format [companyName].epicflow.net.
- Login to Epicflow with the same login/password from the previous step.
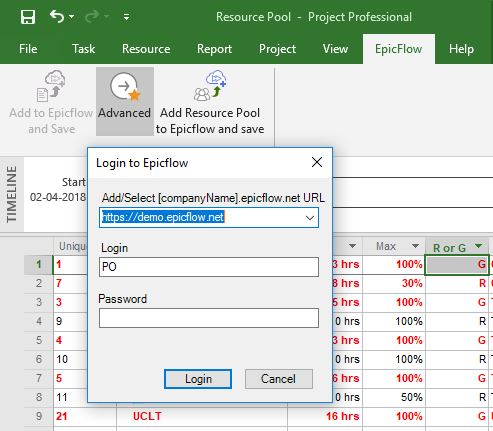
Screen #6 – Resource Pool upload
In result at Resource Management page, you will see the groups and the resources listed from Resource Pool.
For each resource uploaded into the Epicflow you will have automatically created user mapped to the external resource specified in uploaded Resource Pool. However, you can create any user and use it as a resource directly in Epicflow system without a mapping to external Resource Pool (internal resource) but be aware, that all information related to this resource will be stored in Epicflow only and won’t be synchronized back to any Project file unless you mapp internal user with external resource.
For example, if you have task assigned on internal resource in external MS Project File you’ll have task with empty assigned resource field.
Upload of Project
Make sure your project file is connected to the shared resource pool. If not, Epciflow will not upload the file. Make also sure you have done the actions as described by the Preparation instructions.
- Open resource pool in read-write mode
- Open MS project file.
- Link Resource Pool to the Project.
For that select in MS Project menu tab “Resource”-> “Resource pool” -> “Share resources” -> and from the appeared drop-down list choose appropriate Resource Pool.mpp file.
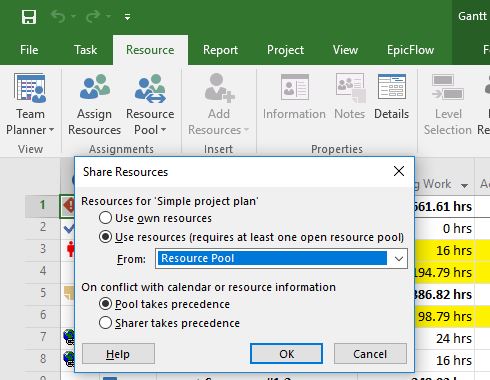
Screen #7 – Linking Resource Pool to the Project
Specify name of the project in MS Project File which will be displayed in Epicflow.
- Go to tab Epicflow and press save & push to Epicflow
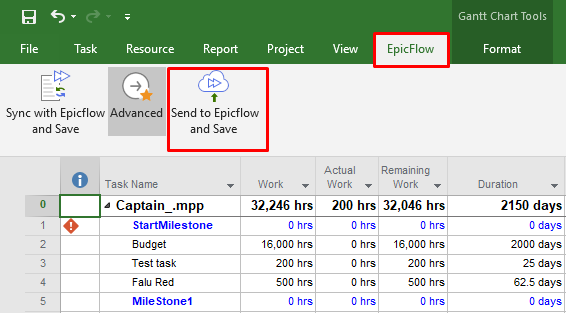
Screen #8 – Saving the Project to environment
The project is uploaded and you can find it on Pipeline page of the Epicflow system.
Synchronize your files
Please note that synchronization functionality will be available only for the Project and Resource Pool previously uploaded into the system
After your upload of the all necessary data, you need to synchronize the such files from time to time to push updates into Epicflow system and collect changes from it.
Synchronization of Resource Pool
To synchronize data from the MSP Resource Pool with the Epicflow environment, you need to:
-
Make necessary changes in the Resource Pool file and save it
-
Go to the “Epicflow” tab in MS Project and click “Send to Epicflow and Save” button, as we have it on the screen bellow
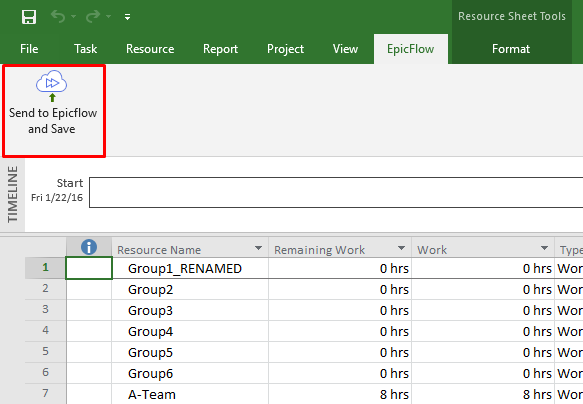 Screen #9 – Synchronizing the Resource Pool
- In case if no other upload and synchronization was done you’ll see a window with request to input credential information. Fill it in and press “Ok” button to finish synchronization of the Resource Pool.

Screen #10– Synchronizing the Resource Pool – Credentials Request
On successful synchronization no error messages are displayed.
In opposite case please refer to Troubleshooting chapter of the wiki or contact Epicflow Support department.
Synchronization of Project
To synchronize data from the MSP with the Epicflow environment, you need to:
-
Make all necessary changes in the MS Project file and save it.
- Go to the “Epicflow” tab in MS Project and click “Sync with Epicflow and Save” button, as we have it on the screen bellow
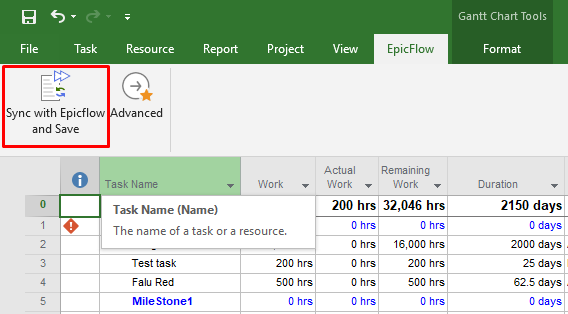
Screen #11 – Synchronizing the Project
- In case if no other upload and synchronization was done you’ll see a window with request to input credential information. Fill it in and press Ok button to finish synchronization of the Project File.
Screen #12– Synchronizing the Project – Credentials Request
On successful synchronization, no error messages are displayed.
In opposite case please refer to Troubleshooting chapter of the wiki or contact Epicflow Support department.
Troubleshooting
Can’t upload resource pool
It may occur due the reason that
- You are using incorrect Resource Pool with violated structure
In this case you would need to follow appearing Error Messages to work them out. As an option please communicate with Support Department for a help request.
- You are trying to upload a second Resource Pool which was created on the basis of previous one
In this case Resource Pool Already contains specific keys assigned by the system and that is the reason of Error message occurring.
To work it out
- Go to the “File”-> “Project Information”->”Advanced Properties”
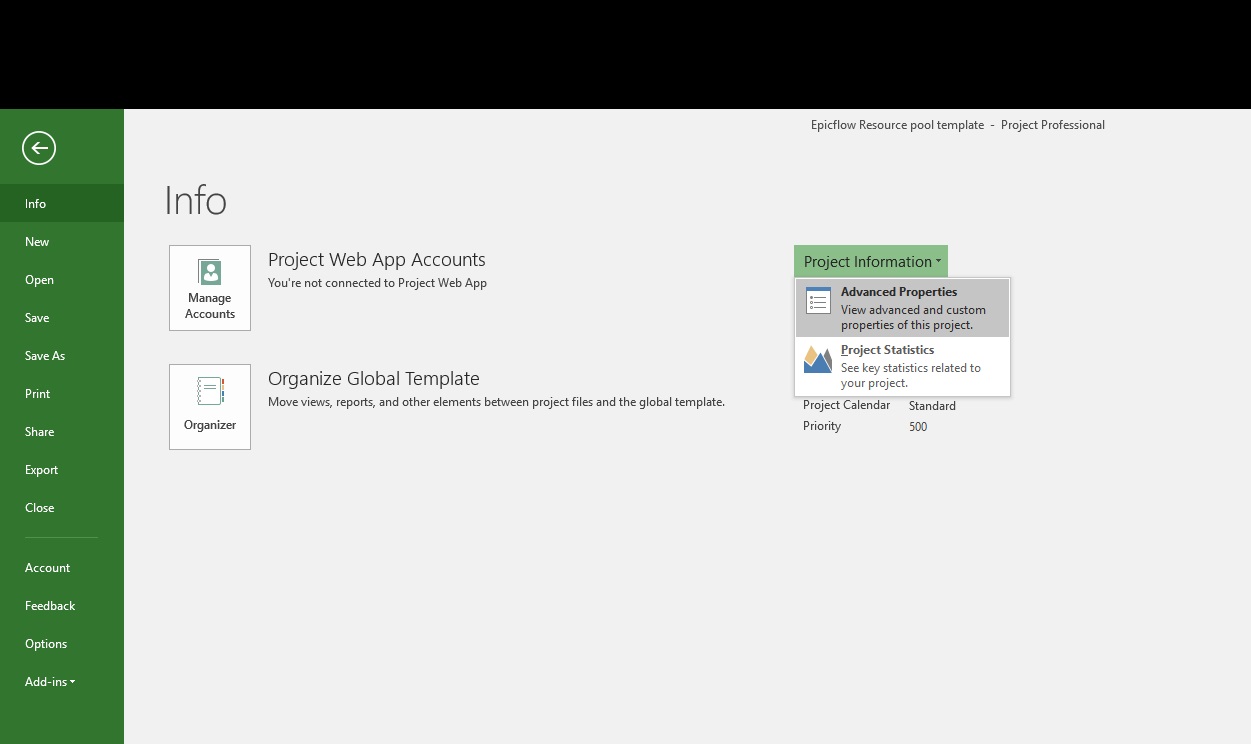
Screen #13 – Advanced Properties
- In newly appeared Resource Pool’s Properties window select “Custom” tab and Delete to keys “Epicflow_File_UID” and “Epicflow_File_Version”
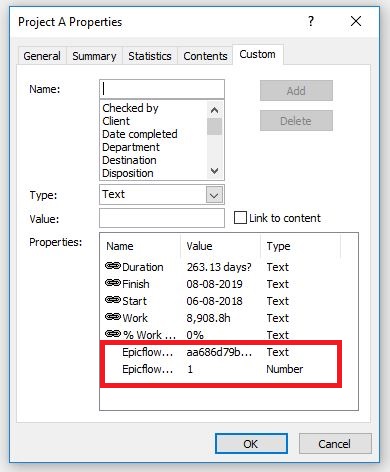
Screen #14 – Project’s Properties
- Save and Close the Resource Pool file
Can’t upload project file
It may occur due the reason that
- You are using incorrect Resource Pool with violated structure
In this case you would need to follow appearing Error Messages to work them out. As an option please communicate with Support Department for a help request.
- Project is not linked to the Resource Pool
You would need to Link it as described in a separate topic of the manual
- New project was created on the basis of previously uploaded project into the system
In this case Project already contains specific keys assigned by the system and that is the reason of Error message occurring.
To work it out
- Go to the “File”-> “Project Information”->”Advanced Properties”
Screen #15 – Advanced Properties
- In newly appeared Project’s Properties window select “Custom” tab and Delete to keys “Epicflow_File_UID” and “Epicflow_File_Version”
Screen #16 – Project’s Properties
- Save and Close the Resource Pool file
Unknown Resource in the Project
If there’s an unknown resource in the Project and they’re assigned to the task, the synchronization should be stopped until the resource is defined in a Resource Pool or task is reassigned to a different one.
But as a rule, a customer has an old project with resources who don’t belong to the Resource Pool and never will.
To avoid the blockage of project synchronization, the Epicflow system has the “Unknown Resource” type that makes it possible to enable synchronization.
During the synchronization, a user gets a prompt message with the list of “Unknown resources” and the option to ignore this error during the next project synchronization.