Task Card Is a feature of Epicflow that grants higher level of convenience for your team in work with one particular task.
It brings all information on the task in structured way to grant you simplest and easiest way in editing and control of all related to the task information and parameters.
Overview
This part will contain general description of elements and actions which can be performed at Task Card page.
- For open Task Card go to the
- Task List and press left mouse button on any task name in the Task column to have it opened
- Pipeline and press left mouse button on any task from the Gantt Chart to have it opened.
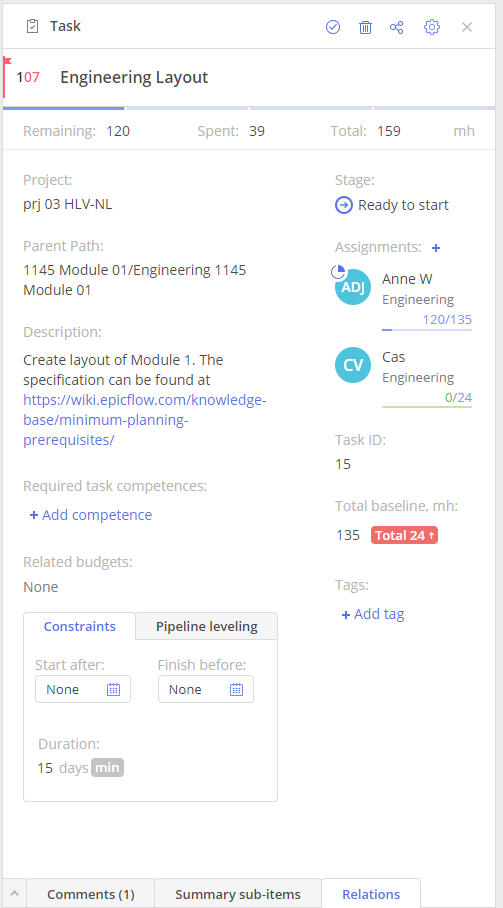
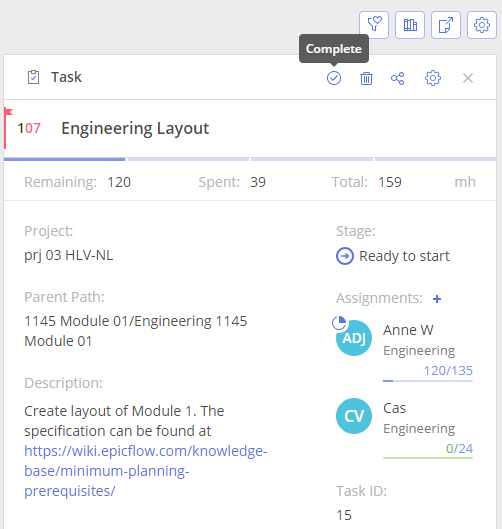
Screen #1 – Task Card
In the left top corner we have Priority of the task. Hovering over your mouse cursor will trigger popup message depiction with the Chain of tasks which contributes to the Task’s priority itself.
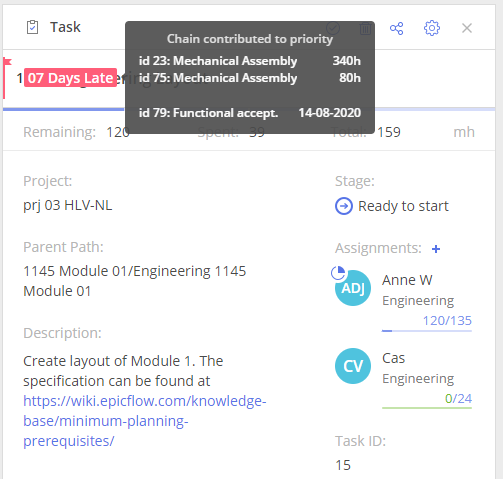
Screen #2 – Task Card – Priority
To the right from Task’s Priority we have task name, which you can easily edit and adapt to your needs and “Complete”, “Delete” with “Cross” icons at the right top corner.
- “Complete” icon will set Remaining to “0” for all assignments in it and as result for the task itself.
- “Delete” icon will erase task permanently from the system on user confirmation.
- “Cross” icon will close the Task Card.
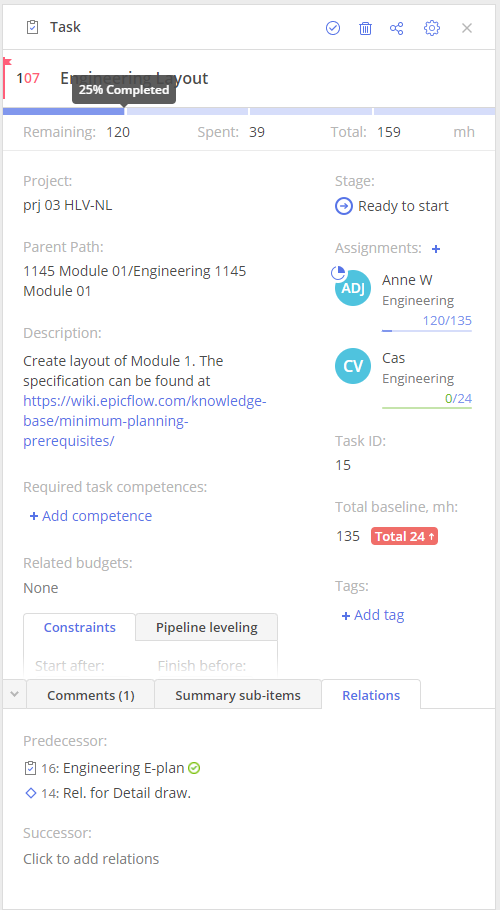
A Progress Bar shows the percentage value of the task’s accomplishment, i.e. how much work has been performed.
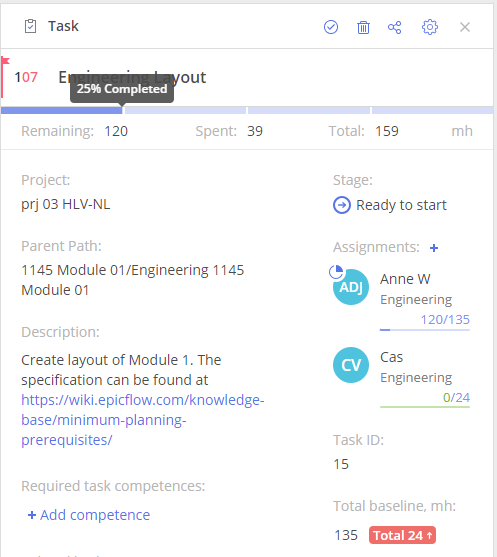
Screen #3 – Task Card – Progress Bar
Below the bar, you can see the Project name, Summary, Phases, Description, Tags and the closest upcoming Milestones for the Chain the task belongs to.
Let’s consider some other elements:
Stage – identifies whether the tasks are completed / (not) estimated / upcoming, (not) ready to start /or blocked.
Assignments – a list of groups or resources assigned to the task showing the current sub-task’s status (“Not in progress”, “In progress”, “On hold”) and progress on the task.
Project Manager – the name of the person responsible for the Project orchestration.
Task ID – identifier of the task.
and
The Relations tab that shows the information about Predecessors and Successors of the task.
Tasks Management
Status
Status of the task can be measured with next three options:
- “Not in progress” – nobody is working on the task at the moment;
- “In progress” – someone is currently working on the task;
- “On hold” – the work on the task is paused.
In case an engineer or a PM register progress on task, status will be automatically changed to “In progress”.
The status “Not in progress” can be set at any time even if the status was previously changed to any other.
Task status for a specific assignee can be changed either
- via Task Card
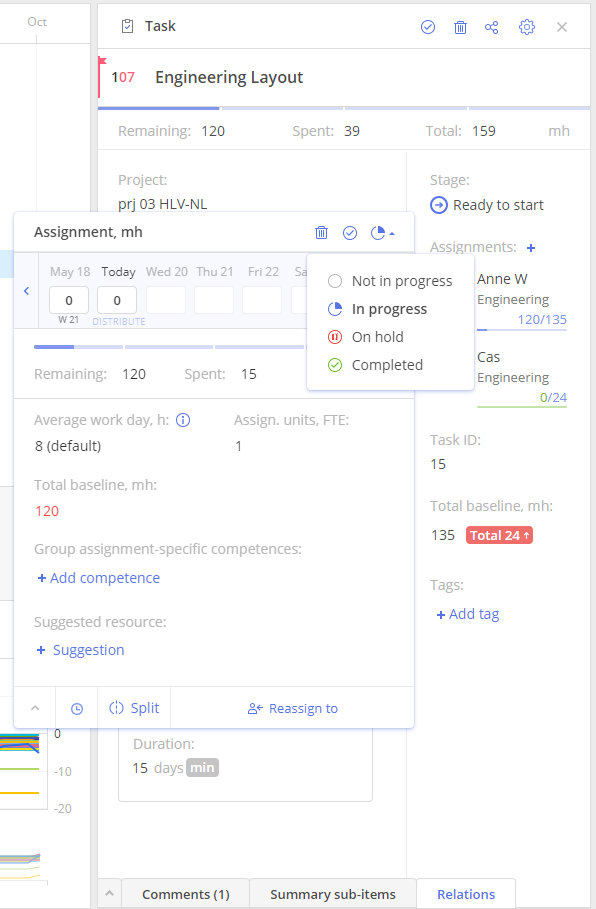
Screen #4 – Task Card – Assignment task Status change
or
- directly from Task List view
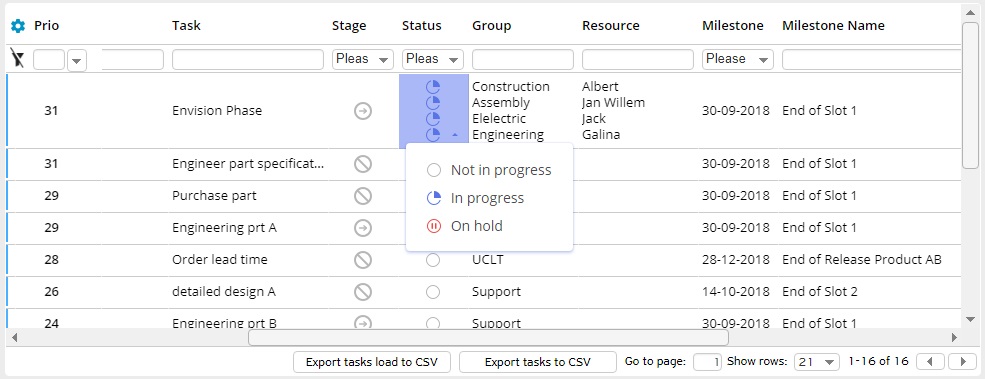
Screen #5 – Task List – Assignment task Status change
Estimates
Once all the resources have been added and tasks are specified, you can specify the hours for them:
- Open Task Card for the required task
- Click on the required Resource
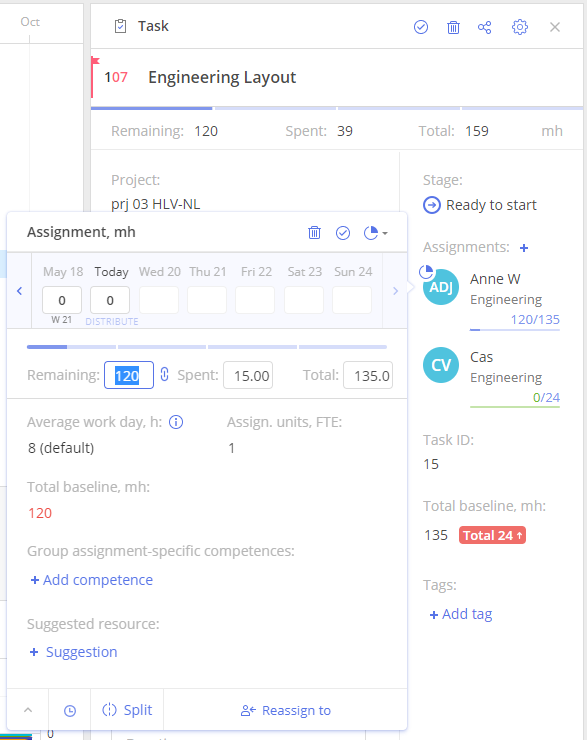
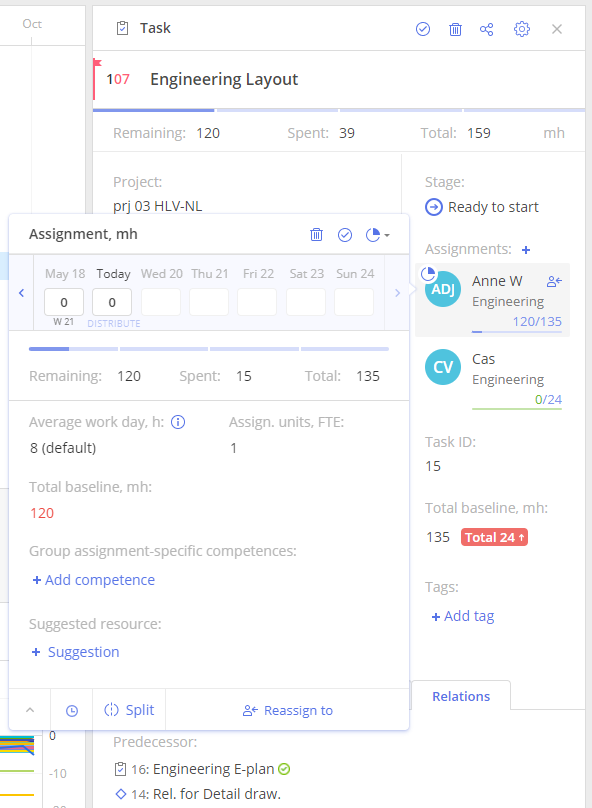
Screen #6 – Task Card – Estimates Editing
Difference between Spent, Remaining, Total
Each task is characterized by estimation of a time which is remaining for its fulfillment, already spent and total sum of such. It’s an essential part of the system and update of those values helps with project’s flow, impediments identification and priorities order.
Remaining is the number of work hours left to accomplish the task. You can modify this number, but please note that it will automatically change the number of Spent work hours or Total.
Spent is the number of work hours that a resource has already burned to accomplish the task. If you increase the number of spent hours, Remaining hours will get reduced accordingly.
Total is the sum of Remaining and Spent work hours.
Constraints
To design or optimize your personal weekly schedule you need to keep focus over the tasks’ prioritization. One of instruments is to set Start or Finish date for the task.
Please note that Project puts constraints on the tasks that force them to start or end on defined date, omitting other the schedule changes.
Screen #7 – Task Card – Task Constraints
Upload Progress
Progress on task accomplishment is measured in decreasing of Remained hours estimation. To update the Task Progress you would need to change value of Remaining hours.
- Open Task Card for the required task,
- Click on the required Resource.
You can also use a Progress bar and drag the point of progress to set up the % of the task progress (by how many % the task is accomplished).
Screen #8 – Task Card – Progress on Task
Automatic Progress Upload
There several approaches to set task for automatic progress indication.
Either you can use UCLT groups or Auto depletions for assignment.
Find the details in corresponding Wiki articles and choose the tool that fits your case.
Close\Complete the Task
Once all the Total Remaining hours have been spent, the task will be marked as a completed one.
Screen #9 – Task Card – Complete the Task Button
To work with the task completion functionality from the Task Card, do the following actions:
- Open user’s task card
- Click on the ‘complete’ icon
- The assignment completion pop-up will appear.
The menu and available options are similar to those in Timesheet.
Screen #10 – Task Card – Complete the Task Menu
Task Completion with Two Users Assigned to the Task
If there are two users assigned to the task, apart from other available options, you’ll also see the following information about both users:
- User picture, his or her name and group to the left of the pop-up,
- Calendar
- Unallocated hours for the user.
You also can use Progress bar element by dragging the pointer of your progress to 100% and setting up task Accomplishment in such way.
For JIRA and CSV integration in case of the task transfer to the “Done” state Epicflow automatically set Remaining hours to 0.
Assignments management
Edit Assignee
- To change assigned Group/Resource for the task in the Task Card you should to click on the button to the right of “Assignments”. Select an appropriate Group/Resource name from the appeared list.
Screen #11a. – Task Card – Resource Assignment
Screen #11b. – Task Card – Resource Assignment
Esc” or left button click anywhere at the page will cancel the change Resource action.
Apart from a particular Resource assignment, a user can select the “anyone” option from the appeared drop-down. It means that any available employee from the specified Resource Group will be assigned to the task.
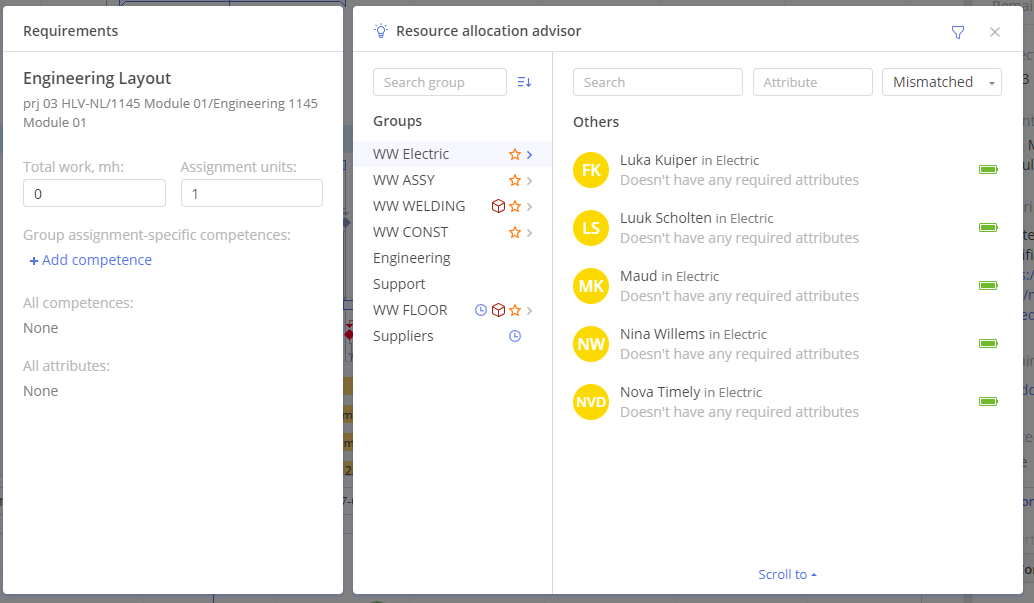
Named Resource/Resource Allocation Advisor
In Resource Allocation advisor, you can find Information block which helps to define resources’ Competences and remaining capacity of the required Resource at assignment in accordance to the defined criteria of the task itself.
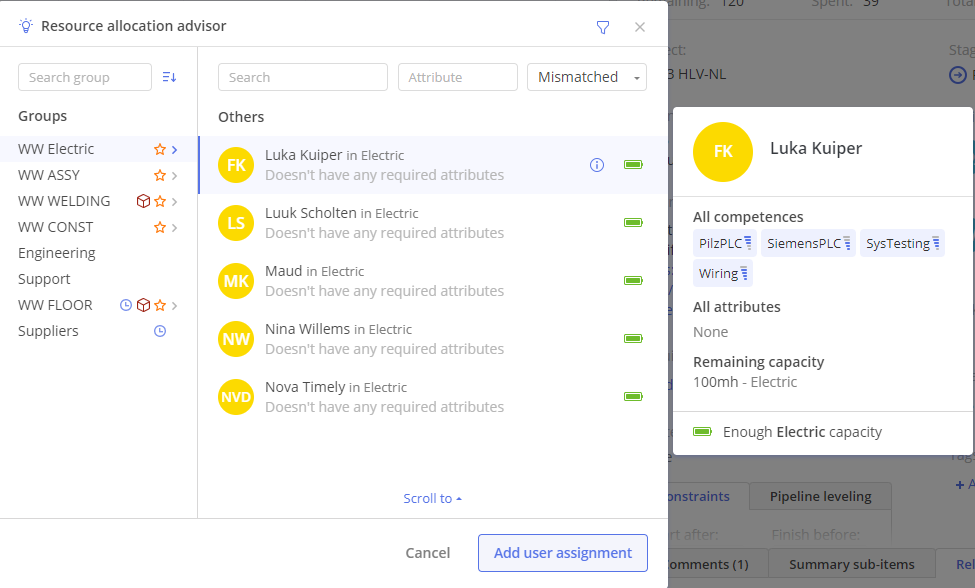
Screen #11c. – Task Card – Information block
Adding a Second Assignee
To add a second resource to the task:
- Open Task Card
- Click “plus” sign located right above “Assignments” list and in newly appeared frame select:
- Group or user as Assignee
- specify Total work
- specify Assignments units
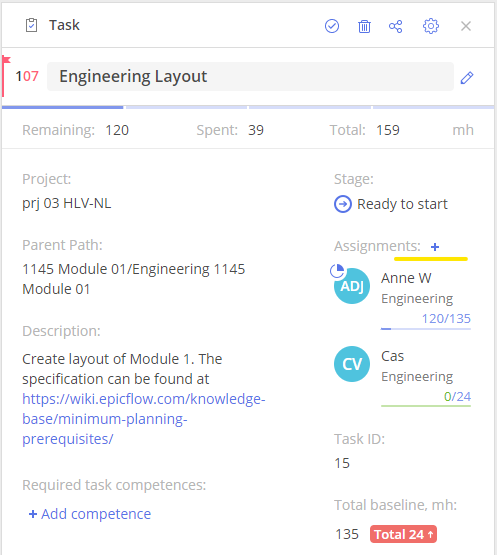
Screen #12 – Task Card – New Assignment
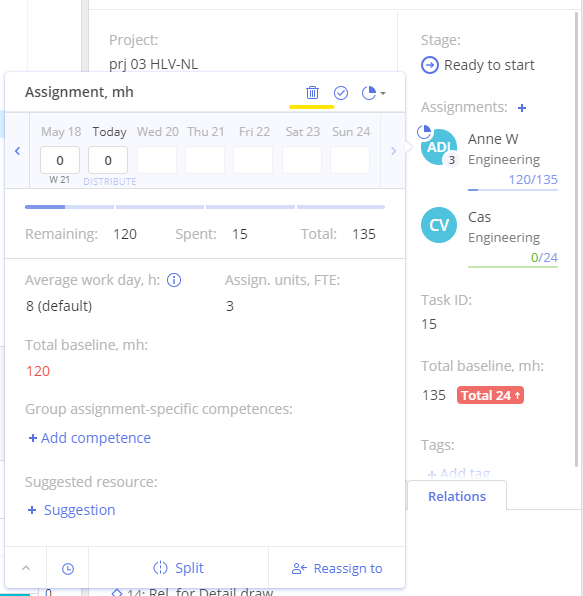
Split assignment
The “Split Assignment” feature helps save your time when assigning resources and visualize the distribution of time between them. To use it, click on the Assignment engineer, set the desired number of “Assign. units” and click “Split” in the newly appeared window.
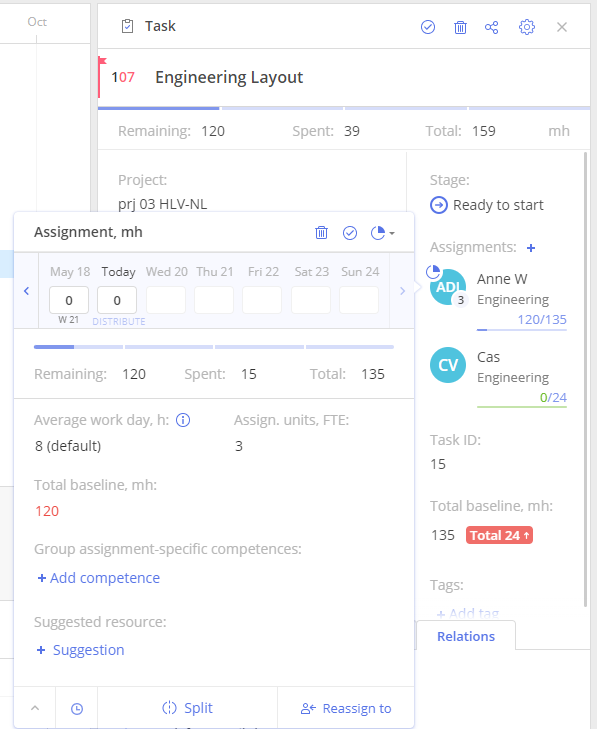
Screen #13a.– Task Card – Task Assignment
In the splitting window that opened, you will see that the amount of time is distributed equally among the number of units specified initially. Now you can assign the desired resources.
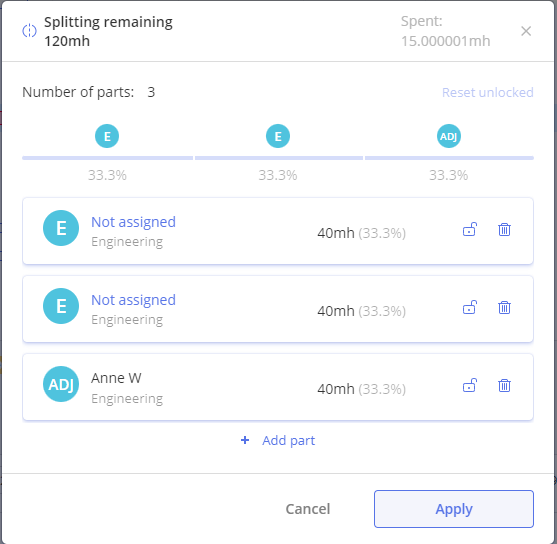
Screen #13b.– Task Card – Task Assignment
Keep in mind that when assigning the same resource to two units, the system will offer to combine them upon saving, as shown in the screenshot below (even if you have more than one “Not assigned”).
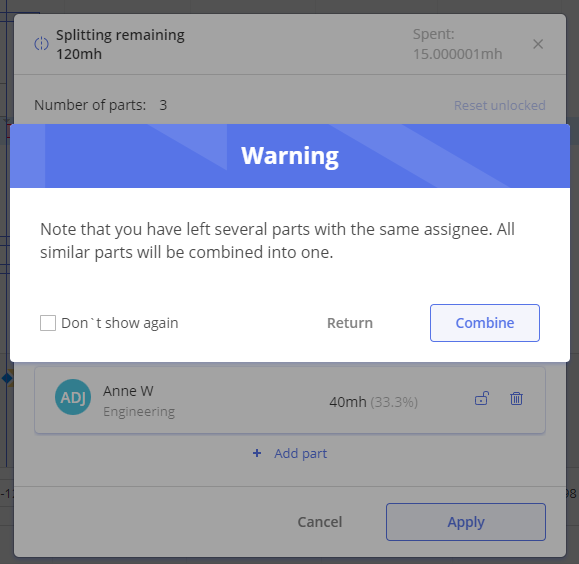
Screen #13c.– Task Card – Task Assignment
The open lock icon means the resource’s involvement in the percentage of time allocated to the task will be reset when this time is changed for other resources. A closed lock, in turn, means that with any change in the task time for a given resource, the percentage of time allocated to the task will remain unchanged.
![]()
Screen #13d.– Task Card – Task Assignment
- To delete one of the units, click the trash can icon next to this resource.
- To add a new unit, click “Add part” at the bottom of list of resources.
Remove Assignee
To remove a resource assigned to the task:
- Open Task Card,
- Hover over the required assignee,
- Click on the “trash” icon in an appeared frame to remove the resource from the Assignments list.
If you have only one assignee in the task, you can’t delete it.
Screen #14a.– Task Card – Task Assignment
If an Assignee has reported any progress, this record can’t be deleted. It will be colored grey and deprived of editing opportunities.
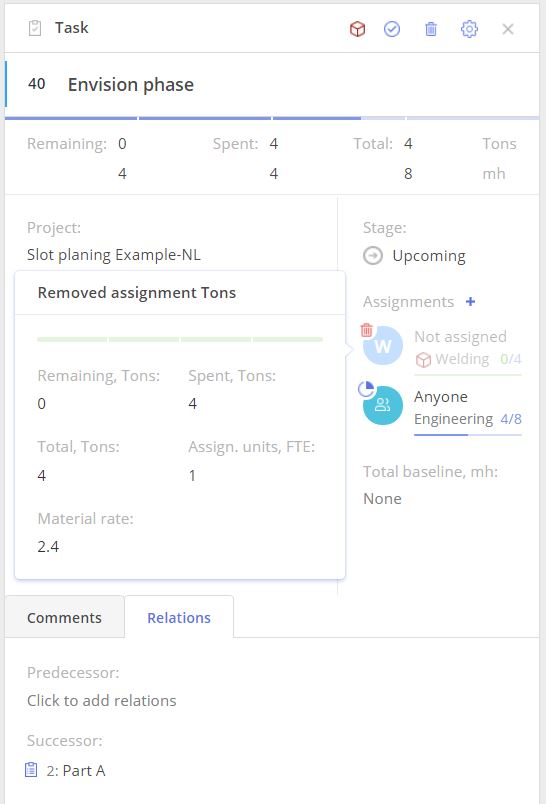
Screen #14b. – Task Card – Task Assignment
Cross-Group Assignment
It may happen that a resource from another group has necessary skills to do a task. At the same time, the task is assigned to a specific group but nobody from that group can take it due to overload or capacity issues. And besides, the task can’t be reassigned to another group.
Epicflow suggests resolving these issues by applying a Cross-Group Assignment feature. It makes it possible to assign a resource from a different group to the task assigned to another group, where none of the resources can complete it.
Let’s say the resource “Admin” has necessary skills to perform the task assigned to the “BE” group. At that, he doesn’t belong to this group, and the resources of the “BE” group can’t do this task due to some capacity and availability issues. In this case, assigning this task to “Admin” with the Cross-Group Assignment is the right decision.
To apply it:
- go to the Task Card,
- click on any Assignment.
In a new frame, you will see a list of available resources with the primary assigned group at the top of the list.
- Select the resource “Admin”. You can see that it is now indicated in the Task Card. However, the executive group is still “BE”.
Note that with such approach the Load created by this task will be evenly distributed among all groups in which the “Admin” resource is allocated and excluded from BE group.
Auto detect assignment’s group
– If NO group is specified but User Resource is assigned to the task, system will take a group with the highest capacity% of the USer Resource but only among those that are connected to the External system.
– In other case group will be inherited from the lower level related summary related to the task that has a group specified.
Please note, that auto-detected group will be shown in Epicflow but it’s not going to be written back to the external system.
Auto depletions for assignments
This functionality is used to plan tasks that are automatically depreciated similar to UCLT tasks. For example, this can be a task for a resource who is hired by a customer on a time basis, or your resource’s relocation to the customer side. To deal with these tasks, automatic hour reporting can be utilized taken into consideration the resource capacity.
To apply this functionality for a separate assignment,
- Open Task Card
- Hover over the required assignee your mouse cursor
- In appeared frame press “Auto depletion” icon
Screen #15 – Task Card – Auto depletions for assignment
How does this functionality work?
It automatically reports one hour per hour during the working day. An exception occurs if you specify a duration within a task.
The calculation of the working day is based on the FTE (Specified working hours) and the end of the working day. By default, the end of the working day is specified as 5 p.m. The start of the day is calculated based on the end of the working day minus FTE. For example: if the FTE is specified as 8 hours and the end time is specified as 5 p.m., the working day will be calculated as 9 a.m to 5 p.m.
Screen #16 – Task Card – Example of auto depletion for assignment
Examples:
- #1 You have a task specified for a total of 8 hours with no duration specified. It will automatically report one hour per hour.
- #2 You have a task specified for a total of 8 hours with a duration specified as 16 hours. It will report 0.5 hours per hour.
Attribute to ignore resource capacity for auto-depletion
Auto-depletion can now be configured to ignore resource capacity for specific tasks.
Previously, auto-depletion hours were reported only when the assigned resource had available capacity. If the resource was fully allocated, auto-depletion was paused.
With this enhancement:
-
Auto-depletion can continue even if the resource has no available capacity.
-
Hours are still reported according to task’s calendar.
-
This behavior applies only to tasks explicitly marked for this purpose.
This is useful for time-based or non-interruptible activities where time must be consumed regardless of capacity planning.
First, make sure that Auto-depletion is enabled for the assignment. Then you can add a specific attribute to a task.
Screen #17 – Task Card – Adding Attribute
-
Comments
Commenting functionality makes it possible to share project-related information directly in Epicflow within the project team.
By having an appropriate set of rights, each user can add, remove, and edit comments. At that, a user can delete or edit only their personal comments.
If you would like to add new line during typing shift-enter combination can be used for that. Pressing enter button will add comment to the task itself.
Users can highlight important comments by clicking on a star icon which appears to the right from the comment upon hovering.
Besides, by hovering over the task, you can select “edit” or “delete” options for the task itself.
Selecting the toggle “Only important ” will hide all unimportant comments.

Screen #18 – Task Card – Comments
The last added comment marked as important will be shown in the “Comments” section of the “Task List” page. If no comments are marked as important, the last added one will be displayed.
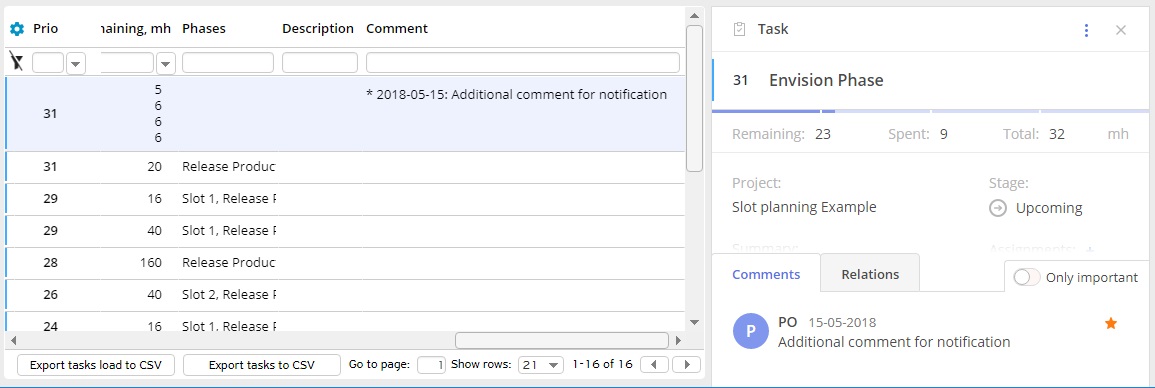
Screen #19 – Task List – Comments
To improve visibility, the entire last comment can now be viewed on the Task List page by hovering over the cell in the Last comment column.
Screen #20 – Task List – Last Comment column
View Configuration
Users can customise a Task Card by selecting the items to be displayed with the help of the “Gear” icon.
Click on the “Default” item to get back to the standard settings whenever it’s required.
Screen #21 – Task Card- Columns Configuration
Navigation
You can open Task Card in several different modules of the system, so to simplify navigation, Epicflow highlights the selected item. Also, you can easily navigate to the item by clicking on the opened Task Card’s header.
Screen #22 – Task Card – Navigation
For faster and more convenient navigation Epicflow includes incorporated hyperlinks into the corresponding section of the Item card at Parent Path level. It provides more flexibility, a specially in combination Sub-items tab.
 Screen #23 – Task Card – Parent Path Navigation
To further streamline navigation, you can now open the Project Card directly from the Task Card by clicking on the Project name.
Screen #24 – Task Card – Project Card Navigation